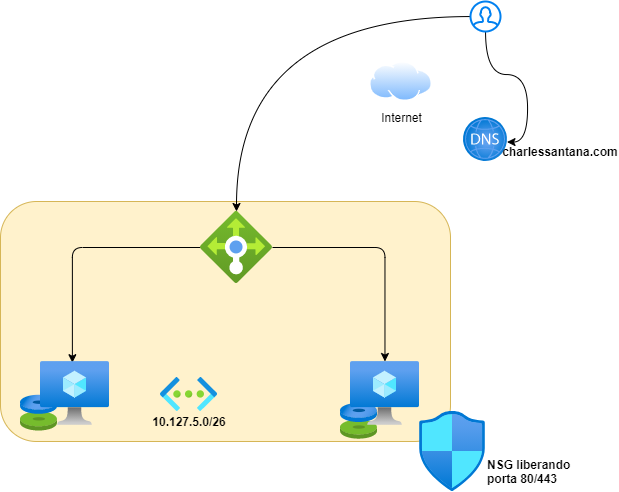
Neste artigo iremos criar Web Site em alta disponibilidade, composto por duas VM Windows Server 2019 com IIS habilitado e um load balance, não iremos abordar aqui segurança como Application Gateway, WAF, API MAN, etc. Este artigo visa somente a criação via scritp de toda a infraestrutura (também não iremos abordar o deploy de qualquer aplicação neste artigo).
#!/bin/bash
##Declarando Variaveis (Obrigatório)
export Subscription_Name=”Santana-Corp”
export RG_Name=”WEBSERVER-PRD-EAST”
export Location=”eastus”
export Object_Name=”WEBSERVER”
##Storage Accout
export Storage=”stgdiag${Object_Name,,}”
export SKU_Storage=”Standard_LRS” ##Exemplo Standard_LRS##
##Grupo de Disponibiliade Availability Set
export Name_AV_SET=”AV-SET”-“${Object_Name}”
##Network Security Group NSG
export NSG_Name=”NSG”-“${Object_Name}”
export Fault_Domain=”3″
export Update_Domain=”20″
export Rule01=”HTTP”
export Rule02=”HTTPS”
##Vnet Existente (Variaveis para utilizar Vnet Existente)
export RG_Vnet=”Resource Group da Vnet existente”
export Subnet_Name=”Subnet da Vnet existente”
export Vnet_Name=”Vnet existente”
##Variaveis de Rede (Obrigatório)
export NIC_Name1=”NIC”-“${Object_Name}”1
export NIC_Name2=”NIC”-“${Object_Name}”2
export Accelerated=”False”
export PublicIP=”PUBLIC-IP”-“${Object_Name}”
export PublicIP_Method=”Static”
export ELB_Name=”ELB”-“${Object_Name}”
export SKU=”Basic”
export Frontend_Name=”FE”-“${Object_Name}”
export BackendPool_Name=”BEP”-“${Object_Name}”
export ProbeName01=”Probe-http”
export ProbeName02=”Probe-https”
export Protocol01=”tcp”
export Port01=”80″
export Port02=”443″
##Variavel para criacao da VM (Obrigatório)
export Image_SO=”Win2019Datacenter”
export VM_Name1=”VM”-“${Object_Name}”1
export VM_Name2=”VM”-“${Object_Name}”2
export User_Name=”azroot”
export PWD=”#!49_WelCome_Az@#”
export Size=”Standard_D2S_v3″
export SKU_STG=”Standard_LRS” ## Disco ##
export DiskName_01=”DISK”-“${Object_Name}”01
export DiskName_02=”DISK”-“${Object_Name}”02
export SizeDisk_01=”256″
export SizeDisk_02=”512″
export Disk_Data01=”DISK-DATA”-“${Object_Name}”1
export Disk_Data02=”DISK-DATA”-“${Object_Name}”2
##Variaveis TAGs (Não Obrigatório)
export Costacenter=”Centro de Custos”
export Value_Costcenter=”111245″
export Environment=”Environment”
export Environment_Value=”Produção”
export Depto=”Departamento”
export Depto_Value=”Recursos Humanos”
###Execução do Script
###Selecionar subscription
az account set –subscription “${Subscription_Name}”
###Criando Resource Group
az group create -n “${RG_Name}” -l “${Location}” –tags “${Costacenter}”=”${Value_Costcenter}” “${Environment}”=”${Environment_Value}” “${Depto}”=”${Depto_Value}”
###Criando Storage Accout
az storage account create -g “${RG_Name}” -n “${Storage}” -l “${Location}” –sku “${SKU_Storage}” –tags “${Costacenter}”=”${Value_Costcenter}” “${Environment}”=”${Environment_Value}” “${Depto}”=”${Depto_Value}”
###Criano IP Publico
az network public-ip create -g “${RG_Name}” -n “${PublicIP}” -l “${Location}” –allocation-method “${PublicIP_Method}” –tags “${Costacenter}”=”${Value_Costcenter}” “${Environment}”=”${Environment_Value}” “${Depto}”=”${Depto_Value}”
###Criando Network Security Group NSG
az network nsg create -g “${RG_Name}” -n “${NSG_Name}” -l “${Location}” –tags “${Costacenter}”=”${Value_Costcenter}” “${Environment}”=”${Environment_Value}” “${Depto}”=”${Depto_Value}”
###Criar regras NSG
az network nsg rule create -g “${RG_Name}” –nsg-name “${NSG_Name}” -n “${Rule01}” –protocol tcp –priority 100 –source-address-prefixes 0.0.0.0/0 –destination-port-range 80 –access allow
az network nsg rule create -g “${RG_Name}” –nsg-name “${NSG_Name}” -n “${Rule02}” –protocol tcp –priority 101 –source-address-prefixes 0.0.0.0/0 –destination-port-range 443 –access allow
###Criar Grupo de Disponibilidade
az vm availability-set create -g “${RG_Name}” -n “${Name_AV_SET}” –platform-fault-domain-count “${Fault_Domain}” –platform-update-domain-count “${Update_Domain}” -l “${Location}” –tags “${Costacenter}”=”${Value_Costcenter}” “${Environment}”=”${Environment_Value}” “${Depto}”=”${Depto_Value}”
###Declarando varivel para utilizar Vnet existente (Obrigatório)
SUBNET_ID001=$(az network vnet subnet show –name “${Subnet_Name}” –vnet-name “${Vnet_Name}” -g “${RG_Vnet}” –query id –output tsv)
SUBNET_ID002=$(az network vnet subnet show –name “${Subnet_Name}” –vnet-name “${Vnet_Name}” -g “${RG_Vnet}” –query id –output tsv)
export IPConfig_Name=”ipconfig1″
###Criando NIC (Interface de rede)
az network nic create –name “${NIC_Name1}” -g “${RG_Name}” –subnet $SUBNET_ID001 –accelerated-networking “${Accelerated}” –network-security-group “${NSG_Name}” –tags “${Costacenter}”=”${Value_Costcenter}” “${Environment}”=”${Environment_Value}” “${Depto}”=”${Depto_Value}”
az network nic create –name “${NIC_Name2}” -g “${RG_Name}” –subnet $SUBNET_ID002 –accelerated-networking “${Accelerated}” –network-security-group “${NSG_Name}” –tags “${Costacenter}”=”${Value_Costcenter}” “${Environment}”=”${Environment_Value}” “${Depto}”=”${Depto_Value}”
###Declaranado Variaveis para Fixar IP
NIC_ID001=$(az network nic show –name “${NIC_Name1}” -g “${RG_Name}” –query id –output tsv)
NIC_ID002=$(az network nic show –name “${NIC_Name2}” -g “${RG_Name}” –query id –output tsv)
###Declarando varivel para utilizar IP Fixo existente (Obrigatório)
IP_ID001=$(az network nic ip-config show -g “${RG_Name}” -n “${IPConfig_Name}” –nic-name “${NIC_Name1}” –query privateIpAddress –output tsv)
IP_ID002=$(az network nic ip-config show -g “${RG_Name}” -n “${IPConfig_Name}” –nic-name “${NIC_Name2}” –query privateIpAddress –output tsv)
###Fixando IP na interface de rede#Fixando IP
az network nic ip-config update -g “${RG_Name}” –nic-name “${NIC_Name1}” -n “${IPConfig_Name}” –private-ip-address $IP_ID001
az network nic ip-config update -g “${RG_Name}” –nic-name “${NIC_Name2}” -n “${IPConfig_Name}” –private-ip-address $IP_ID002
###Criando Virtual Machine Windows Server 2019
az vm create –name “${VM_Name1}” -g “${RG_Name}” -l “${Location}” –availability-set “${Name_AV_SET}” –boot-diagnostics-storage “${Storage}” –os-disk-name “${DiskName_01}” –os-disk-size-gb “${SizeDisk_01}” –image “${Image_SO}” –nics $NIC_ID001 –admin-username “${User_Name}” –admin-password “${PWD}” –size “${Size}” –storage-sku “${SKU_STG}”
az vm create –name “${VM_Name2}” -g “${RG_Name}” -l “${Location}” –availability-set “${Name_AV_SET}” –boot-diagnostics-storage “${Storage}” –os-disk-name “${DiskName_02}” –os-disk-size-gb “${SizeDisk_01}” –image “${Image_SO}” –nics $NIC_ID002 –admin-username “${User_Name}” –admin-password “${PWD}” –size “${Size}” –storage-sku “${SKU_STG}”
###Criando disco de dados
az disk create -g “${RG_Name}” -n “${Disk_Data01}” –size-gb “${SizeDisk_02}”
az disk create -g “${RG_Name}” -n “${Disk_Data02}” –size-gb “${SizeDisk_02}”
###Anexando Disco a VM existente
az vm disk attach -g “${RG_Name}” –vm-name “${VM_Name1}” –name “${Disk_Data01}”
az vm disk attach -g “${RG_Name}” –vm-name “${VM_Name2}” –name “${Disk_Data02}”
###Habilitando IIS Windows Server
az vm extension set –publisher Microsoft.Compute –version 1.8 –name CustomScriptExtension –vm-name “${VM_Name1}” -g “${RG_Name}” –settings ‘{“commandToExecute”:”powershell.exe Install-WindowsFeature -Name Web-Server”}’
az vm extension set –publisher Microsoft.Compute –version 1.8 –name CustomScriptExtension –vm-name “${VM_Name2}” -g “${RG_Name}” –settings ‘{“commandToExecute”:”powershell.exe Install-WindowsFeature -Name Web-Server”}’
###Criando Load Balance
az network lb create -g “${RG_Name}” -n “${ELB_Name}” –sku “${SKU}” –public-ip-address “${PublicIP}” –frontend-ip-name “${Frontend_Name}” –backend-pool-name “${BackendPool_Name}”
###Create health probe on port 80/443
az network lb probe create -g “${RG_Name}” –lb-name “${ELB_Name}” -n “${ProbeName01}” –protocol “${Protocol01}” –port “${Port01}”
az network lb probe create -g “${RG_Name}” –lb-name “${ELB_Name}” -n “${ProbeName02}” –protocol “${Protocol01}” –port “${Port02}”
###Create load balancer rule for port 80/443
az network lb rule create -g “${RG_Name}” –lb-name “${ELB_Name}” -n “${Rule01}” –protocol “${Protocol01}” –frontend-port “${Port01}” –backend-port “${Port01}” –frontend-ip-name “${Frontend_Name}” –backend-pool-name “${BackendPool_Name}” –probe-name “${ProbeName01}”
az network lb rule create -g “${RG_Name}” –lb-name “${ELB_Name}” -n “${Rule02}” –protocol “${Protocol01}” –frontend-port “${Port02}” –backend-port “${Port02}” –frontend-ip-name “${Frontend_Name}” –backend-pool-name “${BackendPool_Name}” –probe-name “${ProbeName02}”
###Adicionando Inteface REDE ao pool de backend Load Balance
az network nic ip-config address-pool add -g “${RG_Name}” –nic-name “${NIC_Name1}” -n “${IPConfig_Name}” –lb-name “${ELB_Name}” –address-pool “${BackendPool_Name}”
az network nic ip-config address-pool add -g “${RG_Name}” –nic-name “${NIC_Name2}” -n “${IPConfig_Name}” –lb-name “${ELB_Name}” –address-pool “${BackendPool_Name}”
