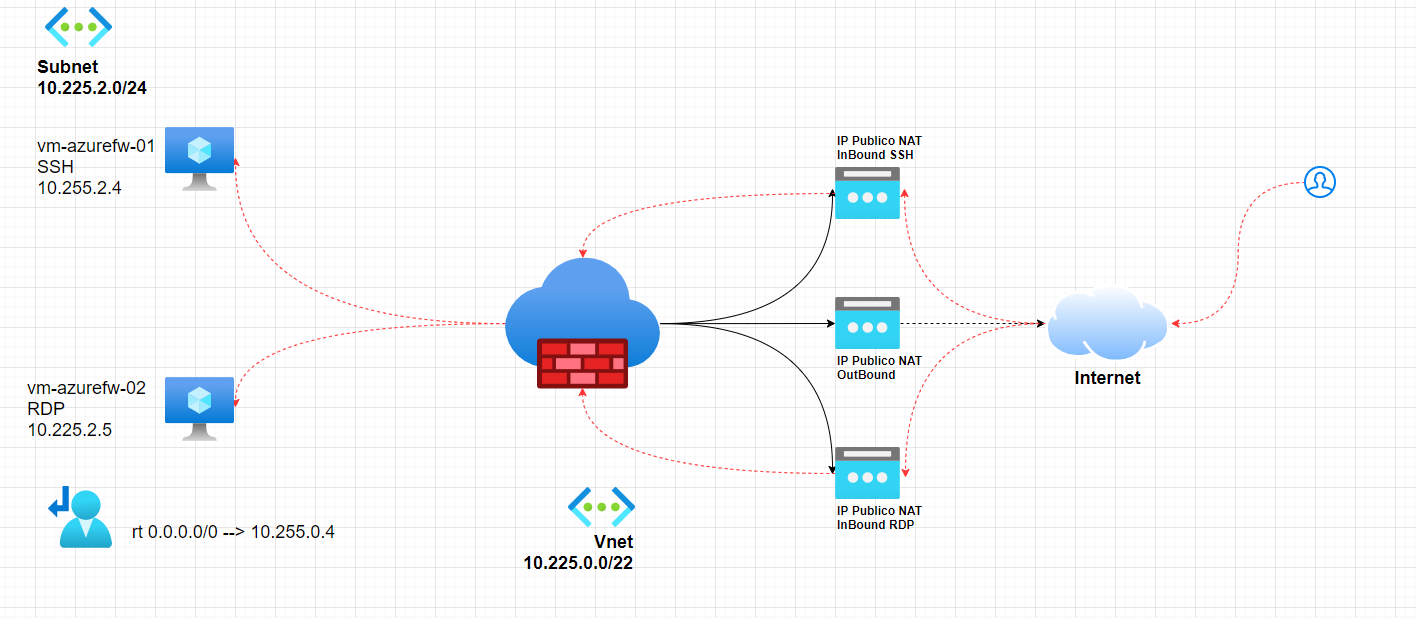
Olá, neste post iremos fazer o deploy do Azure Firewall em uma infraestrutura de Firewal EDGE (como ja feito com Palo Alto e Fortigate) Nesta topologia teremos Azure Firewall como borda de toda rede Azure (neste exemplo)
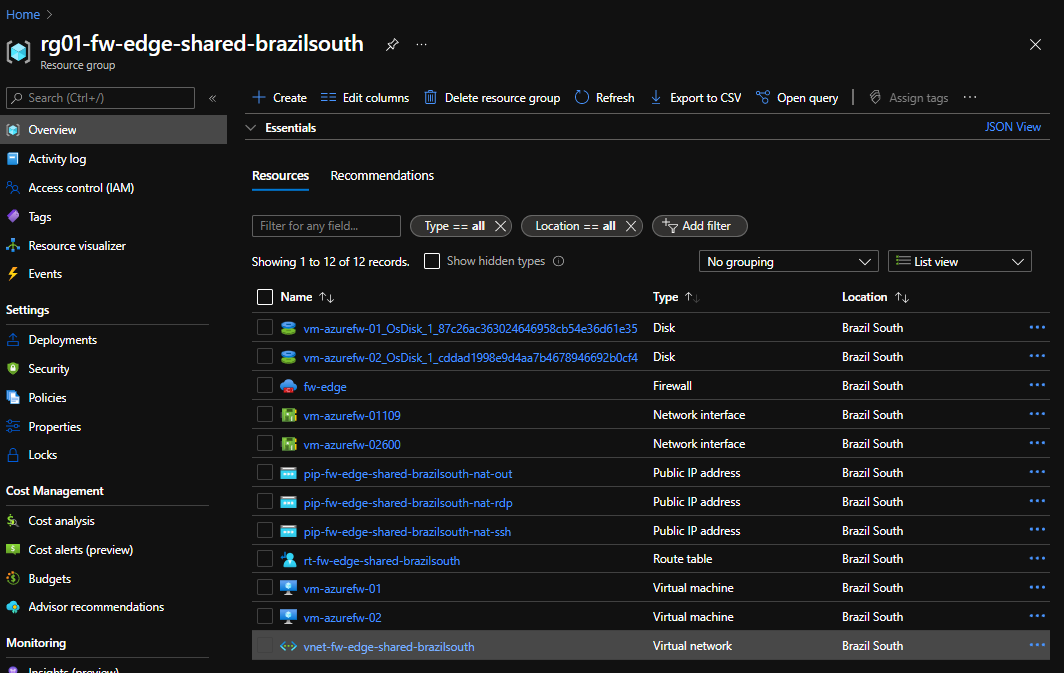
Vamos aos objetos criados
Objeto
Name
Descrição
Resource Group
rg01-fw-edge-shared-brazilsouth
RG
Azure Firewall
fw-edge
Standard
Public IP
pip-fw-edge-shared-brazilsouth-nat-out
xxx.xxx.xxx.xxx
Public IP
pip-fw-edge-shared-brazilsouth-nat-rdp
xxx.xxx.xxx.xxx
Public IP
pip-fw-edge-shared-brazilsouth-nat-ssh
xxx.xxx.xxx.xxx
Route Table
rt-fw-edge-shared-brazilsouth
Route Table
Virtual Network
vnet-fw-edge-shared-brazilsouth
10.225.0.0/22
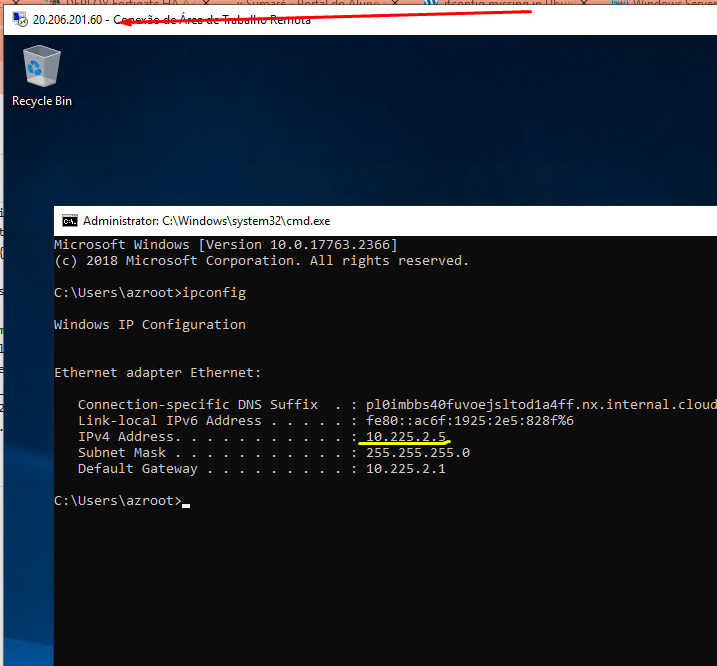
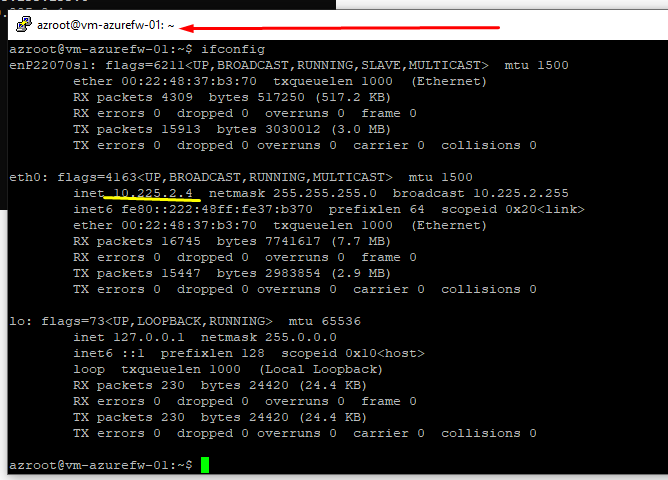
*Não criamos aqui as VMs (Windows/Linux), mas elas estão na SubNet AzureFirewallSubnet-Trust Nossas Subnets
Neste post vou demonstrar a utilização do recurso Azure “Zone DNS Private”. Ele pode ser utilizando para substituir uma VM que seria utilizada como DNS.
Vamos a nossa topologia:
Neste cenário teremos os seguintes objetos:
3x Virtuais Networks 1x Zona DNS Privada
Vamos a nosso script
#!/bin/bash

##Declarando variaveis
export Subscription_Name="XXXXXXXXXXX" ##Insira aqui sua subscription Azure
export RG_Name01="rg"
export RG_Name02="lab"
export RG_Name03="private"
export RG_Name04="dns"
export Location="brazilsouth"
export Environment="shared"
export RG_Name_FULL="${RG_Name01}"-"${RG_Name02}"-"${RG_Name03}"-"${RG_Name04}"-"${Environment}"-"${Location}"

##Variaveis de Objetos
export Zone_01="glbx.corp"
export LinkName01="link"
export LinkName02="zone-dns-private"
export LinkName_FULL="${Vnet_Name_FULL}"

###Declarando Variaveis Tags
export Description="Departamento"
export Value_Description="Redes/Telecom/Segurança/Infraestrutura"
export Cost_Center="Centro de Custo"
export Cost_Center_Value="Redes/Telecom/Segurança/Infraestrutura"
export Support_Description_Description="E-mail Suporte"
export Support_Description_Value="[email protected]"

###Declarando Variaveis de Rede (Vnet1)
export Vnet_Name01="vnet1"
export Vnet_Name_FULL1="${Vnet_Name01}"-"${RG_Name02}"-"${RG_Name03}"-"${RG_Name04}"-"${Environment}"-"${Location}"
export CIDR1="10.128.10.0/24"
export SubName1_01="snet"-"${RG_Name02}"-"${RG_Name03}"-"${RG_Name04}"-"${Environment}"-"${Location}"1
export SubName1_02="snet"-"${RG_Name02}"-"${RG_Name03}"-"${RG_Name04}"-"${Environment}"-"${Location}"2
export SubName1_03="snet"-"${RG_Name02}"-"${RG_Name03}"-"${RG_Name04}"-"${Environment}"-"${Location}"3
export SubName1_04="snet"-"${RG_Name02}"-"${RG_Name03}"-"${RG_Name04}"-"${Environment}"-"${Location}"4
export prefix1_01="10.128.10.0/26"
export prefix1_02="10.128.10.64/26"
export prefix1_03="10.128.10.128/26"
export prefix1_04="10.128.10.192/26"

###Declarando Variaveis de Rede (Vnet2)
export Vnet_Name02="vnet2"
export Vnet_Name_FULL2="${Vnet_Name02}"-"${RG_Name02}"-"${RG_Name03}"-"${RG_Name04}"-"${Environment}"-"${Location}"
export CIDR2="10.128.20.0/24"
export SubName2_01="snet"-"${RG_Name02}"-"${RG_Name03}"-"${RG_Name04}"-"${Environment}"-"${Location}"1
export SubName2_02="snet"-"${RG_Name02}"-"${RG_Name03}"-"${RG_Name04}"-"${Environment}"-"${Location}"2
export SubName2_03="snet"-"${RG_Name02}"-"${RG_Name03}"-"${RG_Name04}"-"${Environment}"-"${Location}"3
export SubName2_04="snet"-"${RG_Name02}"-"${RG_Name03}"-"${RG_Name04}"-"${Environment}"-"${Location}"4
export prefix2_01="10.128.20.0/26"
export prefix2_02="10.128.20.64/26"
export prefix2_03="10.128.20.128/26"
export prefix2_04="10.128.20.192/26"

###Declarando Variaveis de Rede (Vnet3)
export Vnet_Name03="vnet3"
export Vnet_Name_FULL3="${Vnet_Name03}"-"${RG_Name02}"-"${RG_Name03}"-"${RG_Name04}"-"${Environment}"-"${Location}"
export CIDR3="10.128.30.0/24"
export SubName3_01="snet"-"${RG_Name02}"-"${RG_Name03}"-"${RG_Name04}"-"${Environment}"-"${Location}"1
export SubName3_02="snet"-"${RG_Name02}"-"${RG_Name03}"-"${RG_Name04}"-"${Environment}"-"${Location}"2
export SubName3_03="snet"-"${RG_Name02}"-"${RG_Name03}"-"${RG_Name04}"-"${Environment}"-"${Location}"3
export SubName3_04="snet"-"${RG_Name02}"-"${RG_Name03}"-"${RG_Name04}"-"${Environment}"-"${Location}"4
export prefix3_01="10.128.30.0/26"
export prefix3_02="10.128.30.64/26"
export prefix3_03="10.128.30.128/26"
export prefix3_04="10.128.30.192/26"

###Variaveis de Peering
export Peering_01="peering"
export Peering_02="vnet"
export Peering_Name="${Peering_01}"-"${Peering_02}"

###Selecionar subscription
az account set --subscription "${Subscription_Name}"

##Criando RG
az group create -l "${Location}" -n "${RG_Name_FULL}" --tags "${Description}"="${Value_Description}" "${Cost_Center}"="${Cost_Center_Value}" "${Support_Description_Description}"="${Support_Description_Value}"

####Criando Virtual Network (Vnet)
az network vnet create -g "${RG_Name_FULL}" -n "${Vnet_Name_FULL1}" --address-prefix "${CIDR1}" -l "${Location}" --tags "${Description}"="${Value_Description}" "${Cost_Center}"="${Cost_Center_Value}" "${Support_Description_Description}"="${Support_Description_Value}"
az network vnet create -g "${RG_Name_FULL}" -n "${Vnet_Name_FULL2}" --address-prefix "${CIDR2}" -l "${Location}" --tags "${Description}"="${Value_Description}" "${Cost_Center}"="${Cost_Center_Value}" "${Support_Description_Description}"="${Support_Description_Value}"
az network vnet create -g "${RG_Name_FULL}" -n "${Vnet_Name_FULL3}" --address-prefix "${CIDR3}" -l "${Location}" --tags "${Description}"="${Value_Description}" "${Cost_Center}"="${Cost_Center_Value}" "${Support_Description_Description}"="${Support_Description_Value}"

####Criando Subnet
az network vnet subnet create -g "${RG_Name_FULL}" --vnet-name "${Vnet_Name_FULL1}" -n "${SubName1_01}" --address-prefixes "${prefix1_01}"
az network vnet subnet create -g "${RG_Name_FULL}" --vnet-name "${Vnet_Name_FULL1}" -n "${SubName1_02}" --address-prefixes "${prefix1_02}"
az network vnet subnet create -g "${RG_Name_FULL}" --vnet-name "${Vnet_Name_FULL1}" -n "${SubName1_03}" --address-prefixes "${prefix1_03}"
az network vnet subnet create -g "${RG_Name_FULL}" --vnet-name "${Vnet_Name_FULL1}" -n "${SubName1_04}" --address-prefixes "${prefix1_04}"
az network vnet subnet create -g "${RG_Name_FULL}" --vnet-name "${Vnet_Name_FULL2}" -n "${SubName2_01}" --address-prefixes "${prefix2_01}"
az network vnet subnet create -g "${RG_Name_FULL}" --vnet-name "${Vnet_Name_FULL2}" -n "${SubName2_02}" --address-prefixes "${prefix2_02}"
az network vnet subnet create -g "${RG_Name_FULL}" --vnet-name "${Vnet_Name_FULL2}" -n "${SubName2_03}" --address-prefixes "${prefix2_03}"
az network vnet subnet create -g "${RG_Name_FULL}" --vnet-name "${Vnet_Name_FULL2}" -n "${SubName2_04}" --address-prefixes "${prefix2_04}"
az network vnet subnet create -g "${RG_Name_FULL}" --vnet-name "${Vnet_Name_FULL3}" -n "${SubName3_01}" --address-prefixes "${prefix3_01}"
az network vnet subnet create -g "${RG_Name_FULL}" --vnet-name "${Vnet_Name_FULL3}" -n "${SubName3_02}" --address-prefixes "${prefix3_02}"
az network vnet subnet create -g "${RG_Name_FULL}" --vnet-name "${Vnet_Name_FULL3}" -n "${SubName3_03}" --address-prefixes "${prefix3_03}"
az network vnet subnet create -g "${RG_Name_FULL}" --vnet-name "${Vnet_Name_FULL3}" -n "${SubName3_04}" --address-prefixes "${prefix3_04}"

#Criando Peering entre as Vnets

##Peering entre vnet1 e vnet2
az network vnet peering create -g "${RG_Name_FULL}" -n "${Peering_Name}"-"${Vnet_Name_FULL2}" --vnet-name "${Vnet_Name_FULL1}" --remote-vnet "${Vnet_Name_FULL2}" --allow-vnet-access --allow-forwarded-traffic --allow-gateway-transit --allow-vnet-access
az network vnet peering create -g "${RG_Name_FULL}" -n "${Peering_Name}"-"${Vnet_Name_FULL1}" --vnet-name "${Vnet_Name_FULL2}" --remote-vnet "${Vnet_Name_FULL1}" --allow-vnet-access --allow-forwarded-traffic --allow-gateway-transit --allow-vnet-access

##Peering entre vnet1 e vnet3
az network vnet peering create -g "${RG_Name_FULL}" -n "${Peering_Name}"-"${Vnet_Name_FULL3}" --vnet-name "${Vnet_Name_FULL1}" --remote-vnet "${Vnet_Name_FULL3}" --allow-vnet-access --allow-forwarded-traffic --allow-gateway-transit --allow-vnet-access
az network vnet peering create -g "${RG_Name_FULL}" -n "${Peering_Name}"-"${Vnet_Name_FULL1}" --vnet-name "${Vnet_Name_FULL3}" --remote-vnet "${Vnet_Name_FULL1}" --allow-vnet-access --allow-forwarded-traffic --allow-gateway-transit --allow-vnet-access

##Peering entre vnet2 e vnet3
az network vnet peering create -g "${RG_Name_FULL}" -n "${Peering_Name}"-"${Vnet_Name_FULL3}" --vnet-name "${Vnet_Name_FULL3}" --remote-vnet "${Vnet_Name_FULL2}" --allow-vnet-access --allow-forwarded-traffic --allow-gateway-transit --allow-vnet-access
az network vnet peering create -g "${RG_Name_FULL}" -n "${Peering_Name}"-"${Vnet_Name_FULL2}" --vnet-name "${Vnet_Name_FULL2}" --remote-vnet "${Vnet_Name_FULL3}" --allow-vnet-access --allow-forwarded-traffic --allow-gateway-transit --allow-vnet-access

###Criando Zone DNS Privada
az network private-dns zone create -g "${RG_Name_FULL}" -n "${Zone_01}" --tags "${Description}"="${Value_Description}" "${Cost_Center}"="${Cost_Center_Value}" "${Support_Description_Description}"="${Support_Description_Value}"

###criando entradas "." apontando para nossos ADs (Active Directory)
az network private-dns record-set a add-record -g "${RG_Name_FULL}" -z "${Zone_01}" -n "@" -a 10.128.10.4
az network private-dns record-set a add-record -g "${RG_Name_FULL}" -z "${Zone_01}" -n "@" -a 10.128.20.4
az network private-dns record-set a add-record -g "${RG_Name_FULL}" -z "${Zone_01}" -n "@" -a 10.128.30.4
az network private-dns record-set a add-record -g "${RG_Name_FULL}" -z "${Zone_01}" -n "VMAD01" -a 10.128.10.4
az network private-dns record-set a add-record -g "${RG_Name_FULL}" -z "${Zone_01}" -n "VMAD02" -a 10.128.20.4
az network private-dns record-set a add-record -g "${RG_Name_FULL}" -z "${Zone_01}" -n "VMAD03" -a 10.128.30.4

###Variavels para pegar ID da Vnet para vincular com Zone Private DNS Azure
SUBNET_ID001=$(az network vnet show -n "${Vnet_Name_FULL1}" -g "${RG_Name_FULL}" --query id --output tsv)
SUBNET_ID002=$(az network vnet show -n "${Vnet_Name_FULL2}" -g "${RG_Name_FULL}" --query id --output tsv)
SUBNET_ID003=$(az network vnet show -n "${Vnet_Name_FULL3}" -g "${RG_Name_FULL}" --query id --output tsv)

###Criando link de zona dns privada com vnet
az network private-dns link vnet create -g "${RG_Name_FULL}" -n "${LinkName_FULL}"-"${Vnet_Name_FULL1}" -z "${Zone_01}" -v $SUBNET_ID001 -e False
az network private-dns link vnet create -g "${RG_Name_FULL}" -n "${LinkName_FULL}"-"${Vnet_Name_FULL2}" -z "${Zone_01}" -v $SUBNET_ID002 -e False
az network private-dns link vnet create -g "${RG_Name_FULL}" -n "${LinkName_FULL}"-"${Vnet_Name_FULL3}" -z "${Zone_01}" -v $SUBNET_ID003 -e False

###Criando entradas em zona dns privada
az network private-dns record-set a add-record -g "${RG_Name_FULL}" -z "${Zone_01}" -n "intranet" -a 10.128.10.10
az network private-dns record-set a add-record -g "${RG_Name_FULL}" -z "${Zone_01}" -n "site6" -a 10.128.20.10
az network private-dns record-set a add-record -g "${RG_Name_FULL}" -z "${Zone_01}" -n "portalrh" -a 10.128.30.10
Vamos a expliação
Zona de DNS Privada
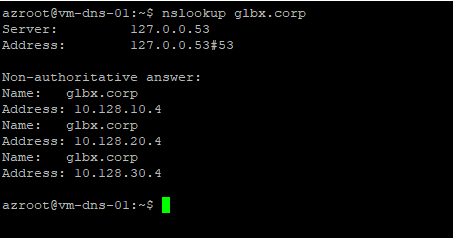
Neste objeto nos teremos a seguinte zona privada “glbx.corp” nosso fqdn do nosso dominio
Teremos “Peering” entre as “Vnet” (Não utilizei um firewall para ficar mais facil a explicação), o peering server para as vnets se falarem (desta forma, teram que fazer a segurança vai NSG).
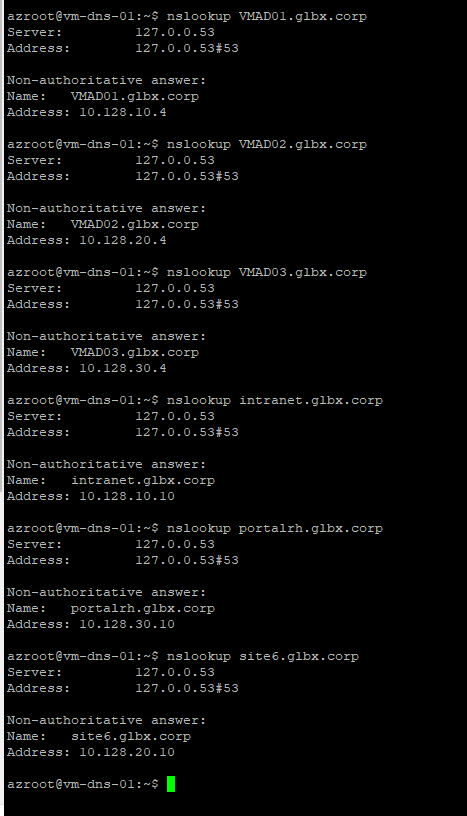
Em cada Vnet temos algumas Virtuais Machines (não esta no desenho) VMAD01 10.128.10.4 VMAD02 10.128.20.4 VMAD03 10.128.30.4 VMINTRANET 10.128.10.10 VMRH01 10.128.20.10 VMSITE6 10.128.30.10
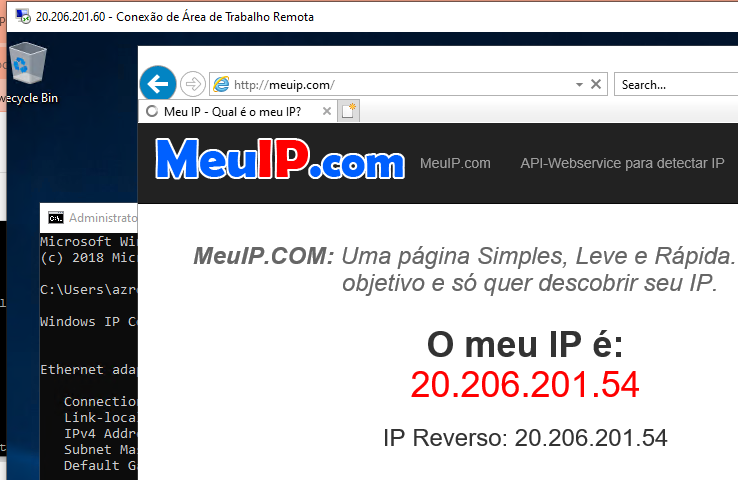
Pronto, com nosso ambiente criada nossas VMs/Endpoint conseguem resolver nomes utilizando o DNS do Azure com nossa Zona de DNS Privada, veja como ficou:
Veja que resolve nosso dominio para os servidores certos
Veja que resolve as entradas criadas
***Para que na sua infraestrutura funcione a utlização de “Azure DNS Private” você não pode esquecer de criar os Links da Zona Privada com sua Vnet.
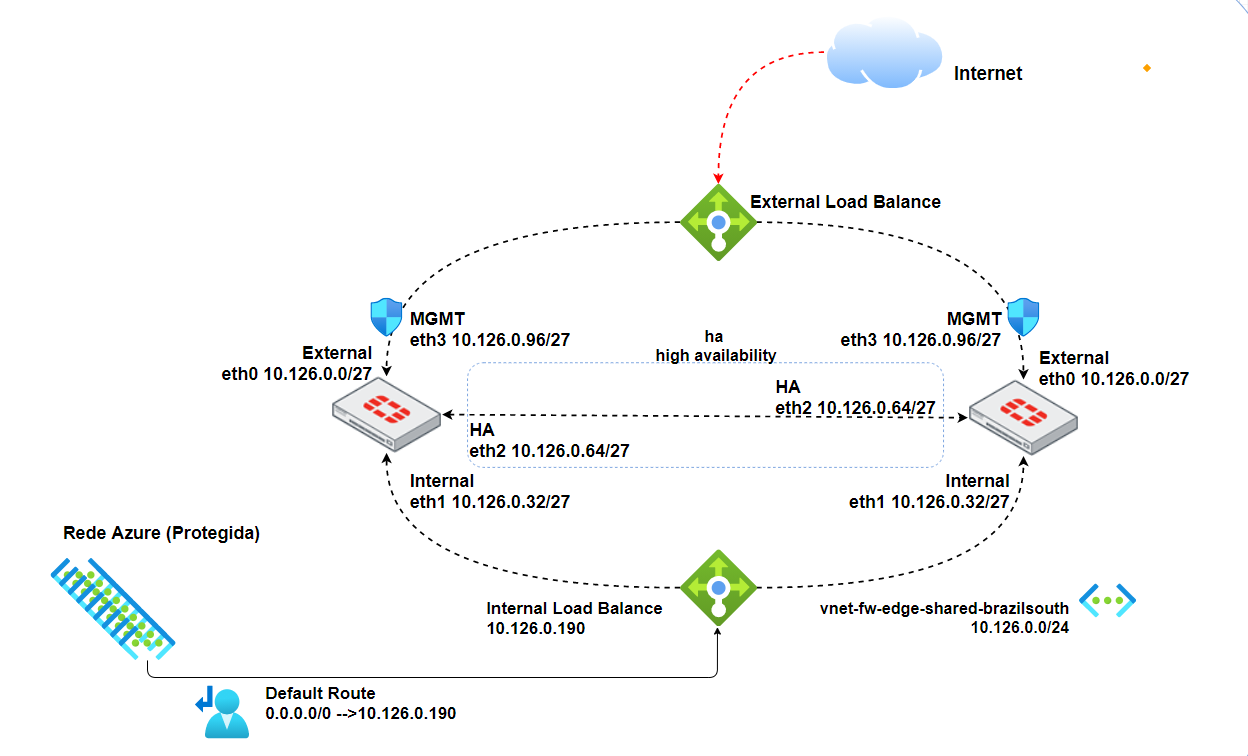
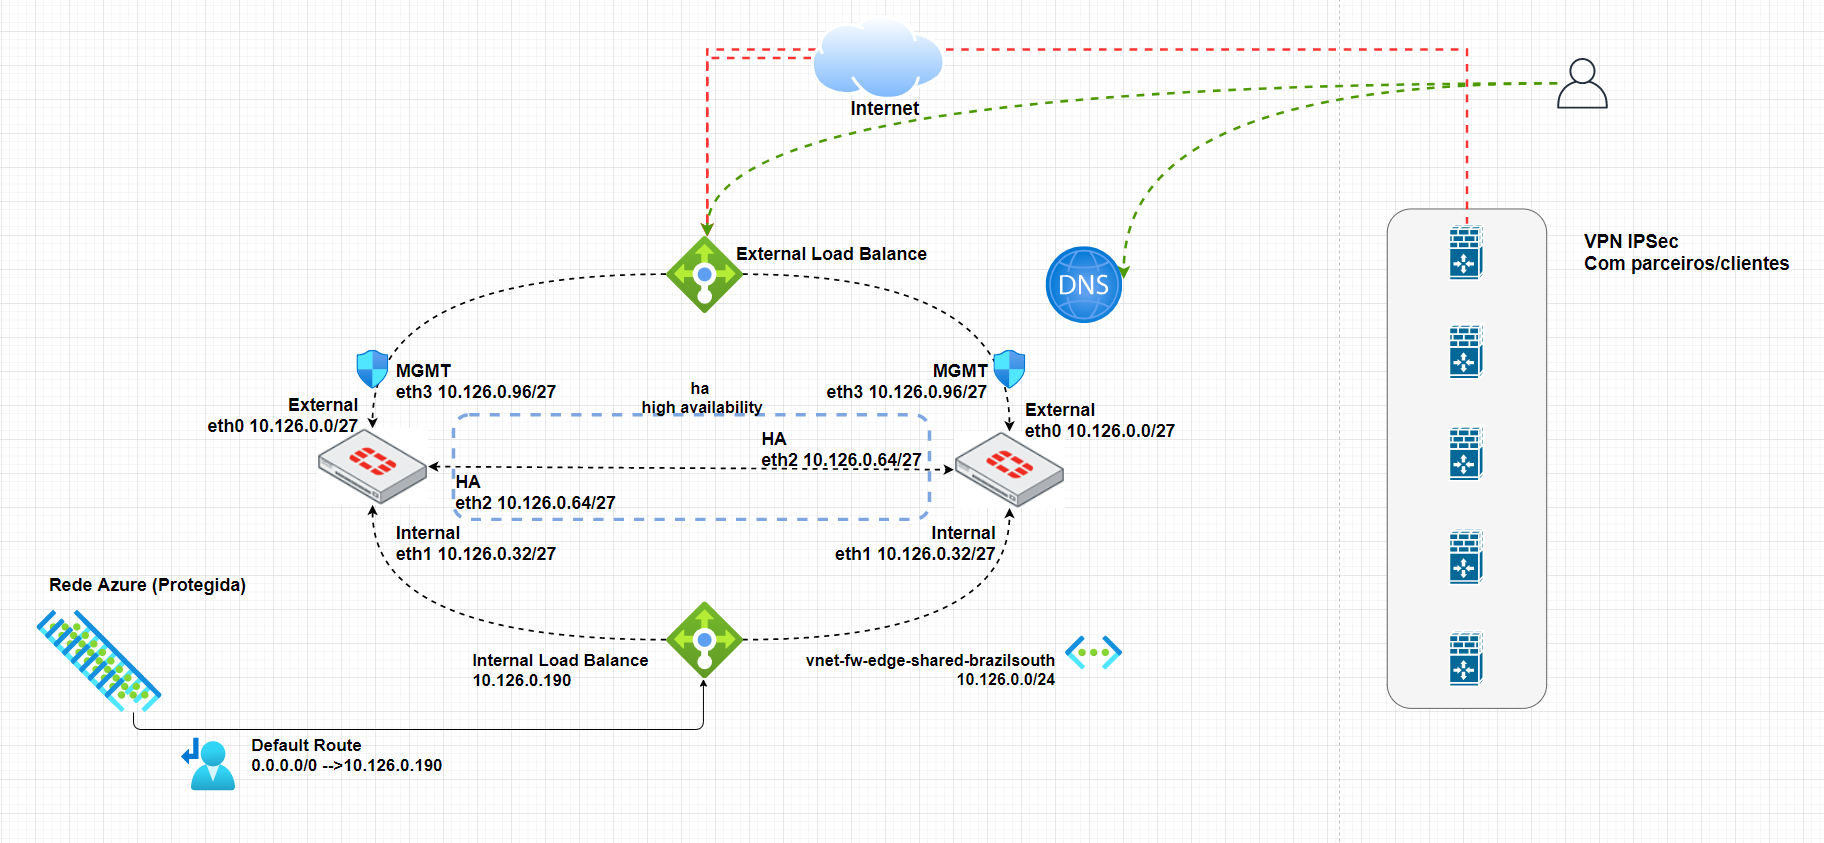
Neste post iremos fazer o deploy de Fortigate (Version 7) em HA (Active/Passive) “Load Balance (ELB/ILB)”, utilizando um template modificado fornecido pela prória fortigate (adequado as preferencias para este artigo de exemplo). Nesta topologia/arquitetura de rede colocamos o Fortigate EDGE para ser a rota default de todas as nossas vnets que estão no azure, com isso toda entrada ou saida de dados passa obrigatóriamente pelo Fortigate EDGE, essa arquitetura não esta certa nem errada, tudo vai depender do compliance de cada empresa, time de segurança, time de rede e claro do orçamento de cada um. Lembra muito o artigo que escrevi sobre Palo Alto
No final vou deixar os arquivos para download e algumas explicações sobre os arquivos .json
1x “nsg-fwedge-shared-brazilsouth-mgmt” com as seguintes regras
Allow-MGMT-HTTPS/SSH Source: XXX.XXX.XXX.XXX/XX (IP ou IPs de origem que podem se conectar na interface MGMT) Destination: 10.126.0.96/24 (Rede de gerencia MGMT)
Temos 3 IPs Publicos
pip-fwedge-mgmt-a (Management Fortigate A) pip-fwedge-mgmt-b (Management Fortigate B) pip-lb-external-fwedge-01 (IP Publico External Load Balance)
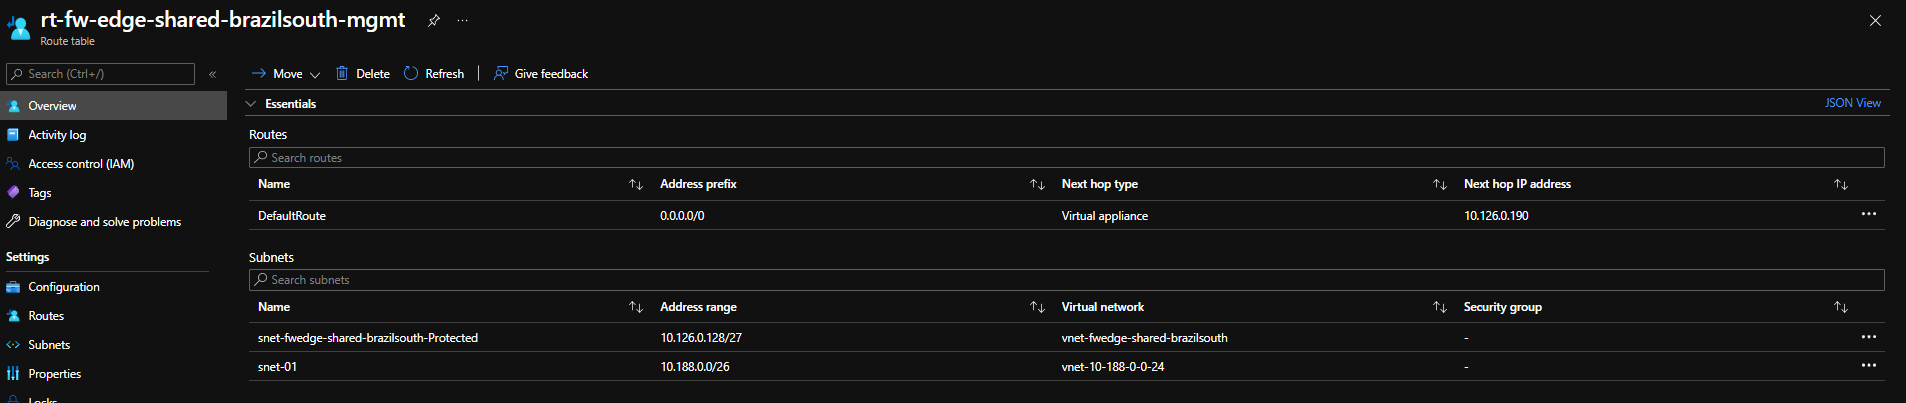
Temos um arquivo de Route Table “rt-fw-edge-shared-brazilsouth”, nele temos as seguintes rotas:
Name
CIDR
Next Hop type
Next Hop IP address
DefaultRoute
0.0.0.0/0
VirtualAppliance
10.126.0.190
Agora vamos ao nosso script
#!/bin/bash
##Declarando variaveis

##Declarando Variaveis (Obrigatório)
export Subscription_Name="XXXXXXXXXXXXXXXXXXXXXXXXXXXXXXXX" ##inserir sua Subscription Azure
export RG_Name02="rg-fw-edge-shared-brazilsouth"
export Location_Region="brazilsouth"

###Script
###Selecionar subscription
az account set --subscription "${Subscription_Name}"

##Criando RG
az group create -n "${RG_Name02}" -l "${Location_Region}"

##Deploy Fortigate Template
az deployment group create -g "${RG_Name02}" --template-file template.json --parameters @parametersFile.json

##Desligando VMs
az vm stop -g "${RG_Name02}" -n "fwedge01"
az vm stop -g "${RG_Name02}" -n "fwedge02"

##Deallocate
az vm deallocate -g "${RG_Name02}" -n "fwedge01"
az vm deallocate -g "${RG_Name02}" -n "fwedge02"

###Criando Storage Accout (Para boot diag)
az storage account create -g "${RG_Name02}" -n "stgdiagfwedgefgt01" -l "${Location_Region}" --sku "Standard_LRS"

##Criando Snet Internal Load Balance (Subnet para load balance interno)
az network vnet subnet create -g "${RG_Name02}" --vnet-name "vnet-fwedge-shared-brazilsouth" -n "snet-fwedge-shared-brazilsouth-LoadBalance" --address-prefixes "10.126.0.160/27"

##alterando IP Internal Load Balance
az network lb frontend-ip update -g "${RG_Name02}" --lb-name "ilb-fwedge-01" -n "frontend-fwedge-internal-01" --vnet-name "vnet-fwedge-shared-brazilsouth" --subnet "snet-fwedge-shared-brazilsouth-LoadBalance" --private-ip-address "10.126.0.190"

###Habilitando Boot dioag VM01/02
az vm boot-diagnostics enable -n "fwedge01" -g "${RG_Name02}" --storage "stgdiagfwedgefgt01"
az vm boot-diagnostics enable -n "fwedge02" -g "${RG_Name02}" --storage "stgdiagfwedgefgt01"

##Fixando IP eht0 (VM01/02)
az network nic ip-config update -g "${RG_Name02}" --nic-name "int-fwedge01-eth0" -n "ipconfig1" --private-ip-address "10.126.0.5"
az network nic ip-config update -g "${RG_Name02}" --nic-name "int-fwedge02-eth0" -n "ipconfig1" --private-ip-address "10.126.0.6"

###Fixando IP eth1 (VM01/02)
az network nic ip-config update -g "${RG_Name02}" --nic-name "int-fwedge01-eth1" -n "ipconfig1" --private-ip-address "10.126.0.37"
az network nic ip-config update -g "${RG_Name02}" --nic-name "int-fwedge02-eth1" -n "ipconfig1" --private-ip-address "10.126.0.38"

###Fixando IP eth2 (VM01/02)
az network nic ip-config update -g "${RG_Name02}" --nic-name "int-fwedge01-eth2" -n "ipconfig1" --private-ip-address "10.126.0.69"
az network nic ip-config update -g "${RG_Name02}" --nic-name "int-fwedge02-eth2" -n "ipconfig1" --private-ip-address "10.126.0.70"

###Fixando IP eth3 (VM01/02)
az network nic ip-config update -g "${RG_Name02}" --nic-name "int-fwedge01-eth3" -n "ipconfig1" --private-ip-address "10.126.0.101"
az network nic ip-config update -g "${RG_Name02}" --nic-name "int-fwedge02-eth3" -n "ipconfig1" --private-ip-address "10.126.0.102"

###Anexando NSG MGMT a snet mgmt
az network vnet subnet update -g "${RG_Name02}" -n "snet-fwedge-shared-brazilsouth-Management" --vnet-name "vnet-fwedge-shared-brazilsouth" --network-security-group "nsg-fwedge-shared-brazilsouth-mgmt"

###Deletando regras existentes (criadas pelo templete, pode-se alterar diretamente no template tb)
az network nsg rule delete -g "${RG_Name02}" --nsg-name "nsg-fwedge-shared-brazilsouth-mgmt" -n "AllowAllInbound"
az network nsg rule delete -g "${RG_Name02}" --nsg-name "nsg-fwedge-shared-brazilsouth-mgmt" -n "AllowAllOutbound"

##Criando regras NSG MGMT HTTPS
az network nsg rule create -g "${RG_Name02}" --nsg-name "nsg-fwedge-shared-brazilsouth-mgmt" -n "Allow-MGMT-HTTPS" --priority "100" \
--source-address-prefixes "179.215.182.42/32" --source-port-ranges "*" \
--destination-address-prefixes "10.126.0.96/27" --destination-port-ranges "443" --access "Allow" \
--protocol "TCP" --description "Acesso liberado a snet management"

##Alterando regras NSG MGMT SSH
az network nsg rule create -g "${RG_Name02}" --nsg-name "nsg-fwedge-shared-brazilsouth-mgmt" -n "Allow-MGMT-SSH" --priority "101" \
--source-address-prefixes "179.215.182.42/32" --source-port-ranges "*" \
--destination-address-prefixes "10.126.0.96/27" --destination-port-ranges "22" --access "Allow" \
--protocol "TCP" --description "Acesso liberado a snet management"

###Anexando Subnet Internal a Route Table
az network vnet subnet update -g "${RG_Name02}" -n "snet-fwedge-shared-brazilsouth-Internal" --vnet-name "vnet-fwedge-shared-brazilsouth" --route-table "rt-fw-edge-shared-brazilsouth-internal"

###Inciando as VM01/02
az vm start -g "${RG_Name02}" -n "fwedge01"
az vm start -g "${RG_Name02}" -n "fwedge02"
Agora tudo pronto, vamos acessar nosso FGT, iremos acesso pelo IP Publico “pip-fwedge-mgmt-a”
Entre com usuário e senha que contas no template
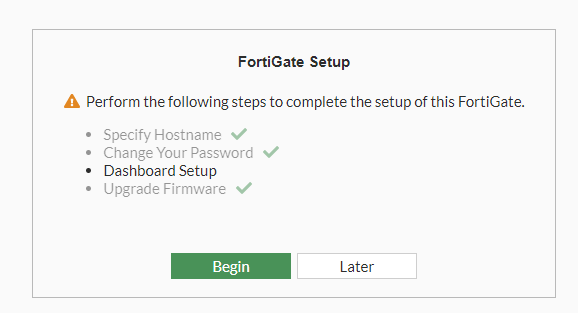
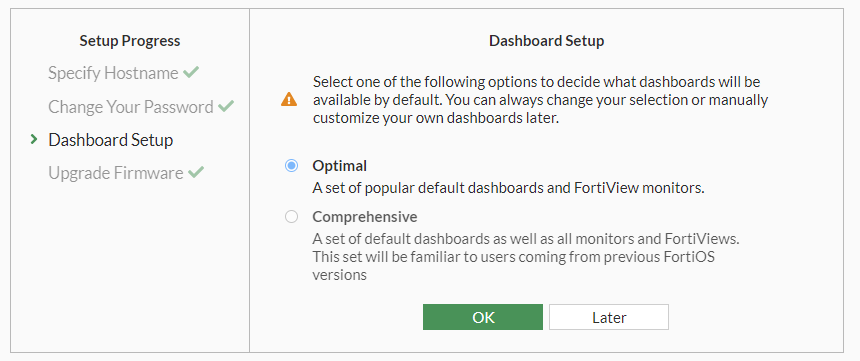
Vamos as configurações iniciais
Clique em “Begin”Clique em “ok”Clique e “ok”
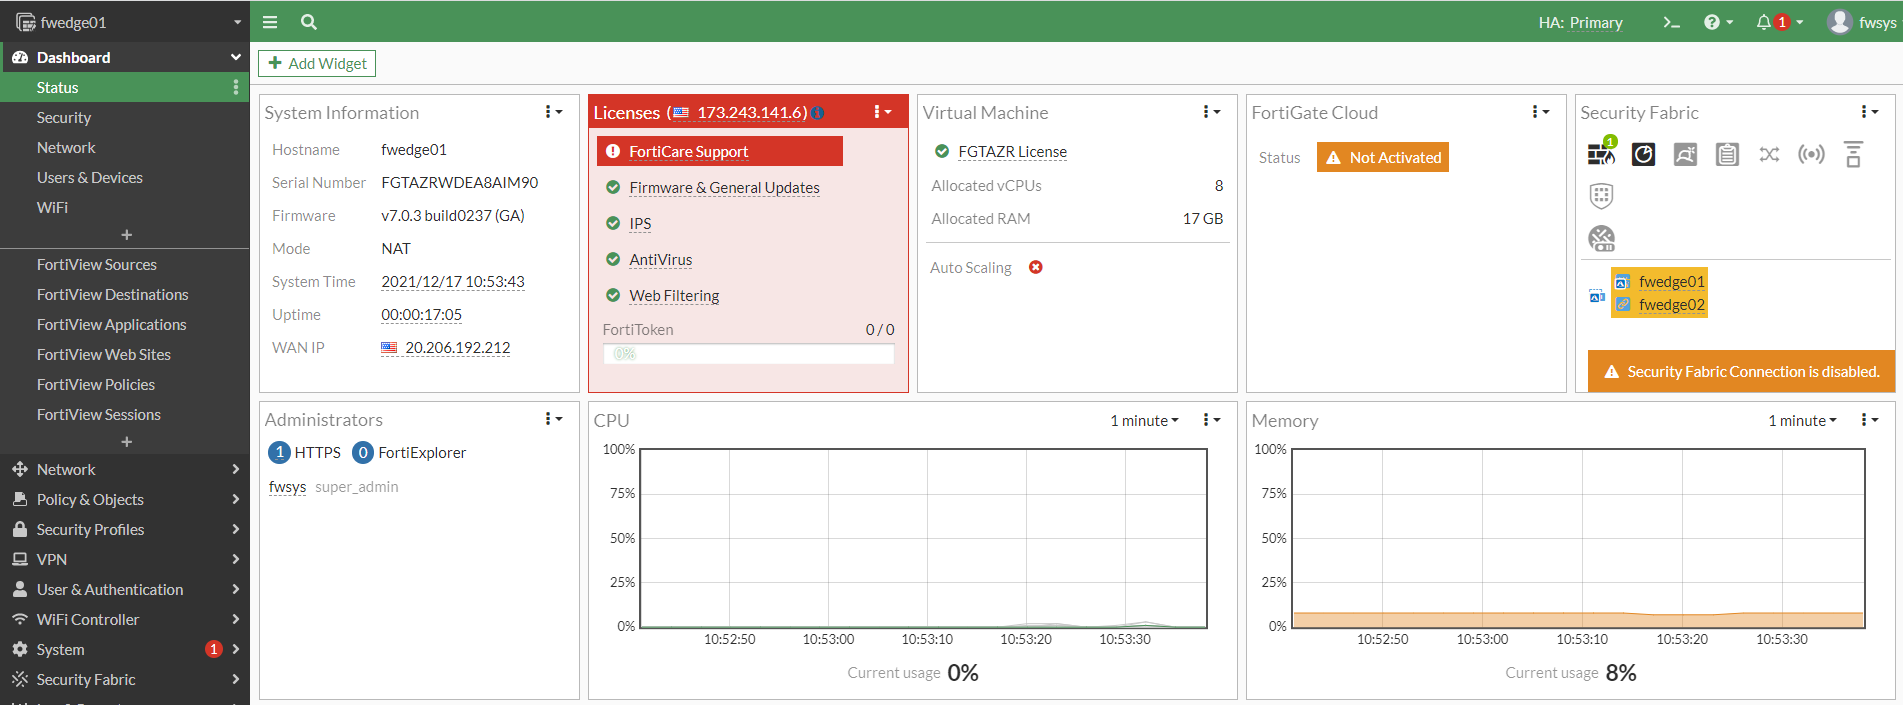
Temos nosso Dashbord inicial
Vamos verificar nosso HA Sync
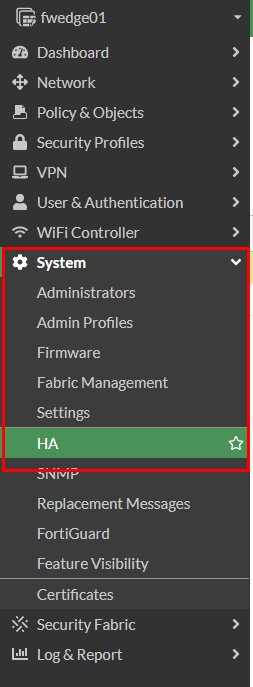
Vamos em System / HA
Tudo certo
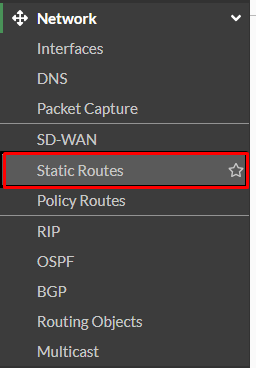
Vamos agora em “Network” “Static Routes”
Por padrão teremos essas rotas (Isso pode ser editado/alterado no template)
Vamos fazer algumas modificações e deixar desta forma
Basicamente, iremos remover a rota “168.63.129.16/32” “10.126.0.1” “port1”
Ficará desta forma
Toda e qualquer nova rede que for criar e for feito peering com a rede do Firewall-EDGE 10.126.0.0/24 teremos que criar a “Static Route”
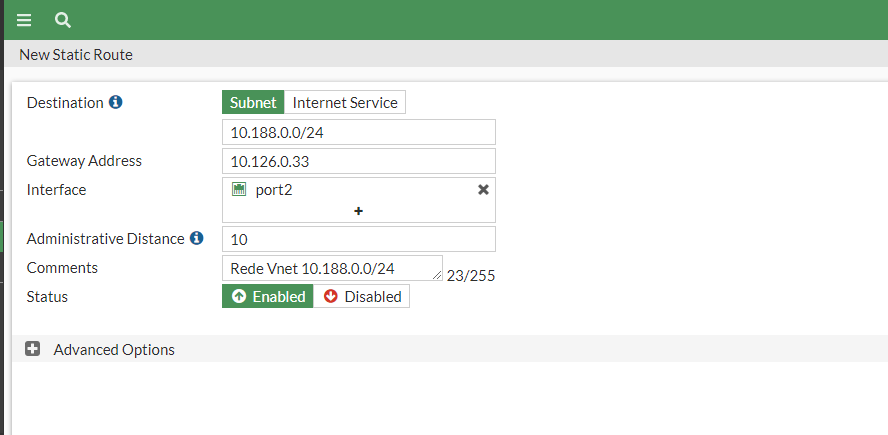
Vamos a um exemplo, em nosso ambiente azure temos a Vnet “10.188.0.0/24”, iremos fazer um peering com ela e add route static no FGT.
Sempre usaremos a port2, pois ela é nossa “LAN-Trust”, o gw 10.126.0.33 é o gw do azure (já expliquei em outros posts como funciona a rede no azure, que ele guarda para si os 3 primeiros IP de cada subnet) Agora nossa Static Route ficará desta forma
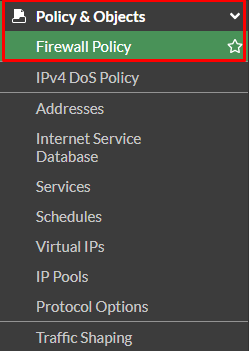
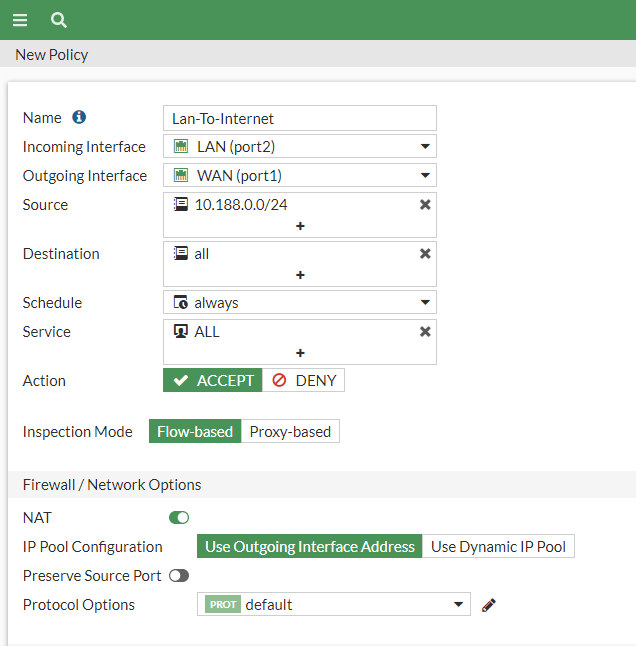
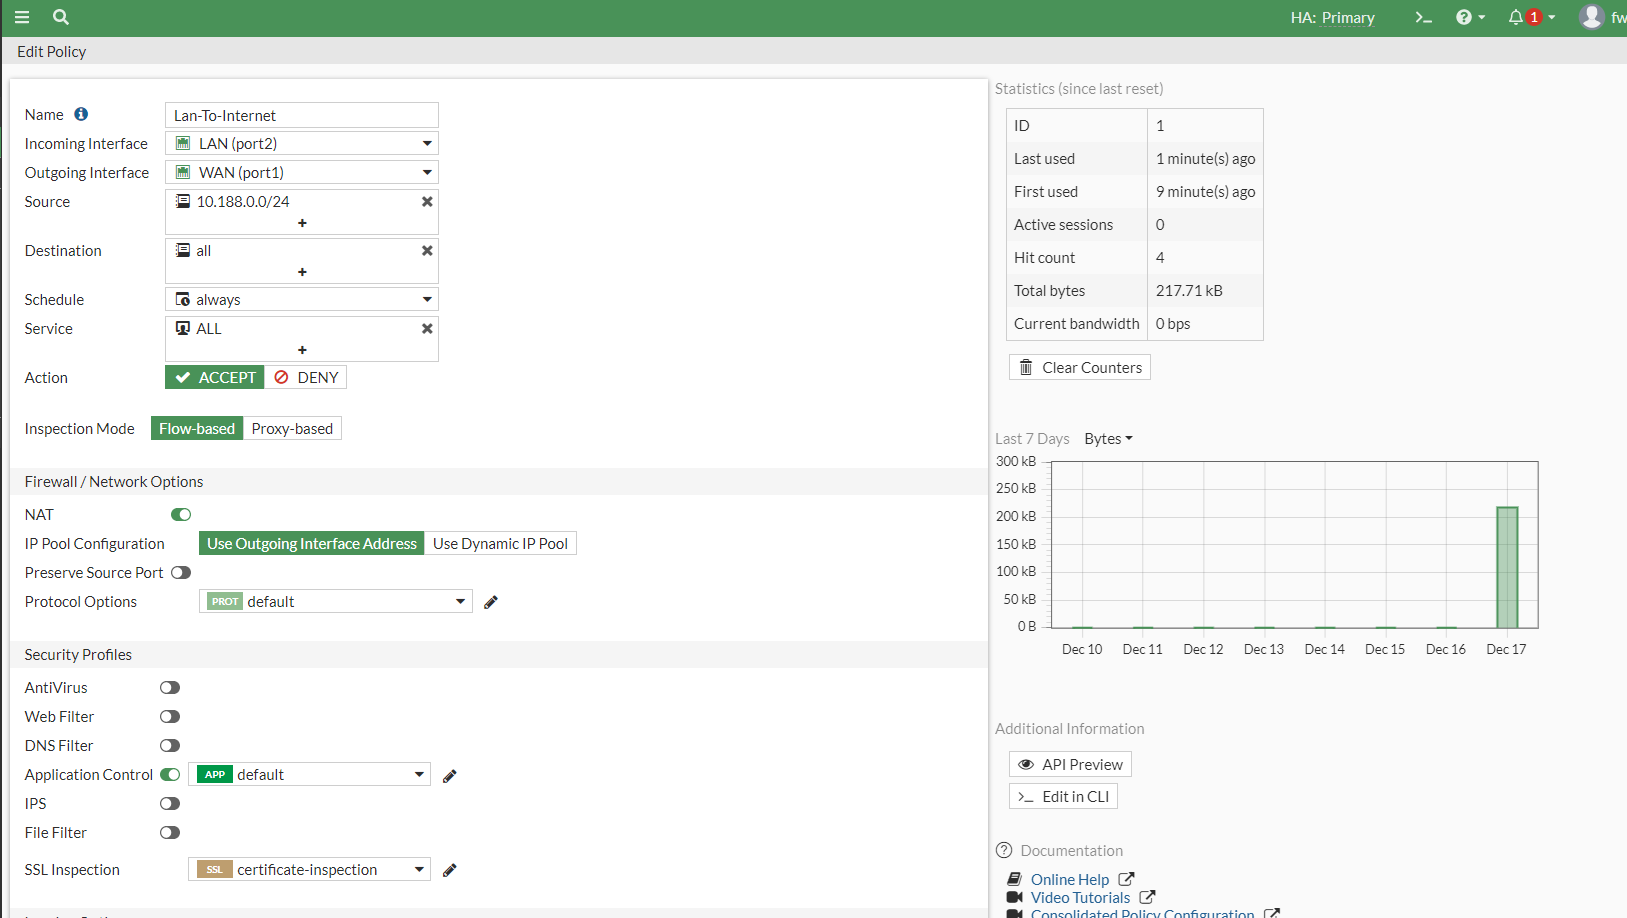
Vamos agora criar um regra de acesso a internet “Policy & Objects” “Firewall Policy”
Create New
Clique em “ok”
Agora nos temos uma regra que vem da nossa interface “LAN-Trust” para a nossa interface “WAN-UnTrust”
Agora vamos add essa vnet/subnet ao nosso Route Table
Assim ficou nosso arquivo
**(Esta vnet tem que possui peering com nossa rede do firewall edge)
Vamos ao teste
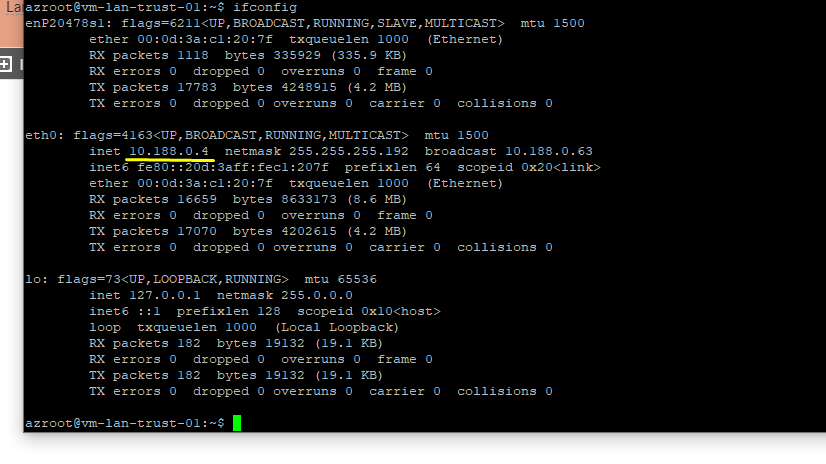
Criamos a seguinte vm “vm-lan-trust-01” subnet 10.188.0.0/26 IP: 10.188.0.4
Estamos dentro da nossa VM Trust
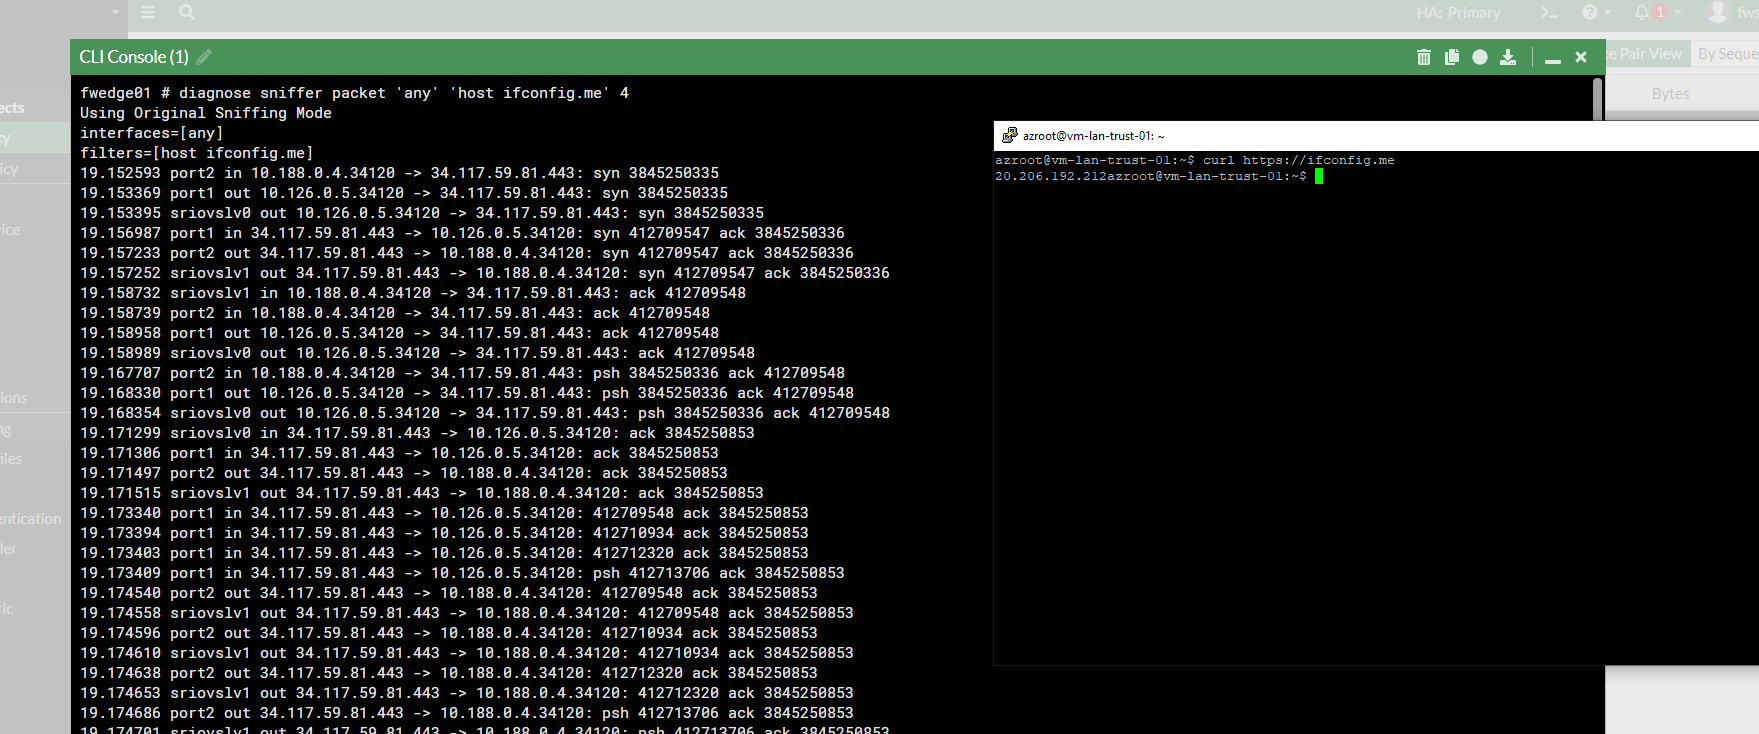
vamos fazer um teste de curl para http//ifconfig.me e monitor em nosso firewall
Como podem ver em nossa VM Trust, trouxe o IP da interface WAN-UnTrust e todo trafego passou pelo nossa firewall
Agora um outro cenário, temos parceiros/clientes que precisam acessar nossas aplicações ou um ambiente de “Transfer” (Connect Direct IBM, SFTP, FTPS, SMB) para isso acontecer de forma segura podemos estabelecer Tuneis IPSec com nossas Parceiros/Clientes e desta forma liberar o acesso de forma segura. Outra cenario seria a publicação de uma aplicação interna e expo-la para internet, temos varias possibilidade de forma segura em nossa ambiente.
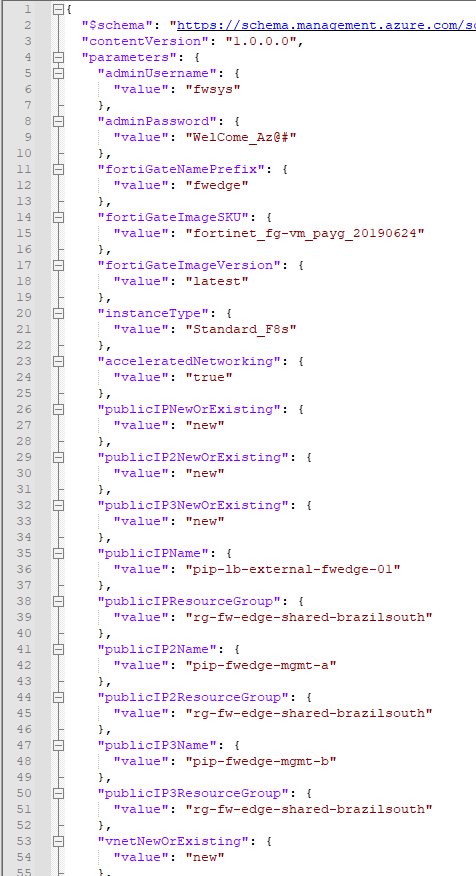
Agora algumas explicações referente aos .json
Linha 5/6: usuário de acesso ao firewall Linha 8/9: senha Linha 12: prefixo do firewall Linha 15: versão do licenciamento, neste exemplo seria PayAsGo (Pague pelo uso, se vc possui BYOL, altere para o valor que consta no template) Linha 18: ultima versão do firmware Linha 21: Size VM Linha 36: nome do IP Publico do External LB Linha 39: RG Linha 42: IP Publico MGMT FGT A Linha 45: RG Linha 48: IP Publico MGMT FGT B Linha 51: RG
Continuando
Linha 57: nome da vnet (o proprio template cria a vnet) Linha 60: RG Linha 63: CIDR da Vnet Linha 66: Nome da Vnet External Linha 69: CIDR da Subnet External
As outras são auto explicativas
***Nunca esquecer de add Static Route em nosso firewall, sempre add as subnet no arquivo Route Table, sempre fazer peering para novas Vnets.
Neste post iremos fazer o deploy de Palo Alto (Version 9) em HA “session synchronization”, utilizando um template modificado (adequado as minhas preferencias para este artigo de exemplo). Nesta topologia/arquitetura de rede colocamos o Palo Alto para ser a rota default de todas as nossas vnets que estão no azure (neste exemplo somente “Trust”, mas nada impede de colocar varias redes com “Peering”) com isso toda entrada ou saida de dados passa obrigatóriamente pelo Palo Alto, essa arquitetura não esta certa nem errada, ai vai do compliance de cada empresa, time de segurança, time de rede e claro do orçamento de cada um. Mas isso não siginifica que penso como ambiente OnPremises somente, que não penso em nuvem, isso é somente uma arquitetura/topologia que muitas empresas que estão em Cloud (Azure,AWS,GCP) utilizam.
Agora vamos colocar a mão na massa.
Nos teremos os seguintes componentes:
2x VMs (PAN OS) Standard D3 v2 – Availability zone 1 8x Interfaces de rede (4 para cada VM) denomindas eth0/1/2/3, eth0=interface management, eth1=interface UnTrust, eth2= Interface Trust e eth3=interface HA 1x Vnet com CIDR 10.110.0.0/22 (aqui vai da sua rede e crescimento previsto) 1x Network Security Group (anexado a snet mgmt) 2x IPs Publicos (uma para cada VM anexado a eth1 para gerencia), este depende do seu acesso a rede. 3x IPs Publicos, 1 para NAT OUTBOUND, 1 para NAT INBOUND AppGW e 1 para NAT INBOUND JUMP 2x Discos HDD (um para cada VM)
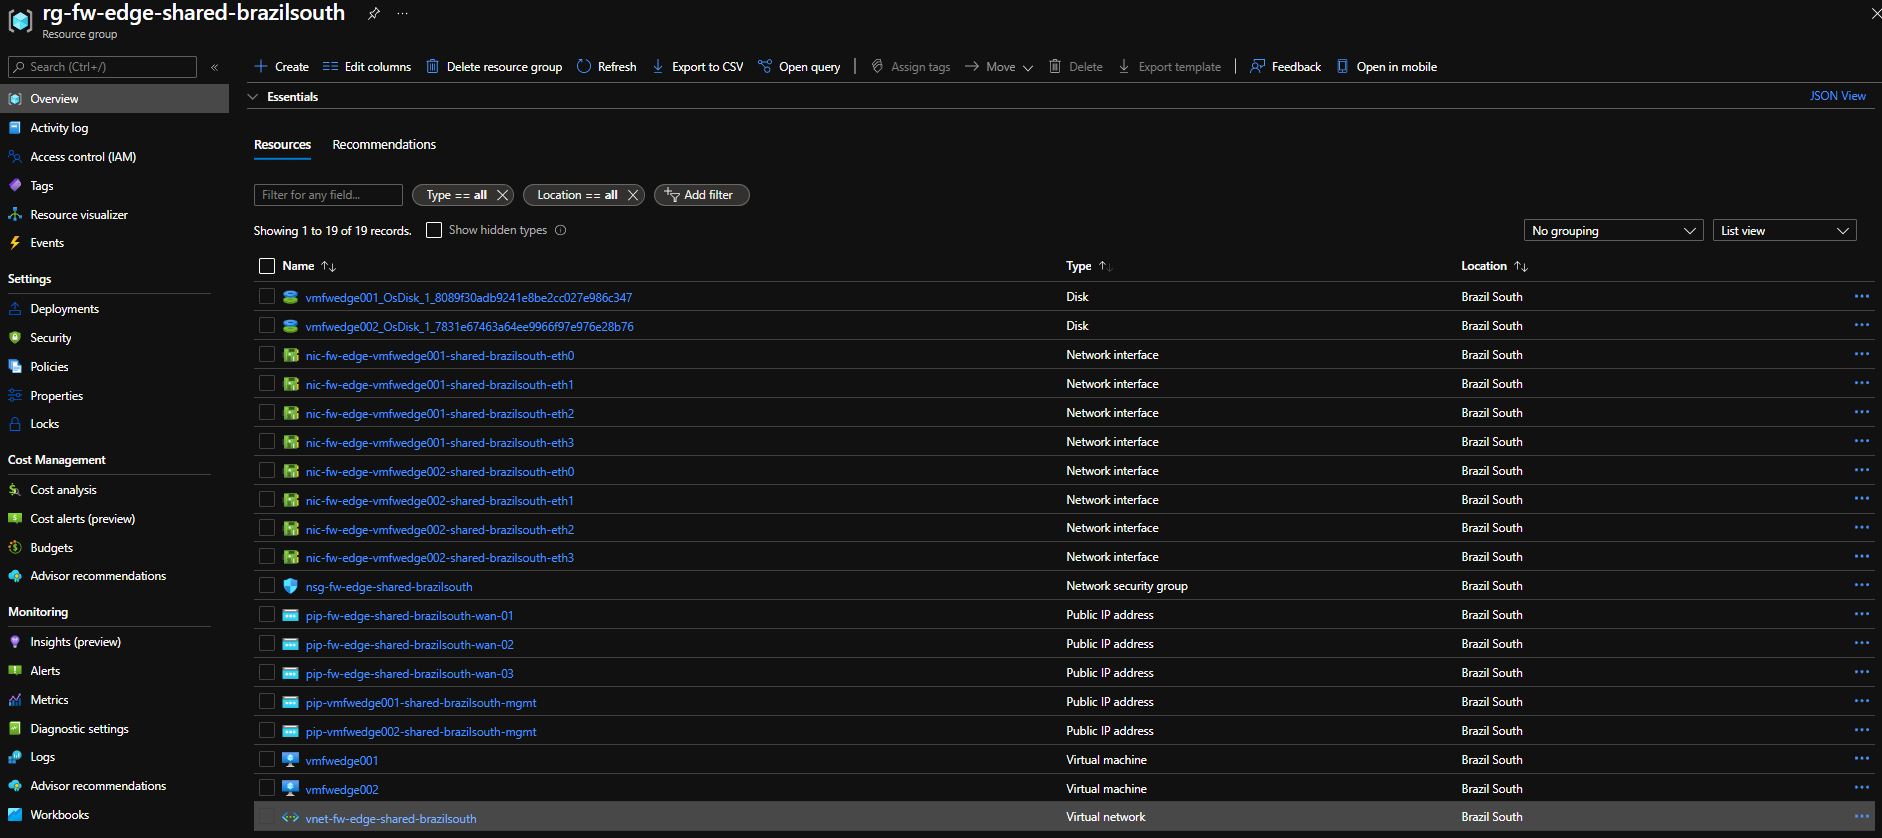
Vamos as nomenclaturas, utilizei a recomendada pela MS Azure link vmfwedge01 vmfwedge02 pip-vmfwedge001-shared-brazilsouth-mgmt pip-vmfwedge002-shared-brazilsouth-mgmt pip-fw-edge-shared-brazilsouth-wan-01 pip-fw-edge-shared-brazilsouth-wan-02 pip-fw-edge-shared-brazilsouth-wan-03 nsg-fw-edge-shared-brazilsouth nic-fw-edge-vmfwedge001-shared-brazilsouth-eth0 nic-fw-edge-vmfwedge001-shared-brazilsouth-eth1 nic-fw-edge-vmfwedge001-shared-brazilsouth-eth2 nic-fw-edge-vmfwedge001-shared-brazilsouth-eth3 nic-fw-edge-vmfwedge002-shared-brazilsouth-eth0 nic-fw-edge-vmfwedge002-shared-brazilsouth-eth1 nic-fw-edge-vmfwedge002-shared-brazilsouth-eth2 nic-fw-edge-vmfwedge002-shared-brazilsouth-eth3 vmfwedge001_OsDisk_1_xxxxx vmfwedge002_OsDisk_1_xxxxx vnet-fw-edge-shared-brazilsouth
Aqui os links para baixar os templates utlizados neste artigo
No arquivo acima teremos uma template.json e dois parameters.jons
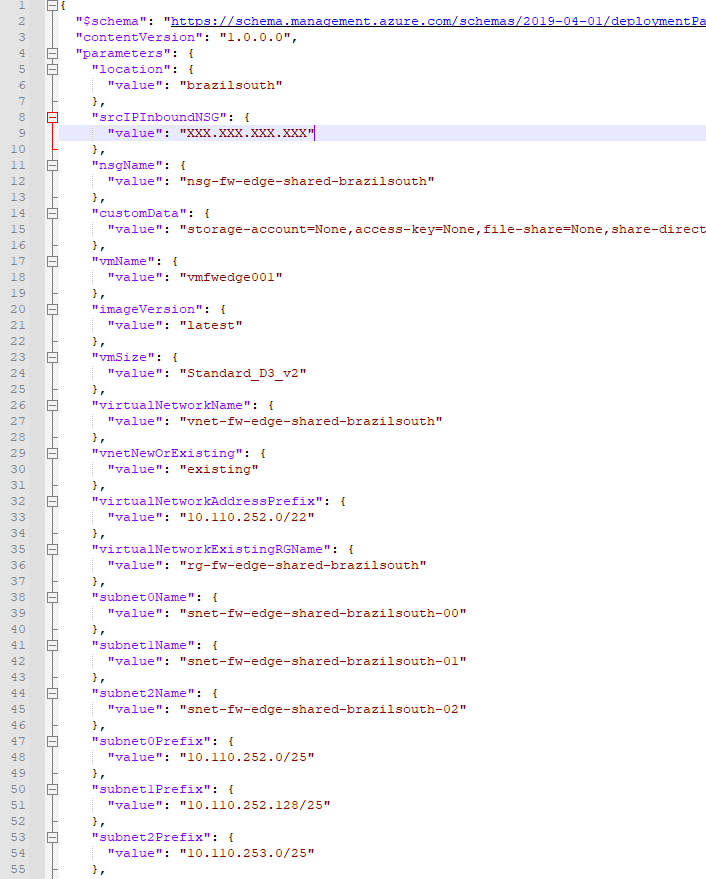
No arquivo “parametersFile.json” nos temos todas as referencias para criação da VM, Vnet, RG, etc…. vamos a uma preve explicação sobre o template
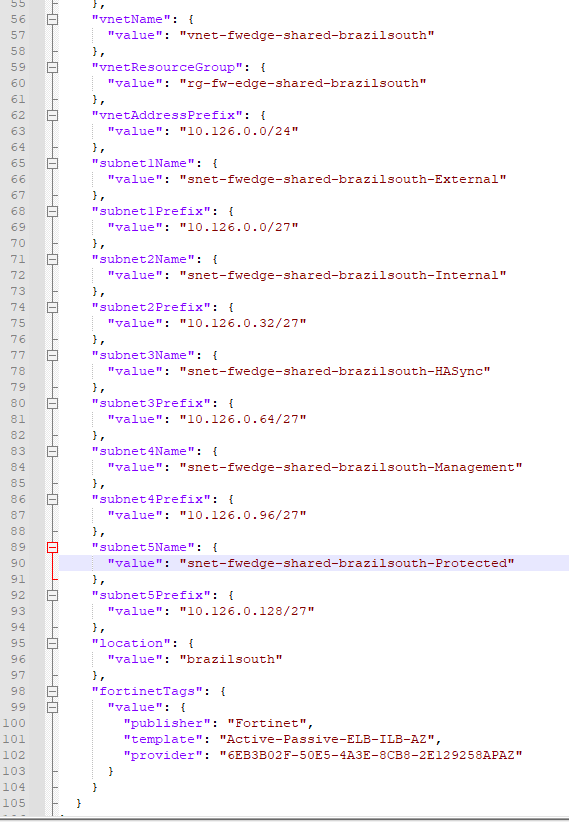
Linha 9: IP para liberação de acesso a snet de mgmt (para liberar somente seu bloco coloque neste formato XXX.XXX.XXX.XXX/XX), para liberar tudo colocar 0.0.0.0/0, mas cuidado, isso libera acesso total a interface mgmt do palo alto, não recomendo deixar “any”. Linha 12: nome do NSG a ser utilizado na snet de mgmt, item obrigatório Linha 15: Não precisa alterar Linha 18: Nome da VM (Virtual machine) pode usar a sua escolha, recomendo se alterar esse nome, para alterar os nomes das interfaces de rede para ficar tudo no mesmo padrão. Linha 21: ultima versão do palo alto, neste caso a 9 Linha 24: Site da VM, neste exemplo “Standard_D3_v2”, pois não iremos precisar de mais que 4 interfaces de rede Linha 27:: Nome da Vnet a ser criada para utilização no Palo Alto Linha 33: CIDR da rede neste exemplo “10.110.0.0/22” Linha 36: nome do Resource Group, neste exemplo “rg-fw-edge-shared-brazilsouth”, pode ser alterado, porém será necessário alterar no script bash abaixo Linha 39: nome da snet de mgmt snet-fw-edge-shared-brazilsouth-00 Linha 42: nome da snet de UnTrus snet-fw-edge-shared-brazilsouth-01 Linha 45: nome da snet de Trust snet-fw-edge-shared-brazilsouth-02 Linha 48: CIDR snet mgmt 10.110.252.0/25 Linha 51: CIDR snet UnTrust 10.110.252.128/25 Linha 54: CIDR snet Trust 10.110.253.0/25
Agora mais alguns parametros
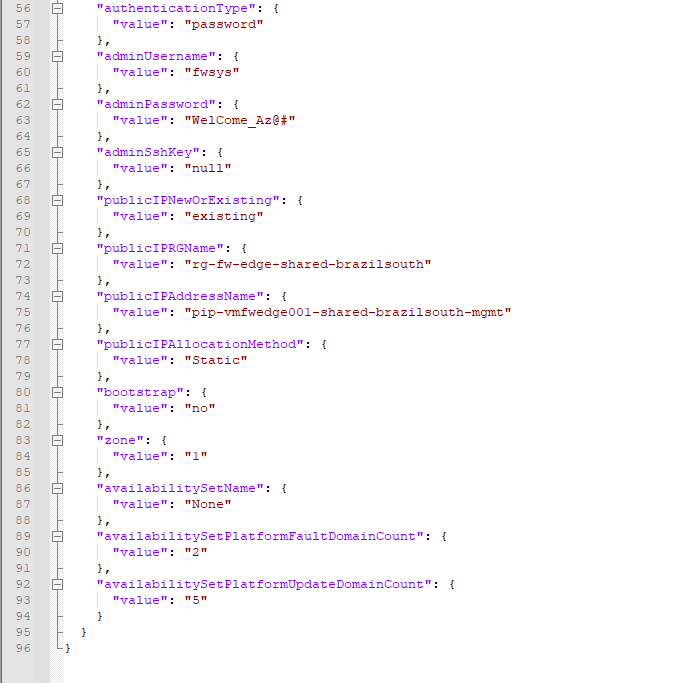
Linha 57: deixe desta forma, pois iremos utilizar usuário e senha para conectar no Palo Alto Linha 60: nome do usuário admin, neste exemplo FWSYS (fica a seu critério) Linha 63: senha, fica a seu critério Linha 69: nome do resource group a ser utilizado, neste exemplo “rg-fw-edge-shared-brazilsouth”, ele será criado pelo script logo abaixo. Linha 75: IP Publico da Interface de MGMT, neste exemplo “pip-vmfwedge001-shared-brazilsouth-mgmt”, será criado pelo script logo abaixo, se alterar o nome será necessário alterar no script bash. Linha 78: Static para utilizar IP fixo Linha 83: muito importante, neste linha difinimos o “Availability zone”, neste exemplo “1” As demais linha não precisam se preocupar.
Agora vamos para o arquivos “parametersFiles2.json”
Basicamente deve ser alterado as linhas Linha 18: nome da vm neste exemplo “vmfwedge02”
Linha 75: nome do IP publico da interface de MGMT neste exemplo “pip-vmfwedge002-shared-brazilsouth-mgmt”
Pronto agora vamos ao deploy via bash (CLI Azure)
Será necessário deixar os arquivos dentro de uma mesma pasta/local
########Declarando variaveis

##Declarando Variaveis (Obrigatório)

###Declarando Variaveis Subscriptions (Nome da sua Subscription Azure)
export Subscription_Name="Santana Corp"

###Variaveis da VM (nomes das VM, igual do template)
export VM_Name_01='vmfwedge001'
export VM_Name_02='vmfwedge002'

###Declarando Variaveis Resource Groups
export RG="rg"
export Name_01="fw-edge"
export Environment="shared"
export Number="0"
export Location_00="brazilsouth"
export RG_Name_FULL_01="${RG}"-"${Name_01}"-"${Environment}"-"${Location_00}"

###Declarando Variaveis Região
export Location="brazilsouth"

###Declarando Variaveis de Rede (Vnet) (Igual do template)
export Vnet="vnet"
export Vnet_Name_FULL="${Vnet}"-"${Name_01}"-"${Environment}"-"${Location}"
export CIDR_01="10.110.252.0/22"
export Subnet_Name_00="snet"-"${Name_01}"-"${Environment}"-"${Location}"-"${Number}"0
export Subnet_Name_01="snet"-"${Name_01}"-"${Environment}"-"${Location}"-"${Number}"1
export Subnet_Name_02="snet"-"${Name_01}"-"${Environment}"-"${Location}"-"${Number}"2
export Subnet_Name_03="snet"-"${Name_01}"-"${Environment}"-"${Location}"-"${Number}"3
export Subnet_Name_04="snet"-"${Name_01}"-"${Environment}"-"${Location}"-"${Number}"4
export Subnet_Name_05="snet"-"${Name_01}"-"${Environment}"-"${Location}"-"${Number}"5
export Subnet_Name_06="snet"-"${Name_01}"-"${Environment}"-"${Location}"-"${Number}"6
export Subnet_Name_07="snet"-"${Name_01}"-"${Environment}"-"${Location}"-"${Number}"7
export prefix_00="10.110.252.0/25"
export prefix_01="10.110.252.128/25"
export prefix_02="10.110.253.0/25"
export prefix_03="10.110.253.128/25"
export prefix_04="10.110.254.0/25"
export prefix_05="10.110.254.128/25"
export prefix_06="10.110.255.0/25"
export prefix_07="10.110.255.128/25"

###Declarando variaveis da interfaces network
export Interface_NIC='nic'
export Interface_Name="${Name_01}"
export Interface_Environment="${Environment}"
export Interface_Location="${Location_00}"
export Interface_ETH='eth'
export Interface_00='0'
export Interface_01='1'
export Interface_02='2'
export Interface_03='3'
export Interface_04='4'
export Interface_05='5'
export Interface_06='6'
export Interface_07='7'
export Interface_Name_Full_00="${Interface_NIC}"-"${Interface_Name}"-"${VM_Name_01}"-"${Interface_Environment}"-"${Interface_Location}"-"${Interface_ETH}""${Interface_00}"
export Interface_Name_Full_01="${Interface_NIC}"-"${Interface_Name}"-"${VM_Name_01}"-"${Interface_Environment}"-"${Interface_Location}"-"${Interface_ETH}""${Interface_01}"
export Interface_Name_Full_02="${Interface_NIC}"-"${Interface_Name}"-"${VM_Name_01}"-"${Interface_Environment}"-"${Interface_Location}"-"${Interface_ETH}""${Interface_02}"
export Interface_Name_Full_03="${Interface_NIC}"-"${Interface_Name}"-"${VM_Name_01}"-"${Interface_Environment}"-"${Interface_Location}"-"${Interface_ETH}""${Interface_03}"
export Interface_Name_Full_04="${Interface_NIC}"-"${Interface_Name}"-"${VM_Name_01}"-"${Interface_Environment}"-"${Interface_Location}"-"${Interface_ETH}""${Interface_04}"
export Interface_Name_Full_05="${Interface_NIC}"-"${Interface_Name}"-"${VM_Name_01}"-"${Interface_Environment}"-"${Interface_Location}"-"${Interface_ETH}""${Interface_05}"
export Interface_Name_Full_06="${Interface_NIC}"-"${Interface_Name}"-"${VM_Name_01}"-"${Interface_Environment}"-"${Interface_Location}"-"${Interface_ETH}""${Interface_06}"
export Interface_Name_Full_07="${Interface_NIC}"-"${Interface_Name}"-"${VM_Name_01}"-"${Interface_Environment}"-"${Interface_Location}"-"${Interface_ETH}""${Interface_07}"

#### VM02
export Interface_Name_Full_13="${Interface_NIC}"-"${Interface_Name}"-"${VM_Name_02}"-"${Interface_Environment}"-"${Interface_Location}"-"${Interface_ETH}""${Interface_00}"
export Interface_Name_Full_14="${Interface_NIC}"-"${Interface_Name}"-"${VM_Name_02}"-"${Interface_Environment}"-"${Interface_Location}"-"${Interface_ETH}""${Interface_01}"
export Interface_Name_Full_15="${Interface_NIC}"-"${Interface_Name}"-"${VM_Name_02}"-"${Interface_Environment}"-"${Interface_Location}"-"${Interface_ETH}""${Interface_02}"
export Interface_Name_Full_08="${Interface_NIC}"-"${Interface_Name}"-"${VM_Name_02}"-"${Interface_Environment}"-"${Interface_Location}"-"${Interface_ETH}""${Interface_03}"
export Interface_Name_Full_09="${Interface_NIC}"-"${Interface_Name}"-"${VM_Name_02}"-"${Interface_Environment}"-"${Interface_Location}"-"${Interface_ETH}""${Interface_04}"
export Interface_Name_Full_10="${Interface_NIC}"-"${Interface_Name}"-"${VM_Name_02}"-"${Interface_Environment}"-"${Interface_Location}"-"${Interface_ETH}""${Interface_05}"
export Interface_Name_Full_11="${Interface_NIC}"-"${Interface_Name}"-"${VM_Name_02}"-"${Interface_Environment}"-"${Interface_Location}"-"${Interface_ETH}""${Interface_06}"
export Interface_Name_Full_12="${Interface_NIC}"-"${Interface_Name}"-"${VM_Name_02}"-"${Interface_Environment}"-"${Interface_Location}"-"${Interface_ETH}""${Interface_07}"

###Variaveis de IPs Publicos
export IP_01="pip"
export ZONE="1"
export IP_02="mgmt"
export SKU="Standard"
export Number_01="01"
export Number_02="02"
export Number_03="03"
export IP_03="wan"
export Name_Object01="fw-edge"

###Variaveis da ifconfig eth
export IFCONFIG_Name="ipconfig"
export IFCONFIG_Number01="1"
export IFCONFIG_Number02="2"
export IFCONFIG_Number03="3"
export IFCONFIG_Number04="4"

###Variaveis interface de rede
export INT_01="nic"
export INT_02="${Name_01}"
export INT_03="${VM_Name_01}"
export INT_11="${VM_Name_02}"
export INT_04="${Environment}"
export INT_05="${Location_00}"
export INT_06="eth"
export INT_07="0"
export INT_08="1"
export INT_09="2"
export INT_10="3"
export INT_Name_01="${INT_01}"-"${INT_02}"-"${INT_03}"-"${INT_04}"-"${INT_05}"-"${INT_06}""${INT_08}"
export INT_Name_02="${INT_01}"-"${INT_02}"-"${INT_03}"-"${INT_04}"-"${INT_05}"-"${INT_06}""${INT_09}"
export INT_Name_03="${INT_01}"-"${INT_02}"-"${INT_03}"-"${INT_04}"-"${INT_05}"-"${INT_06}""${INT_07}"
export INT_Name_04="${INT_01}"-"${INT_02}"-"${INT_11}"-"${INT_04}"-"${INT_05}"-"${INT_06}""${INT_07}"


###Declarando Variaveis Tags
export Description="Departamento"
export Value_Description="Redes/Telecom/Segurança/Infraestrutura"
export Cost_Center="Centro de Custo"
export Cost_Center_Value="Redes/Telecom/Segurança/Infraestrutura"
export Support_Description_Description="E-mail Suporte"
export Support_Description_Value="[email protected]"

####Selecionar subscription
az account set --subscription "${Subscription_Name}"

####Criando Resource Group Firewall EDGE Shared
az group create -n "${RG_Name_FULL_01}" -l "${Location}" --tags "${Description}"="${Value_Description}" "${Cost_Center}"="${Cost_Center_Value}" "${Support_Description_Description}"="${Support_Description_Value}"

###Create IPs Publicos
az network public-ip create -g "${RG_Name_FULL_01}" -n "${IP_01}"-"${VM_Name_01}"-"${Environment}"-"${Location_00}"-"${IP_02}" --sku "${SKU}" --zone "${ZONE}"
az network public-ip create -g "${RG_Name_FULL_01}" -n "${IP_01}"-"${VM_Name_02}"-"${Environment}"-"${Location_00}"-"${IP_02}" --sku "${SKU}" --zone "${ZONE}"
az network public-ip create -g "${RG_Name_FULL_01}" -n "${IP_01}"-"${Name_Object01}"-"${Environment}"-"${Location_00}"-"${IP_03}"-"${Number_01}" --sku "${SKU}" --zone "${ZONE}"
az network public-ip create -g "${RG_Name_FULL_01}" -n "${IP_01}"-"${Name_Object01}"-"${Environment}"-"${Location_00}"-"${IP_03}"-"${Number_02}" --sku "${SKU}" --zone "${ZONE}"
az network public-ip create -g "${RG_Name_FULL_01}" -n "${IP_01}"-"${Name_Object01}"-"${Environment}"-"${Location_00}"-"${IP_03}"-"${Number_03}" --sku "${SKU}" --zone "${ZONE}"

####Criando Virtual Network (Vnet)
az network vnet create -g "${RG_Name_FULL_01}" -n "${Vnet_Name_FULL}" --address-prefix "${CIDR_01}" -l $Location --tags "${Description}"="${Value_Description}" "${Cost_Center}"="${Cost_Center_Value}" "${Support_Description_Description}"="${Support_Description_Value}"

####Criando Subnet
az network vnet subnet create -g "${RG_Name_FULL_01}" --vnet-name "${Vnet_Name_FULL}" -n "${Subnet_Name_00}" --address-prefixes "${prefix_00}"
az network vnet subnet create -g "${RG_Name_FULL_01}" --vnet-name "${Vnet_Name_FULL}" -n "${Subnet_Name_01}" --address-prefixes "${prefix_01}"
az network vnet subnet create -g "${RG_Name_FULL_01}" --vnet-name "${Vnet_Name_FULL}" -n "${Subnet_Name_02}" --address-prefixes "${prefix_02}"

####Deploy Palo Alto Template
az deployment group create -g "${RG_Name_FULL_01}" --template-file template.json --parameters @parametersFile.json

###Desalocando a VM (aqui iremos desligar/desalocar a VM)
az vm deallocate -g "${RG_Name_FULL_01}" -n "${VM_Name_01}"

####Criando restantes das Subnets
az network vnet subnet create -g "${RG_Name_FULL_01}" --vnet-name "${Vnet_Name_FULL}" -n "${Subnet_Name_03}" --address-prefixes "${prefix_03}"
###az network vnet subnet create -g "${RG_Name_FULL_01}" --vnet-name "${Vnet_Name_FULL}" -n "${Subnet_Name_04}" --address-prefixes "${prefix_04}"
###az network vnet subnet create -g "${RG_Name_FULL_01}" --vnet-name "${Vnet_Name_FULL}" -n "${Subnet_Name_05}" --address-prefixes "${prefix_05}"
###az network vnet subnet create -g "${RG_Name_FULL_01}" --vnet-name "${Vnet_Name_FULL}" -n "${Subnet_Name_06}" --address-prefixes "${prefix_06}"
###az network vnet subnet create -g "${RG_Name_FULL_01}" --vnet-name "${Vnet_Name_FULL}" -n "${Subnet_Name_07}" --address-prefixes "${prefix_07}"

####Criando interfaces de rede v2 (interface de rede HA eth3)
az network nic create -g "${RG_Name_FULL_01}" --vnet-name "${Vnet_Name_FULL}"  --subnet "${Subnet_Name_03}" -n

#### Adicionando interfaces Network
az vm nic add --nics "${Interface_Name_Full_03}" -g "${RG_Name_FULL_01}" --vm-name "${VM_Name_01}"

###Iniciando a VM01
az vm start -g "${RG_Name_FULL_01}" -n "${VM_Name_01}"

###################
####Deploy Palo Alto Template segunda VM02
az deployment group create -g "${RG_Name_FULL_01}" --template-file template.json --parameters @parametersFile2.json

###Desalocando a VM02
az vm deallocate -g "${RG_Name_FULL_01}" -n "${VM_Name_02}"

####Criando interfaces de rede v2 (VM02)
az network nic create -g "${RG_Name_FULL_01}" --vnet-name "${Vnet_Name_FULL}"  --subnet "${Subnet_Name_03}" -n "${Interface_Name_Full_08}" --ip-forwarding

#### Adicionando interfaces Network vm2
az vm nic add --nics "${Interface_Name_Full_08}" -g "${RG_Name_FULL_01}" --vm-name "${VM_Name_02}"

###Inciado a VM02
az vm start -g "${RG_Name_FULL_01}" -n "${VM_Name_02}"

###Anexando NSG SNET 00
az network vnet subnet update -g "${RG_Name_FULL_01}" -n "${Subnet_Name_00}" --vnet-name "${Vnet_Name_FULL}" --network-security-group "nsg-fw-edge-shared-brazilsouth"

###Configurando IPs interface eth1
az network nic ip-config create -g "${RG_Name_FULL_01}" -n "${IFCONFIG_Name}""${IFCONFIG_Number02}" --nic-name "${INT_Name_01}" --public-ip-address "${IP_01}"-"${Name_Object01}"-"${Environment}"-"${Location_00}"-"${IP_03}"-"${Number_01}"
az network nic ip-config create -g "${RG_Name_FULL_01}" -n "${IFCONFIG_Name}""${IFCONFIG_Number03}" --nic-name "${INT_Name_01}" --public-ip-address "${IP_01}"-"${Name_Object01}"-"${Environment}"-"${Location_00}"-"${IP_03}"-"${Number_02}"
az network nic ip-config create -g "${RG_Name_FULL_01}" -n "${IFCONFIG_Name}""${IFCONFIG_Number04}" --nic-name "${INT_Name_01}" --public-ip-address "${IP_01}"-"${Name_Object01}"-"${Environment}"-"${Location_00}"-"${IP_03}"-"${Number_03}"

##Declaranado Variaveis para Fixar IP (eht1)
NIC_ID001=$(az network nic show --name "${INT_Name_01}" -g "${RG_Name_FULL_01}" --query id --output tsv)

##Declarando varivel para utilizar IP Fixo existente (eht1)
IP_ID001=$(az network nic ip-config show -g "${RG_Name_FULL_01}" -n "${IFCONFIG_Name}""${IFCONFIG_Number02}" --nic-name "${INT_Name_01}" --query privateIpAddress --output tsv)
IP_ID002=$(az network nic ip-config show -g "${RG_Name_FULL_01}" -n "${IFCONFIG_Name}""${IFCONFIG_Number03}" --nic-name "${INT_Name_01}" --query privateIpAddress --output tsv)
IP_ID003=$(az network nic ip-config show -g "${RG_Name_FULL_01}" -n "${IFCONFIG_Name}""${IFCONFIG_Number04}" --nic-name "${INT_Name_01}" --query privateIpAddress --output tsv)

###Fixando o IP (eht1)
az network nic ip-config update -g "${RG_Name_FULL_01}" --nic-name "${INT_Name_01}" -n "${IFCONFIG_Name}""${IFCONFIG_Number02}" --private-ip-address $IP_ID001
az network nic ip-config update -g "${RG_Name_FULL_01}" --nic-name "${INT_Name_01}" -n "${IFCONFIG_Name}""${IFCONFIG_Number03}" --private-ip-address $IP_ID002
az network nic ip-config update -g "${RG_Name_FULL_01}" --nic-name "${INT_Name_01}" -n "${IFCONFIG_Name}""${IFCONFIG_Number04}" --private-ip-address $IP_ID003

###Configurando IPs interface eth2
az network nic ip-config create -g "${RG_Name_FULL_01}" -n "${IFCONFIG_Name}""${IFCONFIG_Number02}" --nic-name "${INT_Name_02}"

##Declaranado Variaveis para Fixar IP (eht2)
NIC_ID002=$(az network nic show --name "${INT_Name_02}" -g "${RG_Name_FULL_01}" --query id --output tsv)

##Declarando varivel para utilizar IP Fixo existente (eht2)
IP_ID004=$(az network nic ip-config show -g "${RG_Name_FULL_01}" -n "${IFCONFIG_Name}""${IFCONFIG_Number02}" --nic-name "${INT_Name_02}" --query privateIpAddress --output tsv)

###Fixando o IP (eht1)
az network nic ip-config update -g "${RG_Name_FULL_01}" --nic-name "${INT_Name_02}" -n "${IFCONFIG_Name}""${IFCONFIG_Number02}" --private-ip-address $IP_ID004

##Declaranado Variaveis para Fixar IP VM01(eht0)
NIC_ID005=$(az network nic show --name "${INT_Name_03}" -g "${RG_Name_FULL_01}" --query id --output tsv)

##Declarando varivel para utilizar IP Fixo existente (eht0)
IP_ID005=$(az network nic ip-config show -g "${RG_Name_FULL_01}" -n "${IFCONFIG_Name}""${IFCONFIG_Number01}" --nic-name "${INT_Name_03}" --query privateIpAddress --output tsv)

###Fixando o IP (eht0)
az network nic ip-config update -g "${RG_Name_FULL_01}" --nic-name "${INT_Name_03}" -n "${IFCONFIG_Name}""${IFCONFIG_Number01}" --private-ip-address $IP_ID005

############
##Declaranado Variaveis para Fixar IP VM02(eht0)
NIC_ID006=$(az network nic show --name "${INT_Name_04}" -g "${RG_Name_FULL_01}" --query id --output tsv)

##Declarando varivel para utilizar IP Fixo existente (eht0)
IP_ID006=$(az network nic ip-config show -g "${RG_Name_FULL_01}" -n "${IFCONFIG_Name}""${IFCONFIG_Number01}" --nic-name "${INT_Name_04}" --query privateIpAddress --output tsv)

###Fixando o IP (eht0)
az network nic ip-config update -g "${RG_Name_FULL_01}" --nic-name "${INT_Name_04}" -n "${IFCONFIG_Name}""${IFCONFIG_Number01}" --private-ip-address $IP_ID006
Agora nos temos nos objetos criados, vamos acessar via IP da interface MGMT do VM01, sempre com https://XXX.XXX.XXX.XXX A tela inicial apresentada
Agora vamos as configurações para Palo Alto
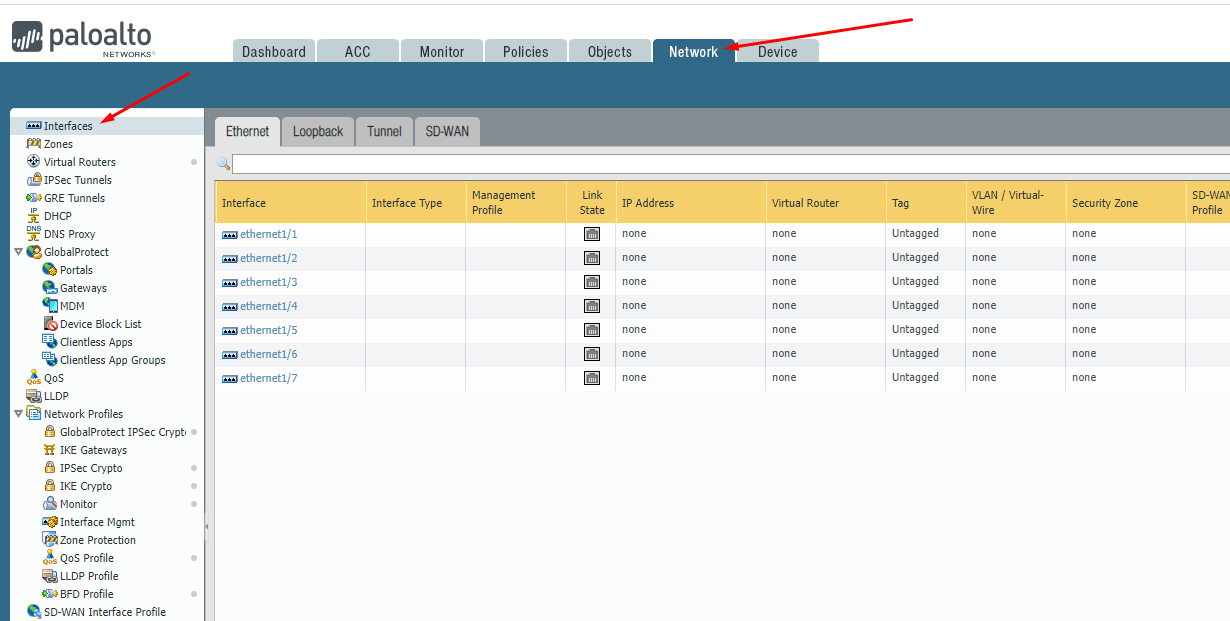
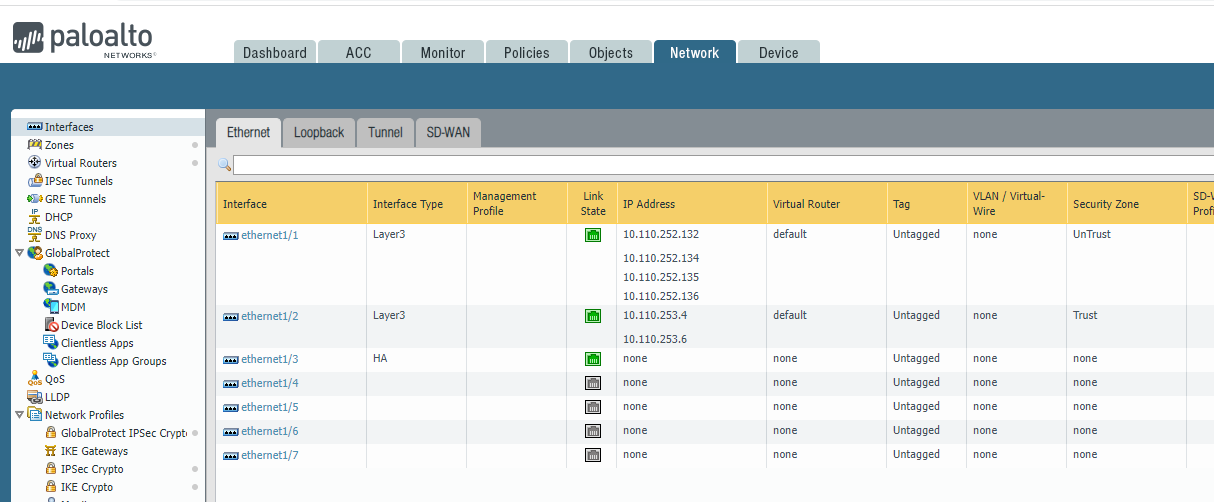
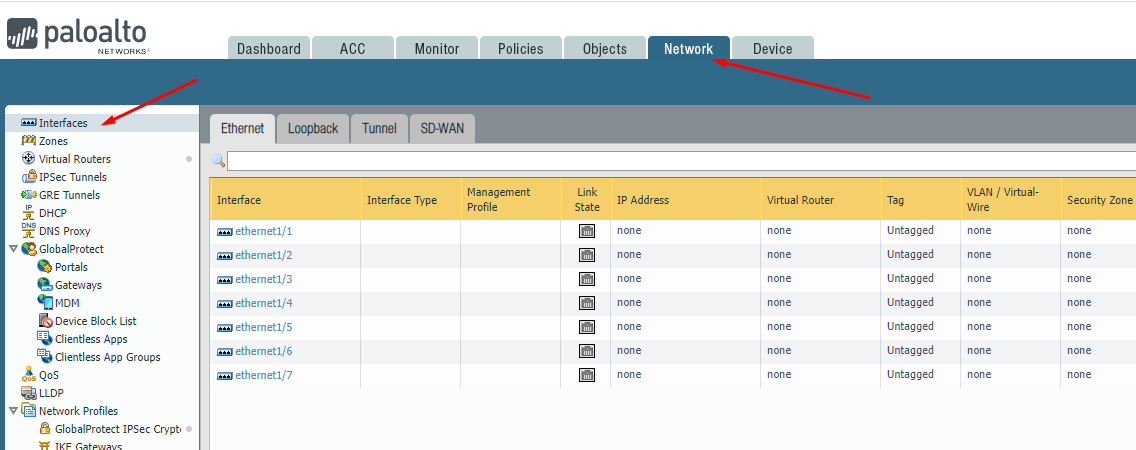
1-) Interfaces de rede, clique em “Network” depois “Interfaces”
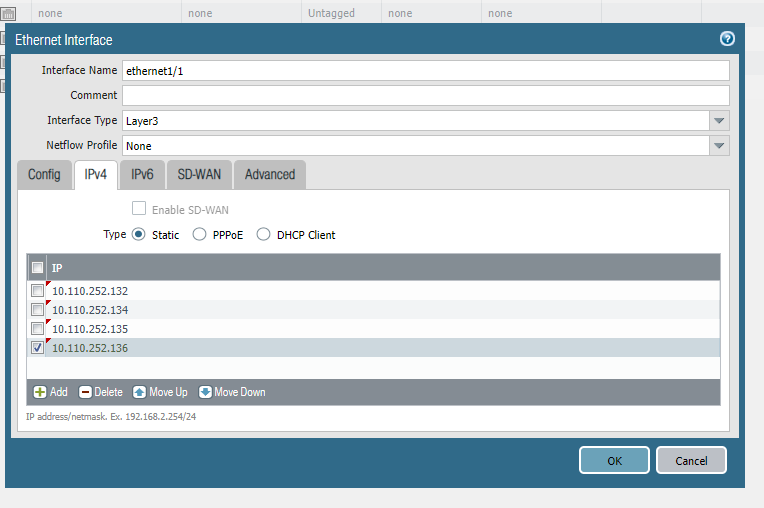
Agora vamos as configurações Clique em “ethernet1/1” será nossa interface de “UnTrust”
Em interface Type altere para “Layer3”, depois em IPV4 add o IP da interface eth1, neste caso 10.110.252.132, 10.110.252.134,10.110.252.135,10.110.252.136
Clique OK
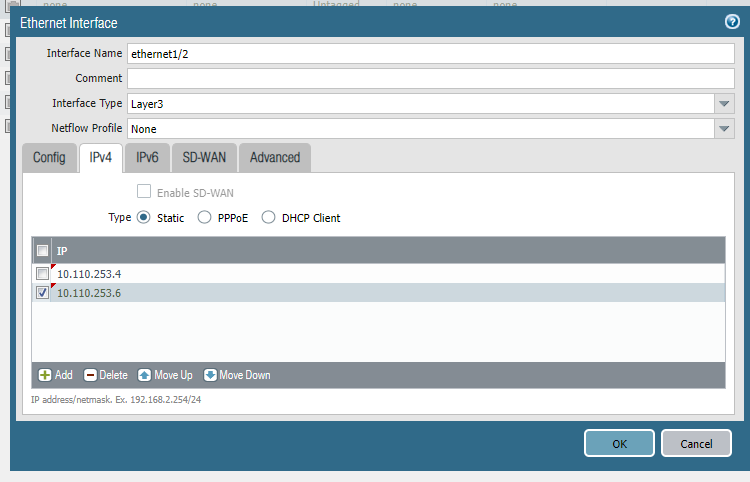
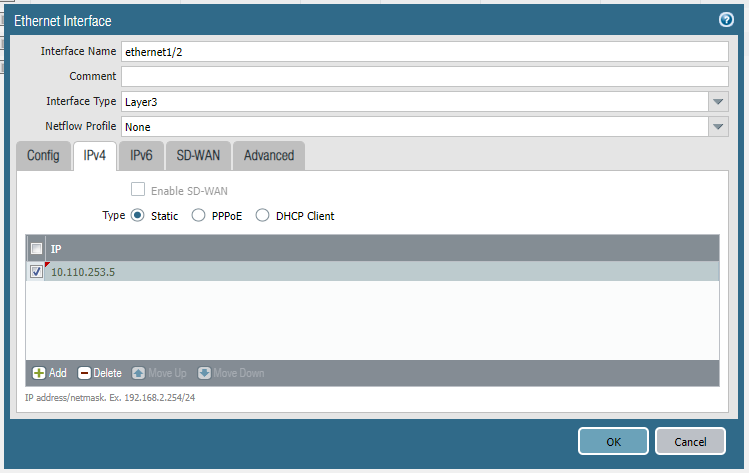
Agora vamos para “ethernet1/2” nossa interface “Trust”
Mesmo procedimentos, porém com os IPs 10.110.253.4 e 10.110.253.6
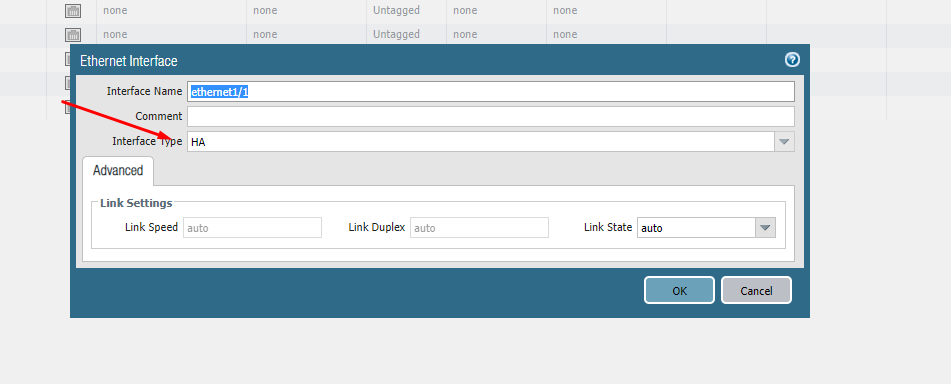
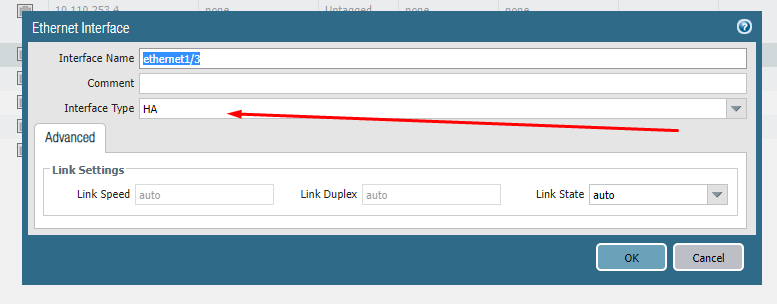
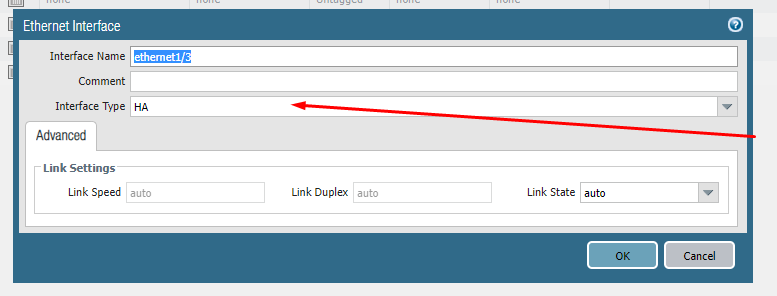
Agora iremos na ethernet1/3, nossa interface de HA
Nesta somente deixa o “Interface Type” como “HA” e clique em “OK”
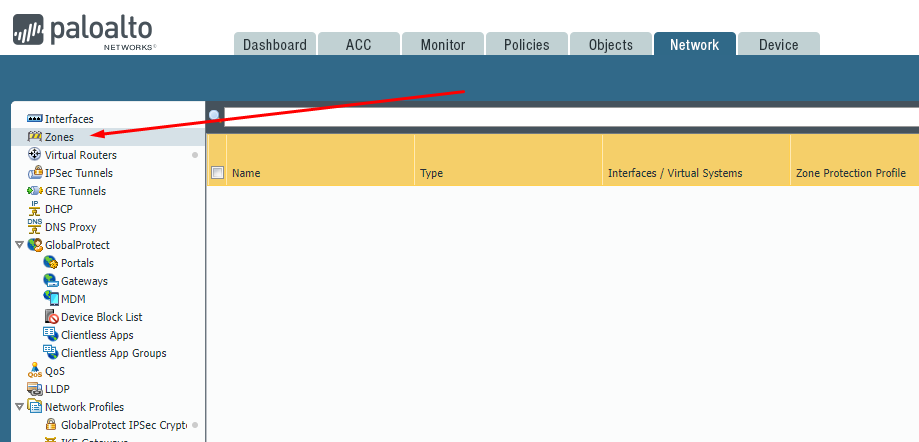
Agora vamos criar nossas “Zonas”
Clique em “Zone” e depois em “add”
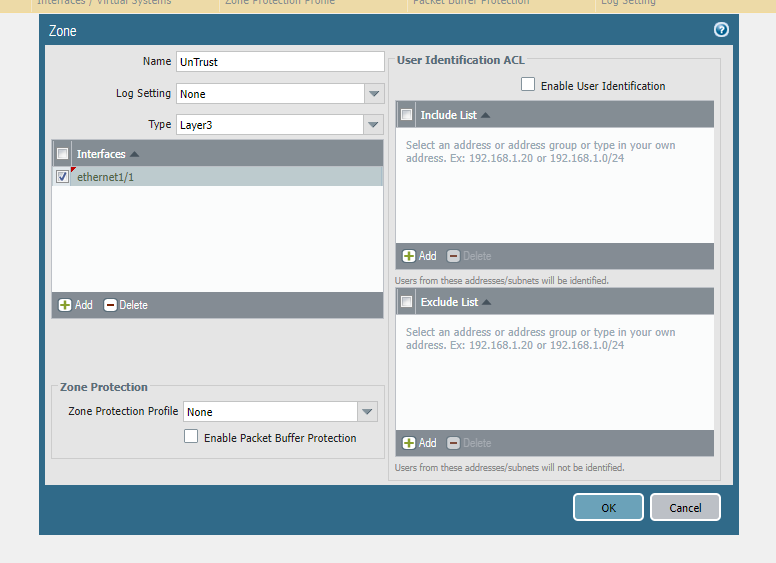
Primeira zona “UnTrust”, Type “L3” interface “ethernet1/1”, clique em “ok”
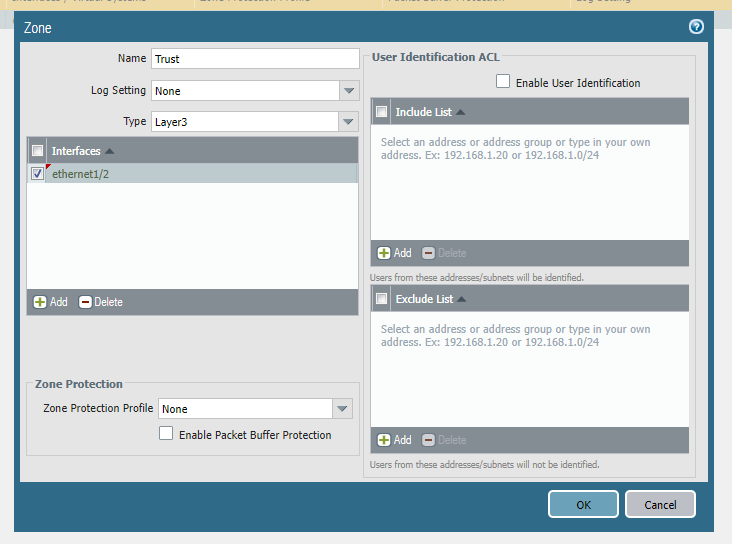
Segunda “zona”
Name: “Trust” Type “Layer3” interfaces “ethernet1/2”, clique em “ok”
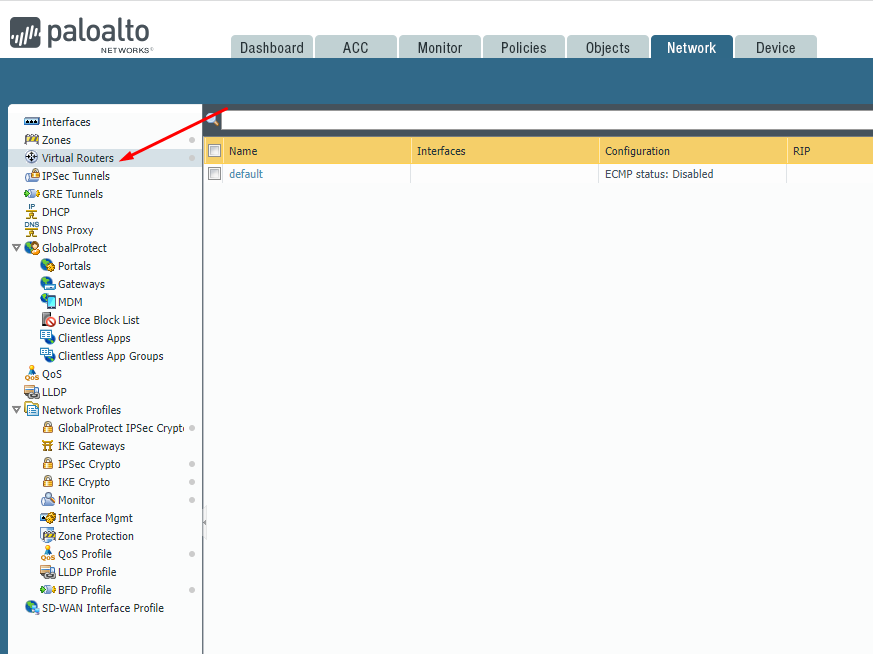
Vamos criar nossa VR (Virtual Routers), vá em “Network” depois em “Virtual Routers”
Vamos utilizar a “Default”, clique em “Default”
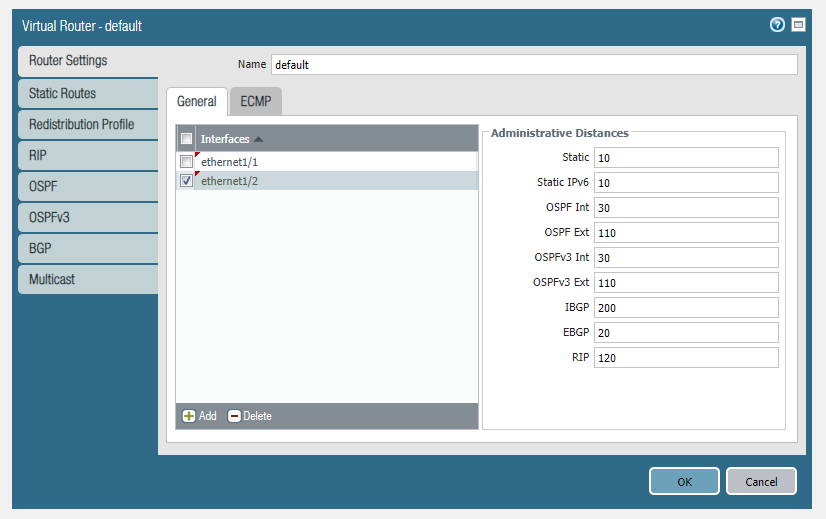
Route Settings, Interfaces Add
Depois clique em Static Routes, add
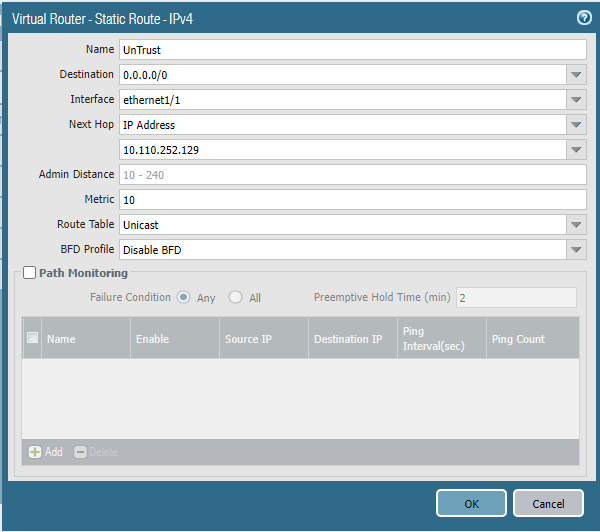
Name: UnTrust (Nossa zona não segura “Internet” Destionation: 0.0.0.0/0 tudo que ele não conhecer irá mandar para esta ROTA Interface: “ethernet1/1” Next Hop: IP Address IP: 10.110.252.129 Agora pórque este IP? Vamos a explicação, a subnet (snet) utilizada nesta interface foi a: “snet-fw-edge-shared-brazilsouth-01” que tem seu CIDR “10.110.252.128/25” ou seja:
Temos o ID da rede 10.110.252.128/25 Inicia em 10.110.252.129 e vai até 10.110.252.254 Brodcast 10.110.252.255 No Azure ele toma para si (se apodera) dos 3 primeiros IPs, neste exemplo: 10.110.252.129 10.110.252.130 10.110.252.131
O IP 10.110.252.132 esta em nossa interface eth1, por isso o gateway neste snet (Subnet) é o primeiro IP da rede neste caso 10.110.252.129, clique em OK
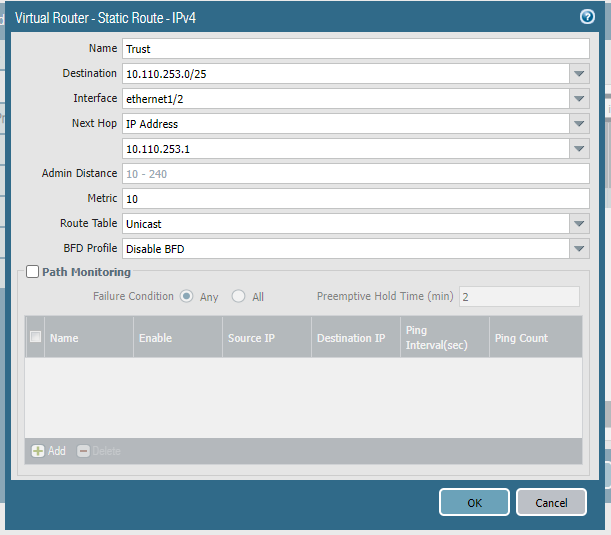
Vamos add nossa rota interna (Nossa rede interna) Neste exemplo, somente iremos add a snet (subnet snet-fw-edge-shared-brazilsouth-02 10.110.253.0/25)
Aqui a lógica para o IP é a mesma
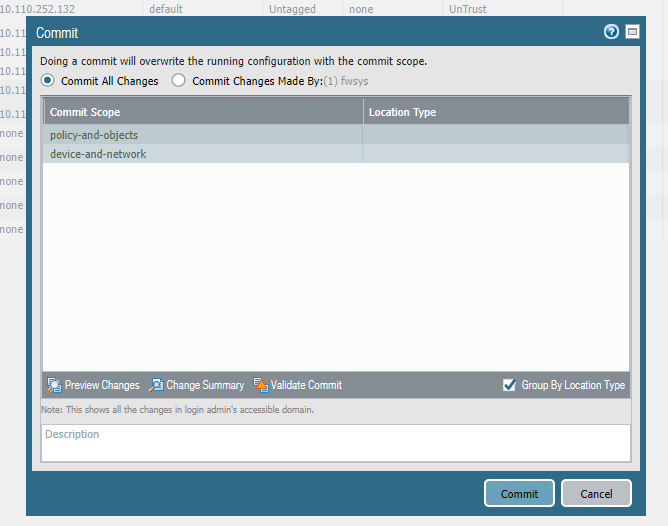
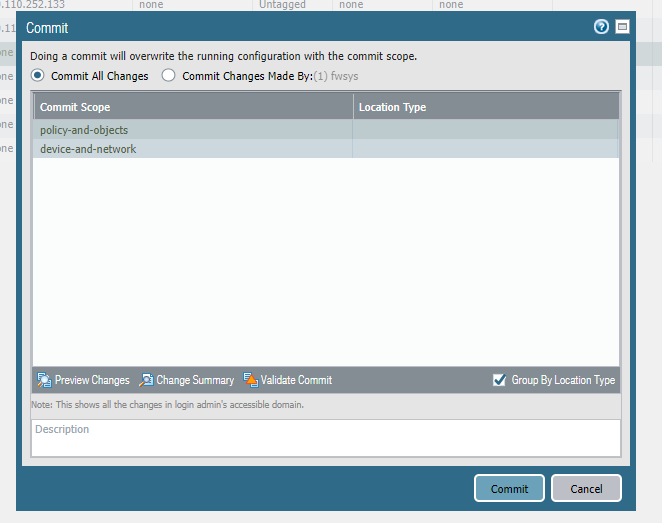
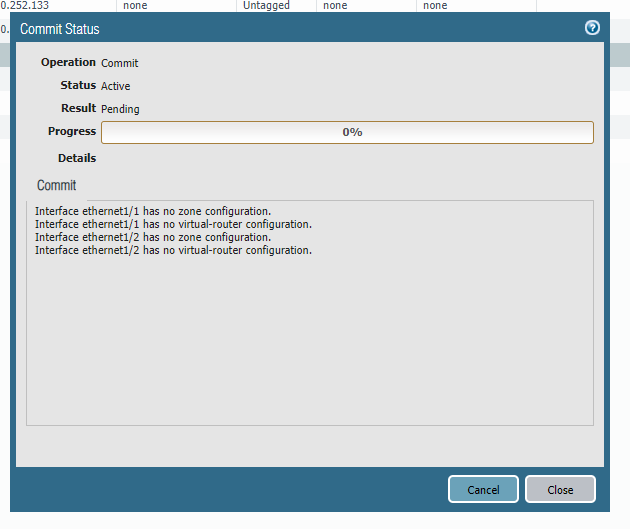
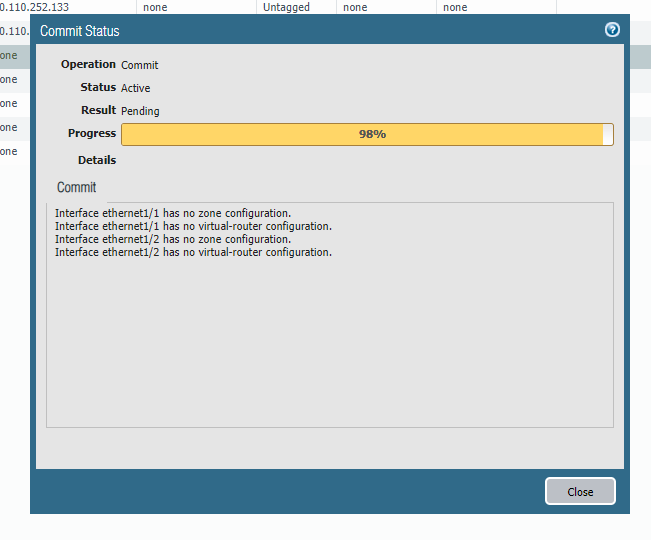
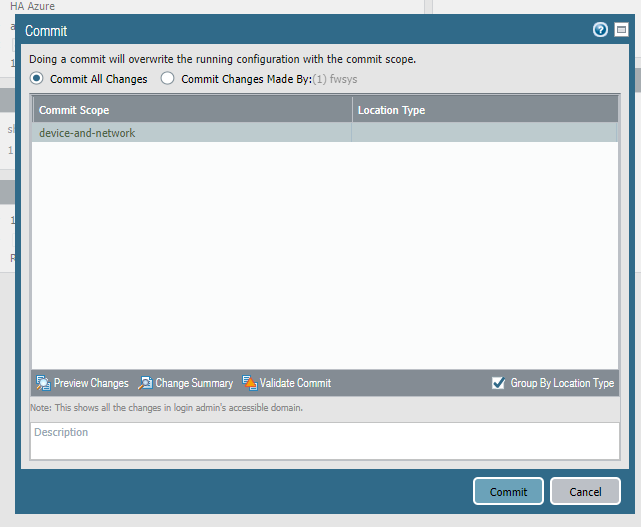
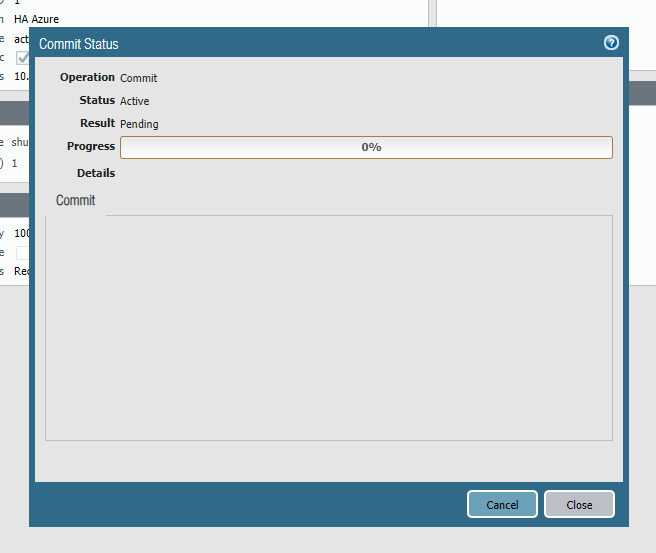
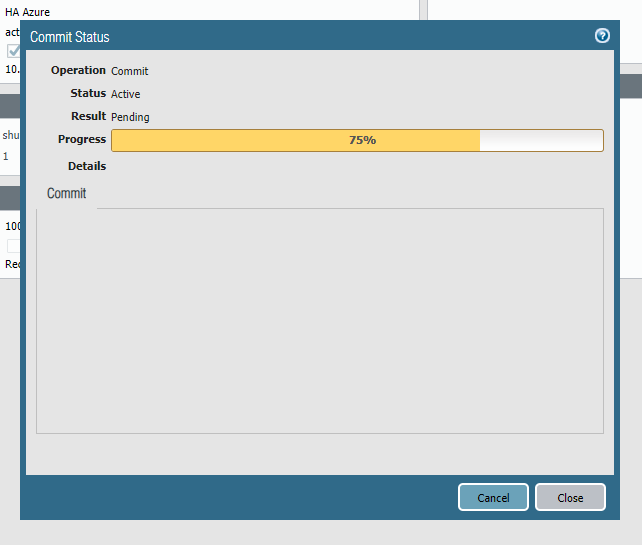
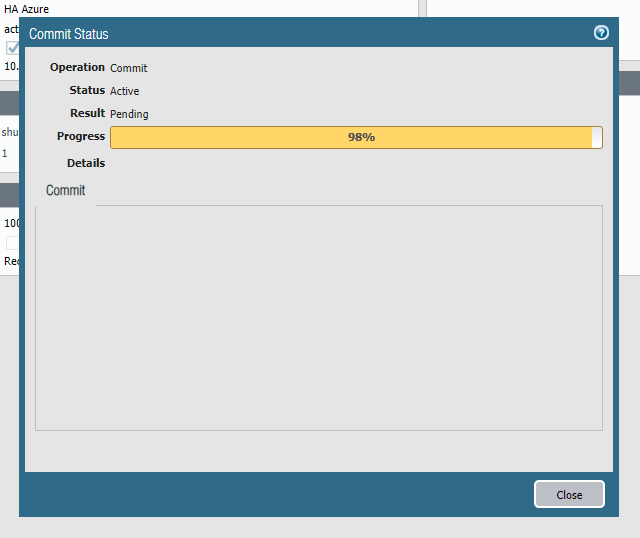
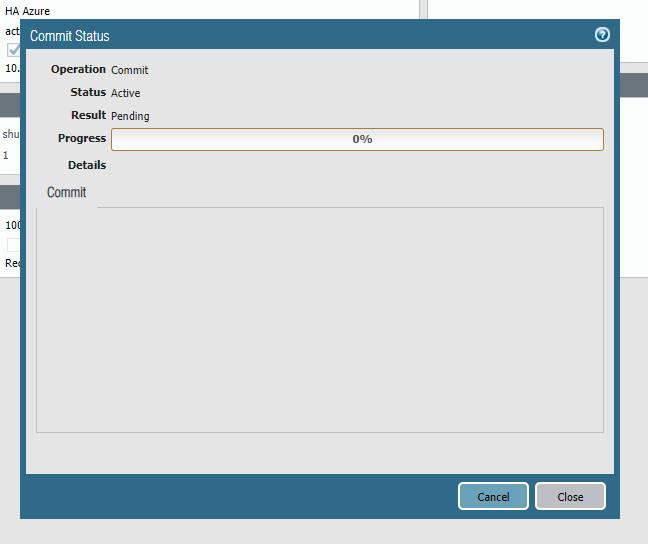
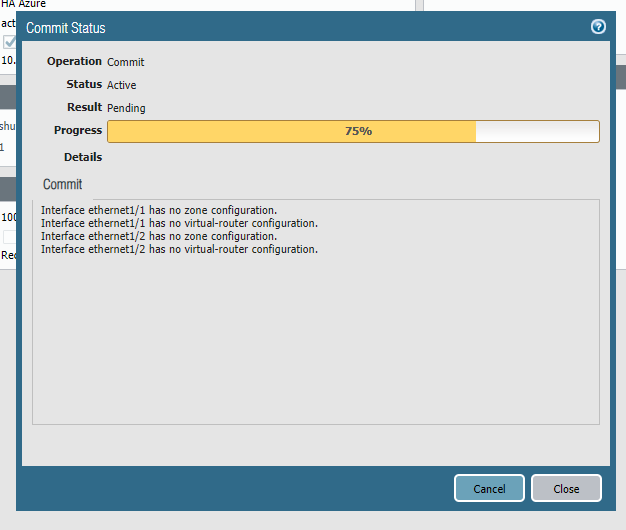
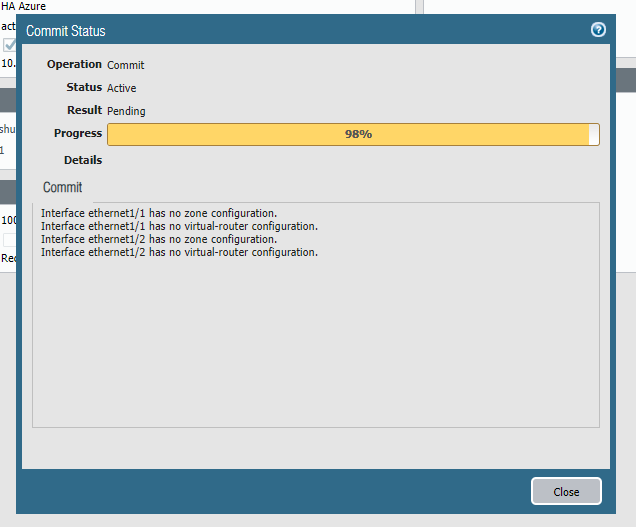
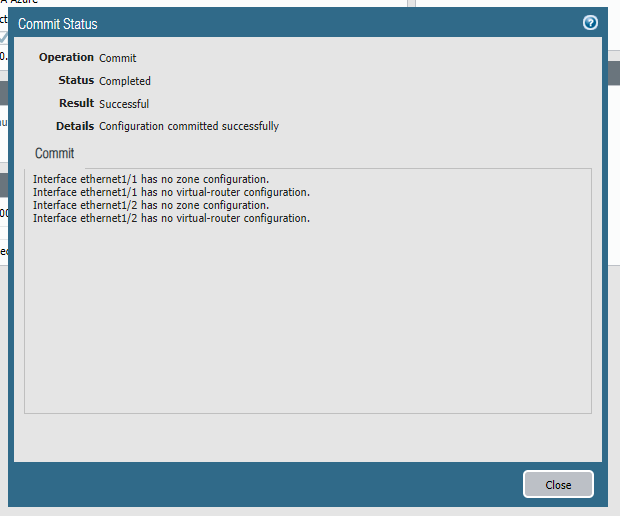
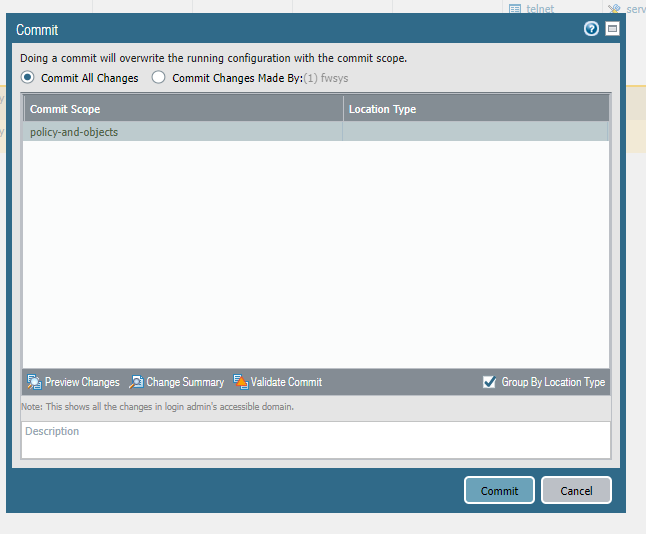
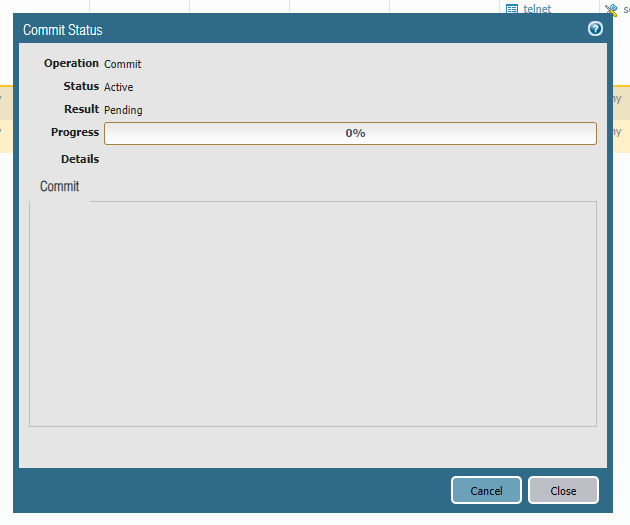
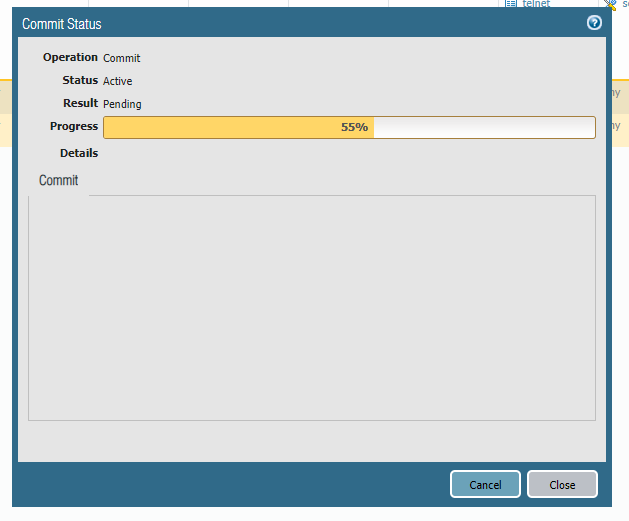
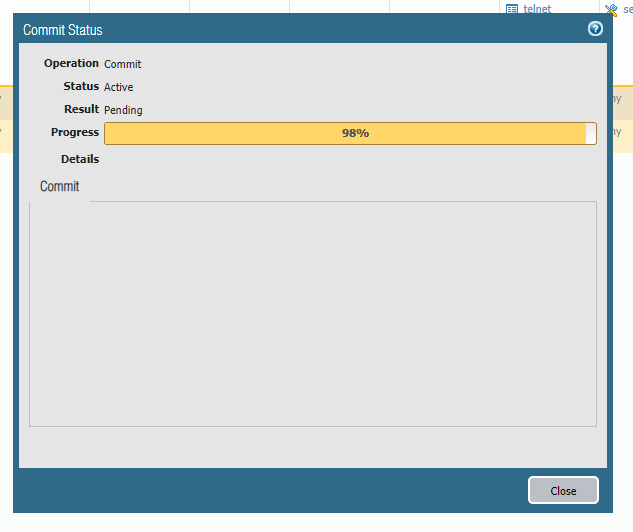
Agora vamos efetivar nossas configurações, clique em “Commit”
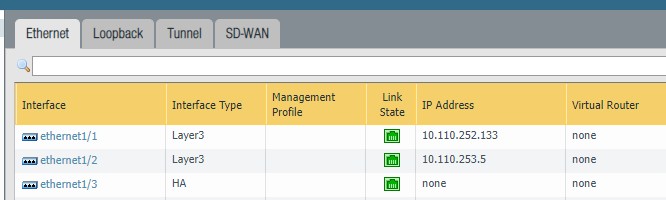
Agora veja em “network”
As interfaces estão “up”
Agora vamos as configurações na segunda VM (caixa)
Vamos em “network” e depois em “interfaces”, neste só iremos configurar isso nada mais.
Em “ethernet1/1”
Interface Type: Layer3 IP: 10.110.252.133, seguindo nossa CIDR: snet-fw-edge-shared-brazilsouth-01 10.110.252.128/25, clique em OK
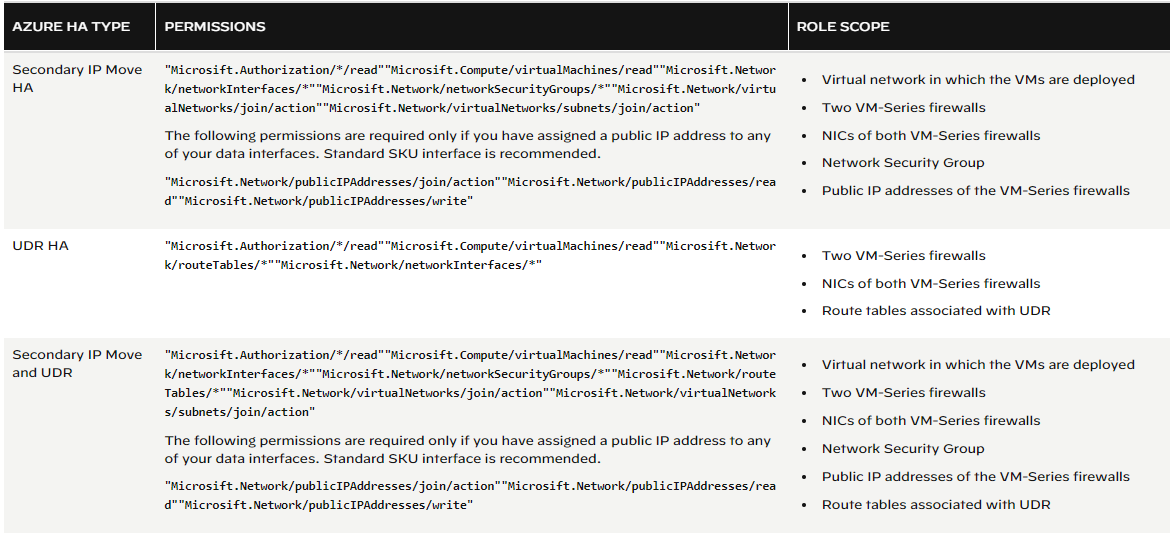
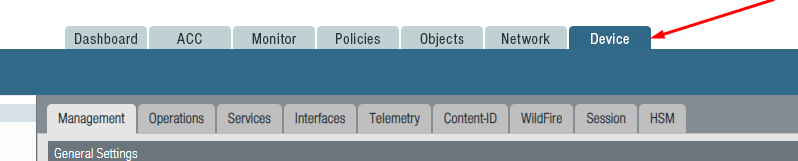
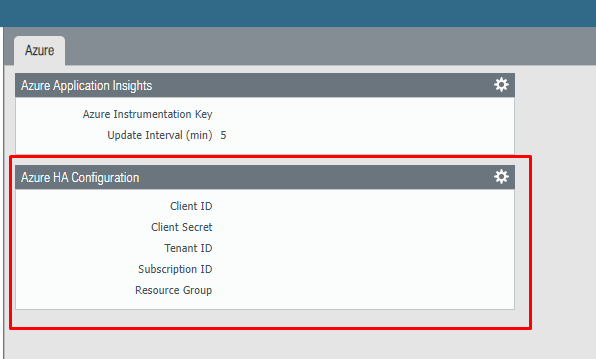
Com nosso AppRegistration criado, vamos add em nossa Palo Alto, VM01 Vamos em “Devices”
VM Series
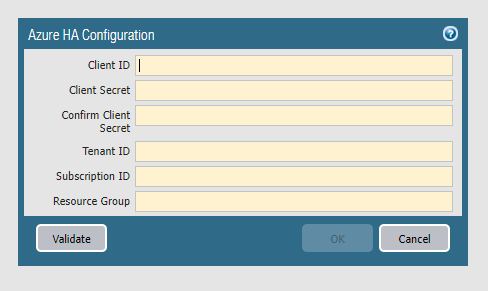
Azure HA Configuration, clique na roda dentada
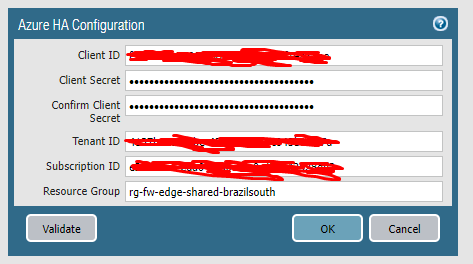
Vamos iniciar o preenchimento
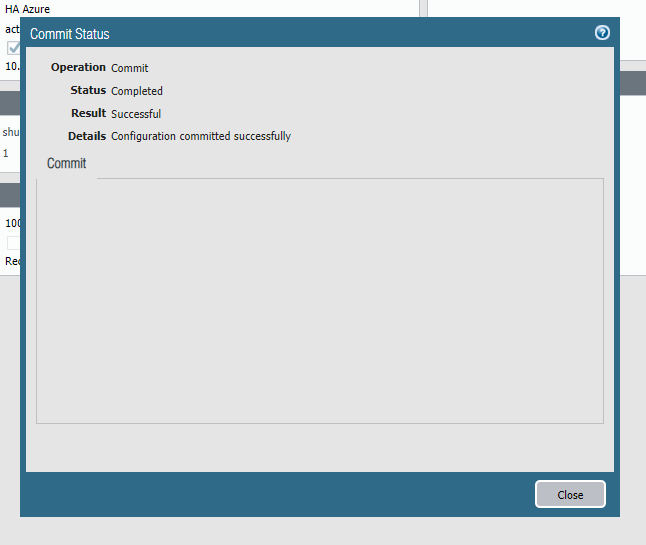
Resource Group: é o que criamos em nosso script, clique em validade
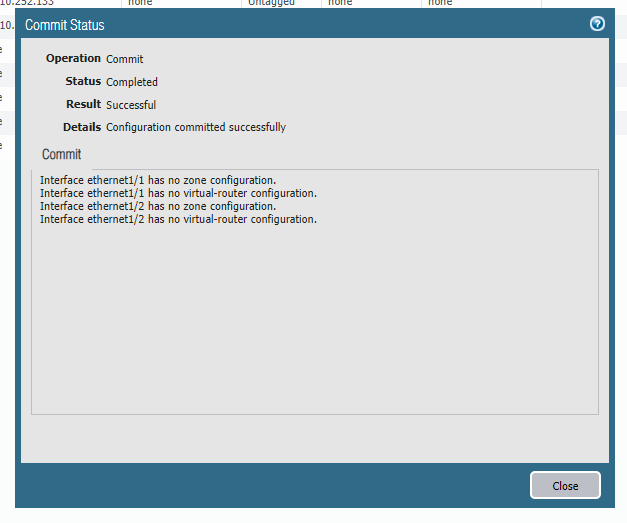
Se tudo ocorreu certo, deve recever essa mensagem
Clique em “close” depois em “ok”
Continuemos a nossa configuração de HA
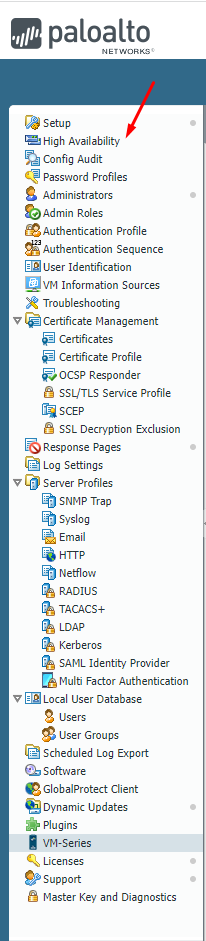
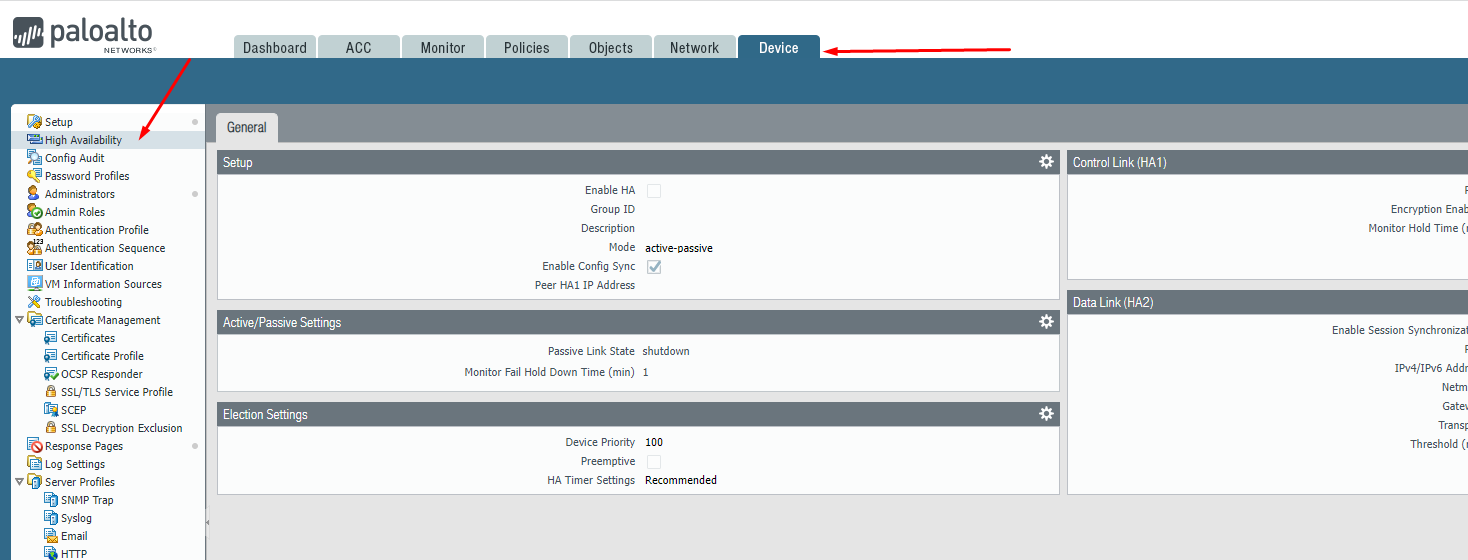
Em “High Availability”
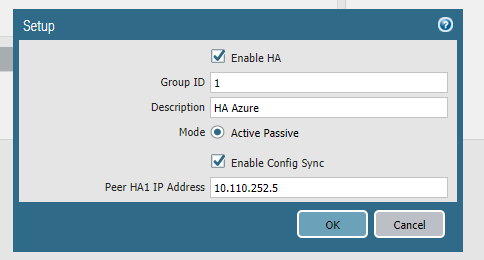
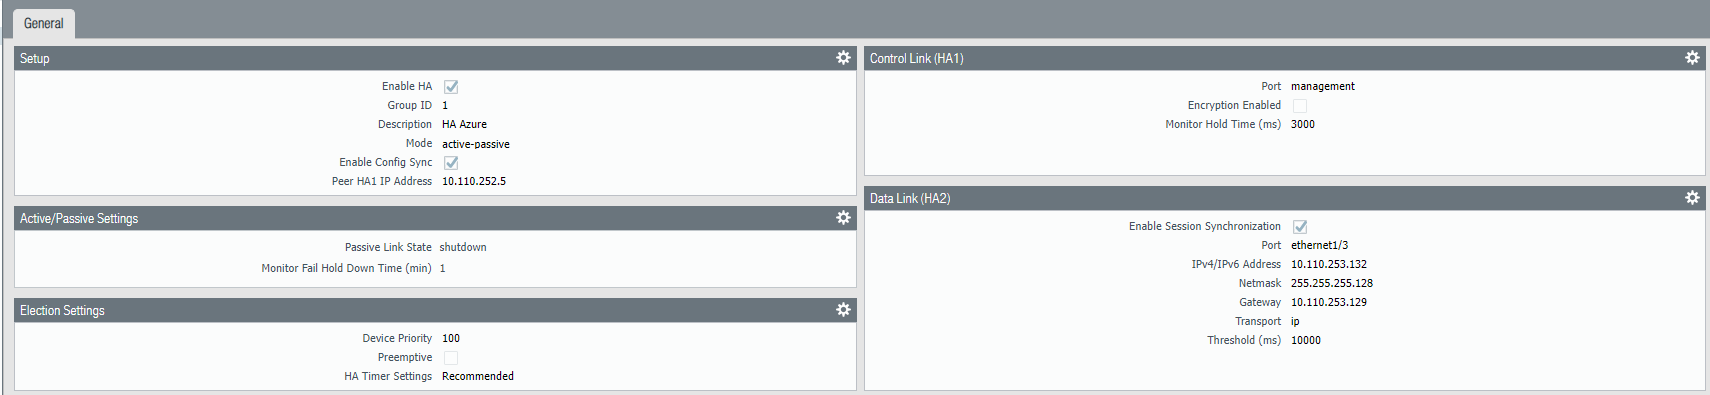
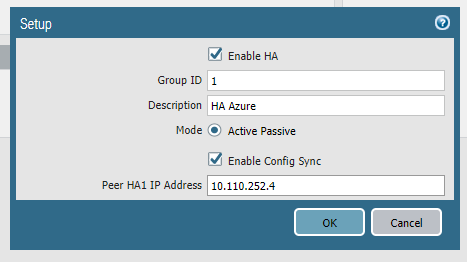
Setup, clique na roda dentada
Habilite “Enable HA” Group ID “1” Description “HA Azure” Mode “Active Passive” Habilite “Enable Config Sync” Peer HA1 IP Address “10.110.252.5” *IP da interfaces mgmt da segunda VM” Clique em “ok”
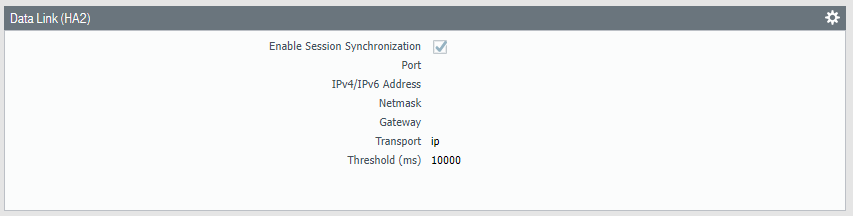
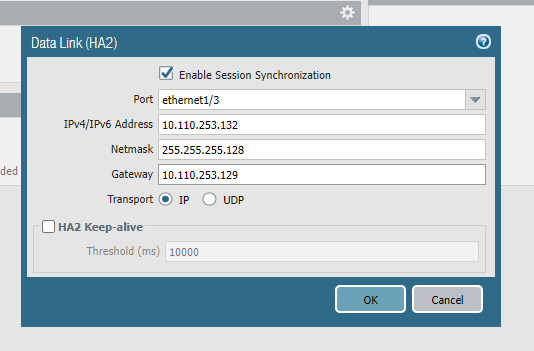
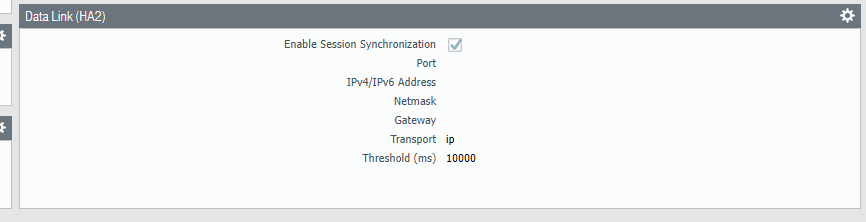
Em “Data Link (HA2), clique na roda dentada
Seguindo a mesma lógica para endereçamento IP Azure
Port “ethernet1/3 IPv4 “10.110.253.132” IP da interface eth3 da VM01 Netmask “255.255.255.128” mascara da snet Gateway “10.110.253.129” gateway da snet Clique em “ok”
Se tudo deu certo, teremos esta tela
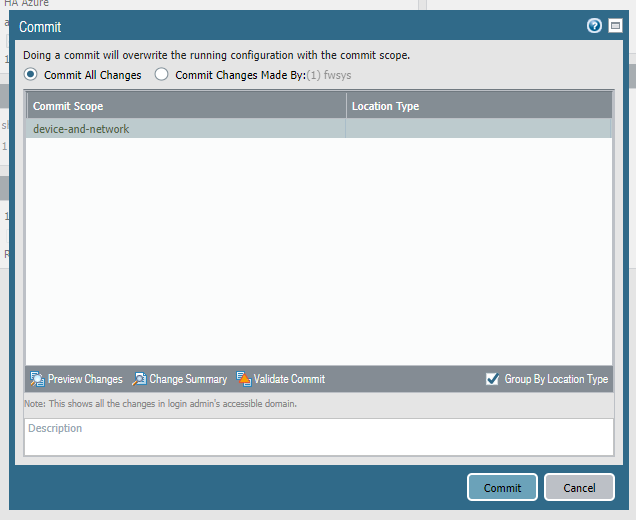
Vamos efetivar nossas configurações
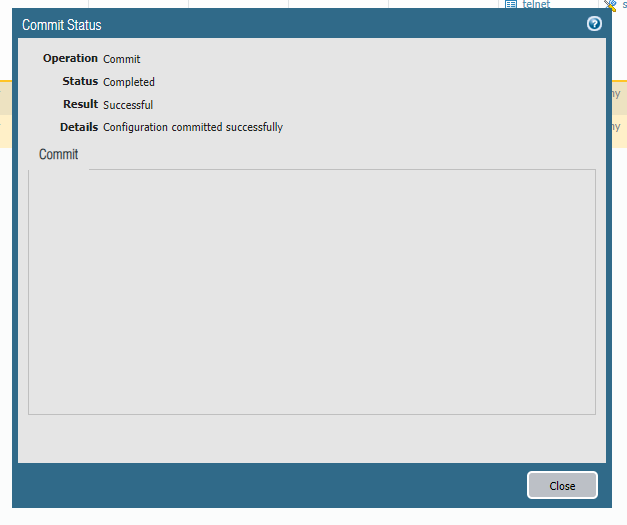
Clique em “Commit”
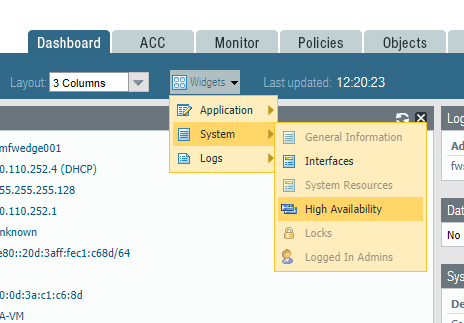
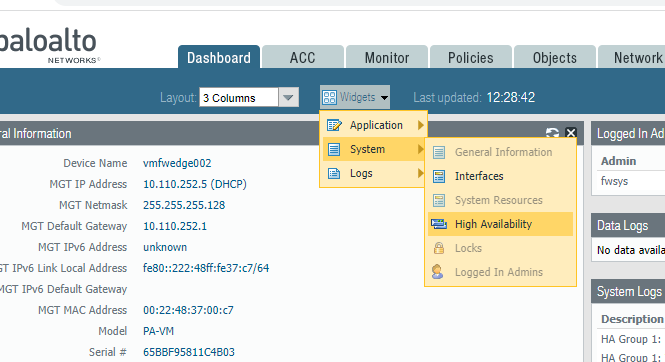
Agora vamos em “Dashbord”
Vamos add “Widgets” de HA
Estamos quase lá
Agora vamos confirar a segunda VM
Na segunda VM vamos em “Devices” “High Availability”
Setup, clique na roda dentada
Habilite “Enable HA” Group ID “1” Description “HA Azure” Mode “Active Passive” Habilite “Enable Config Sync” Peer HA1 IP Address: 10.110.252.4 *IP da interface mgmt da vm01 Clique em OK
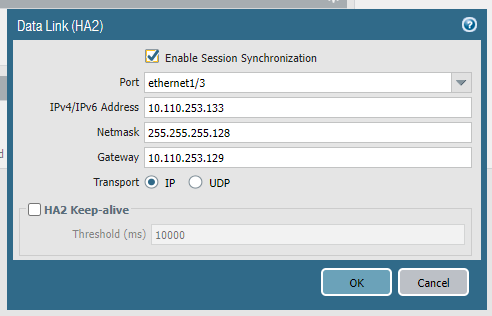
Em “Data Link (HA2), clique na roda dentada
Port “ethernet1/3” IPv4 “10.110.253.133” ip da inteface eth3 Netmask: 255.255.255.128 Gateway “10.110.253.129”
Seguindo a mesma lógica de endereçamento azure
Clique em OK
Agora vamos efetivas nossas configurações, clique em “Commit”
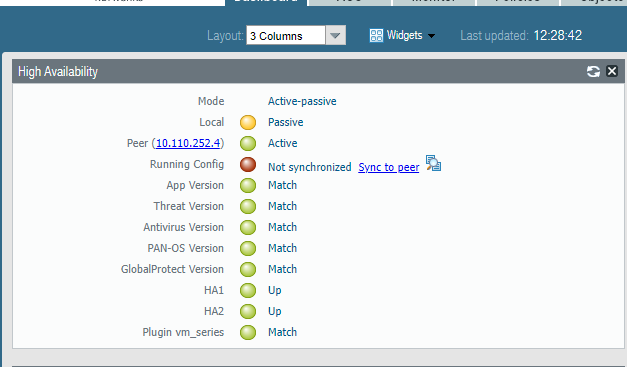
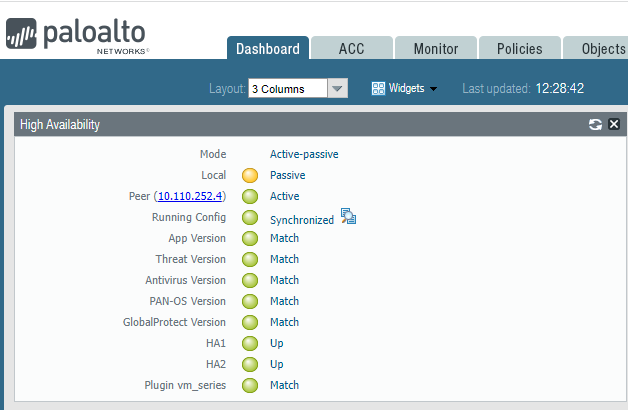
Em “Dashbord”
Vamos add “Widgets” HA
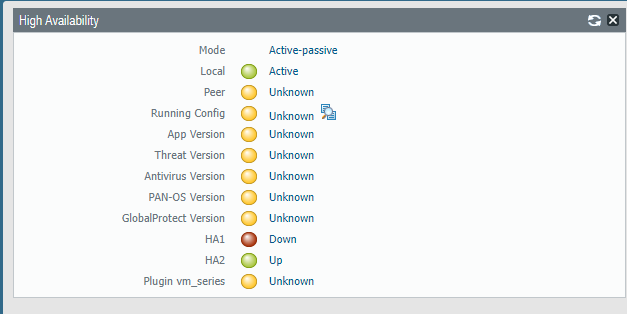
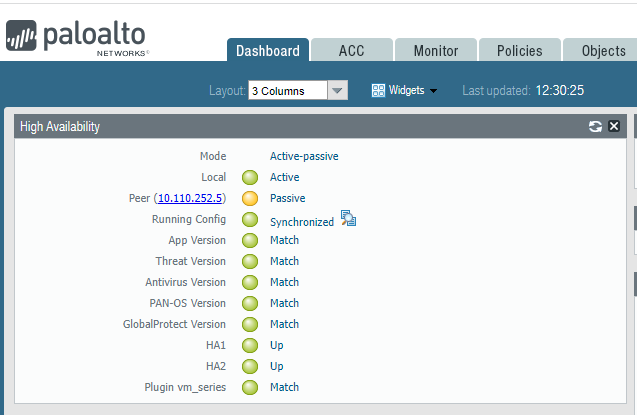
Veja como esta
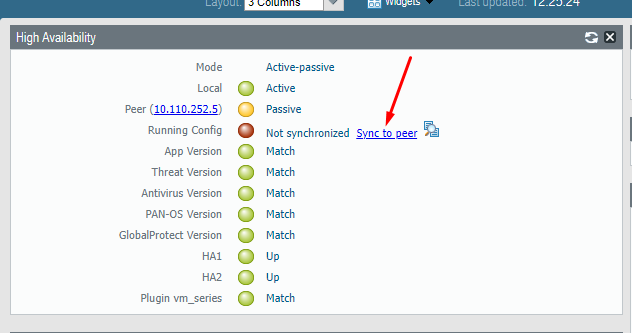
Agora vamos na VM01 em Dashbord
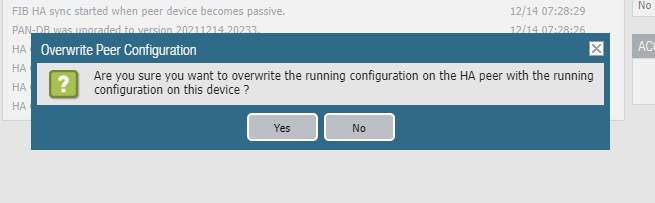
Vamos fazer o Sync, clique em “Sync to peer”
Clique em “yes”
Pronto, nossa HA esta completo
Veja em Dashbord da VM01 e VM02
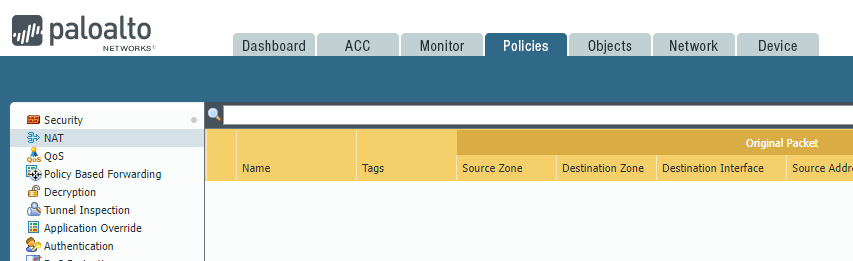
Agora vamos criar uma regra de NAT para saída (OUTBOUND) para internet
Vamos em “Policies” depois em “Nat” e clique em ADD
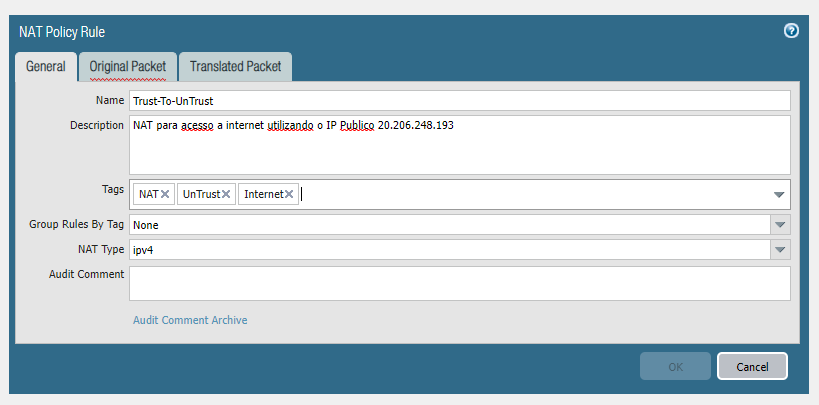
General Name “Trust-To-UnTrust” Description “NAT para acesso a internet utilizando o IP Publico 20.206.248.193” este IP esta na eth1 Tags “NAT, UnTrust, Internet” NAT Type “ipv4”
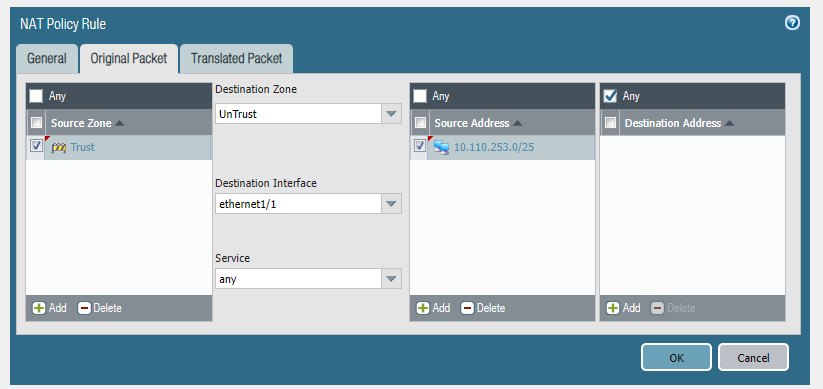
Original Packet
Souce Zone “Trust” nossa rede interna Destination Zone “UnTrust” Internet Destination Interface “ethernet1/1” nossa interface UnTrust Source Address “10.110.253.0/25” neste momento somente a “snet” “Trust” Destionation Address “Any” neste exemplo, fica a seu critério esta liberação
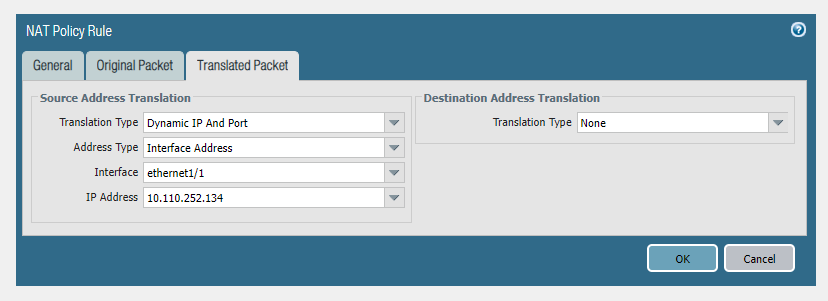
Translated Packet
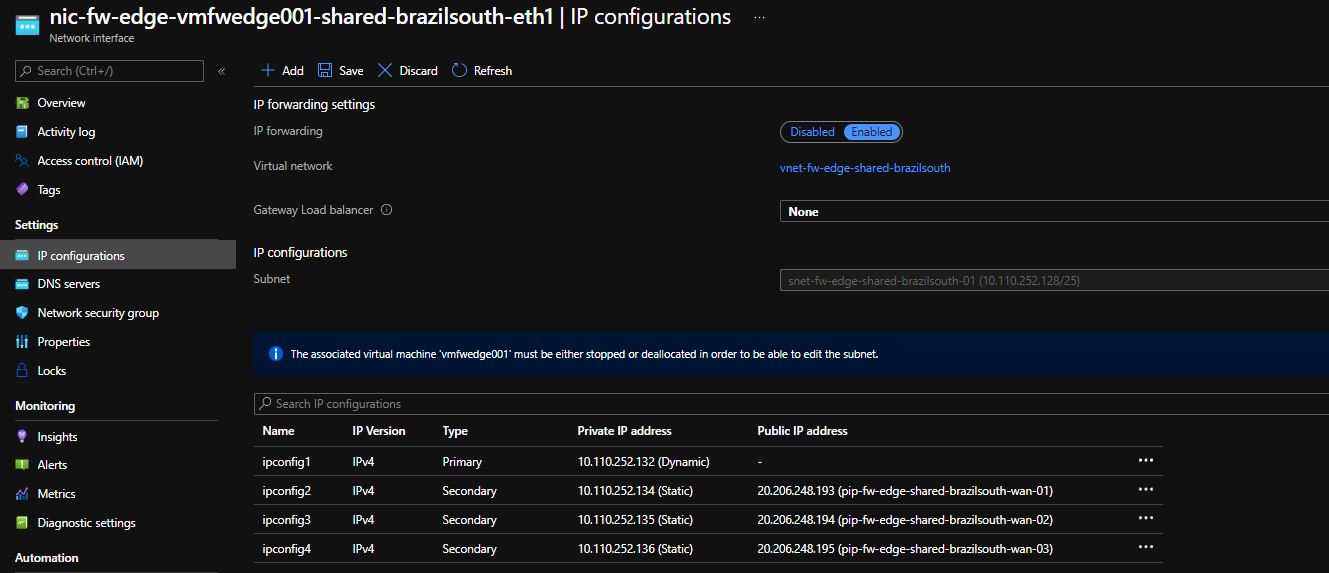
Translation Type “Dynamic IP And Port” Address Type “Interface Address” Interface “ethernet1/1” nossa interface “UnTrust” onde temos algums IPs IP Address “10.110.252.134” este IP esta atribuido a interface eth1, no azure não atribuimos o IP publico diretamente e sim o privado que tem o publico associado
Veja na interface eth1 o IP 10.110.252.134 esta associado ao IP 20.206.248.193
Clique em “ok”
Agora vamos criar uma regra de saida no firewall para acessar a internet
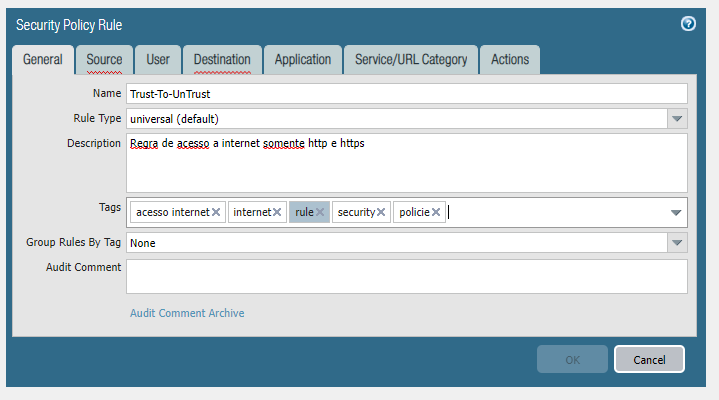
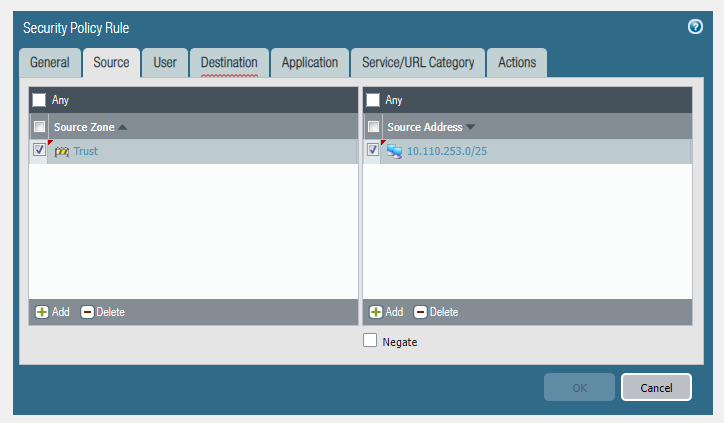
Vamos em “Security”, clique em “add”
General Name “Trust-To-UnTrust” Rule Type “universal (default) Description “Regra de acesso a internet somente http e https” Tags “acesso a internet, internet, rule, security, police”
Agora em Source Source Zone “Trust” Source Address “10.110.253.0/25”
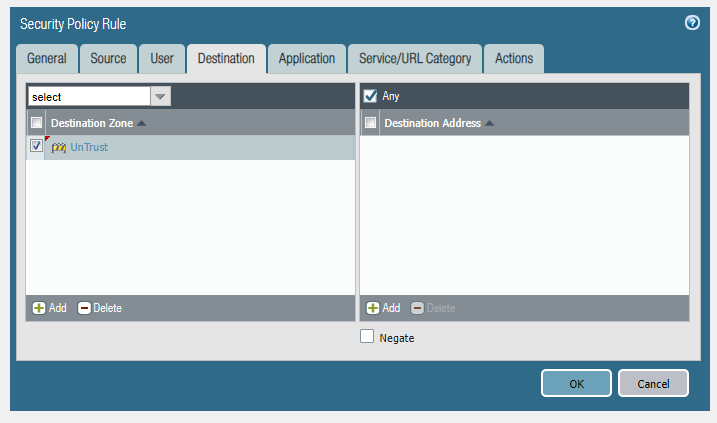
Não itemos utilizar “User”, vamos direto para “Destination” Destination Zone “UnTrust” Destination Address “Any” fica a seu critério liberar “any” ou não
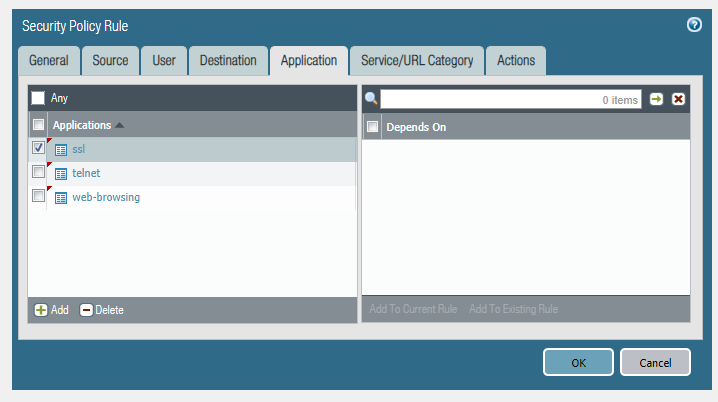
Agora vamos para “Application”
Principio de segurança, mas fica a seu critério liberar ou não Application “ssl” “telnet” “web-browsing”
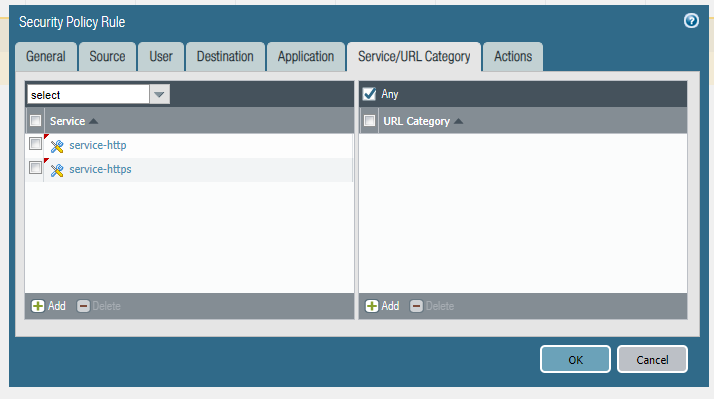
Vamos para “Service/URL Category”
Mais uma vez fica a seu critério tal liberação Service “http” “https” URL Category “internet-communication-and-telephony” “online-storage-and-backup” “web-hosyting”
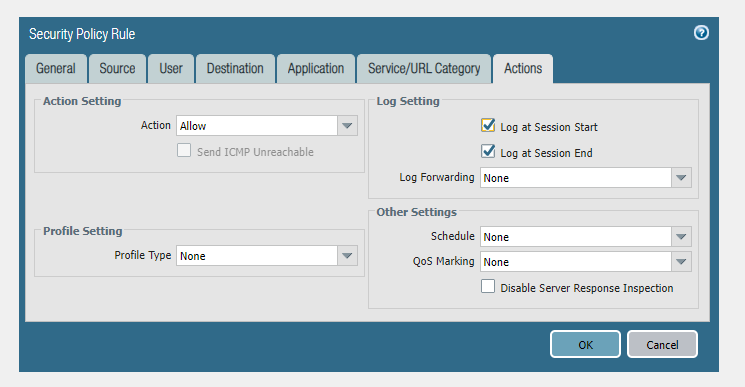
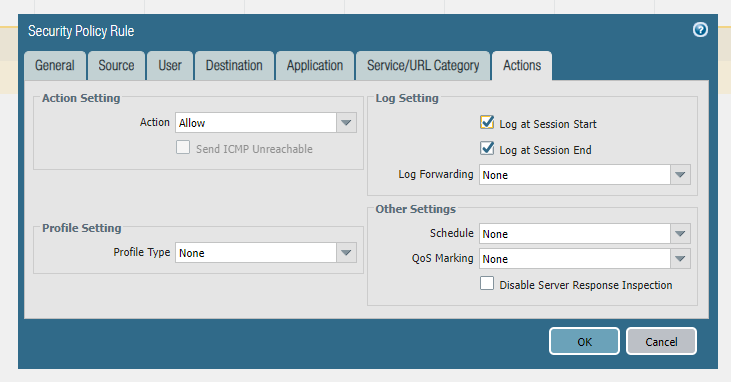
Vamos para action
Action “Allow”
Log Setting “Log at Session Start” Log Setting “Log at Session End”
Clique em “ok”
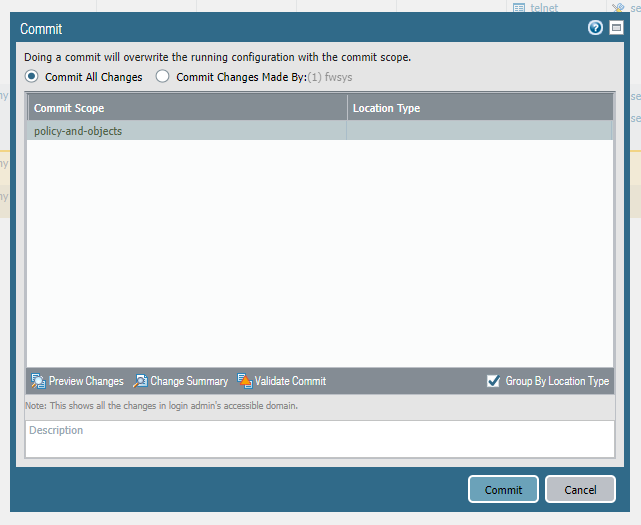
Agora vamos efetivar nossas configurações, clique em “commit”
Agora vamos dar continuidade em nossa configuração da arquitetura/topologia de rede Azure
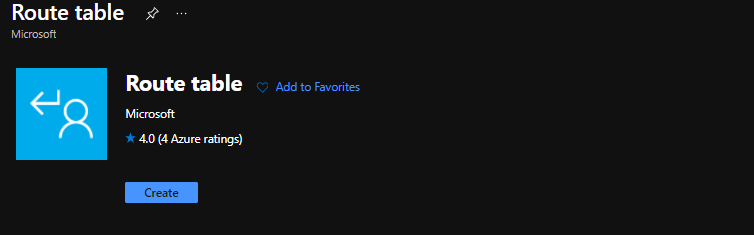
Agora precisamos criar um arquivo de roteamento (Route Table”
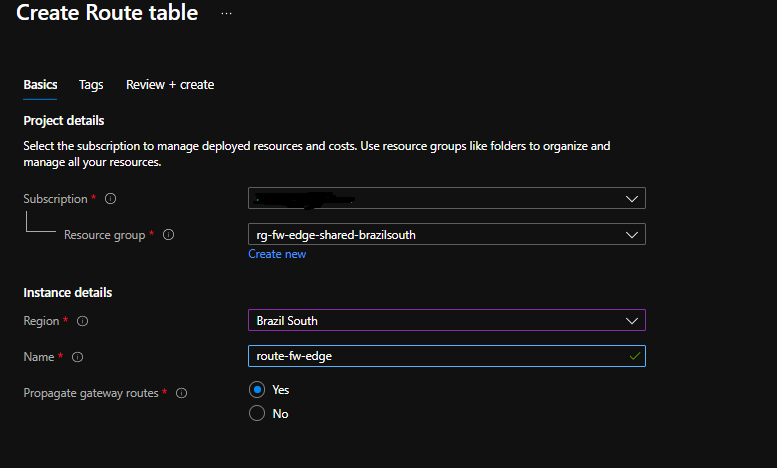
Criar Azure
Escolha sua subscription Resource Group Region Name Propagate gateway routes “yes”
Agora vamos configurar nosso arquivo de roteamento
Vamos criar uma unica rota, pois nesta arquitetura/topologia tudo passa pelo Palo Alto em HA
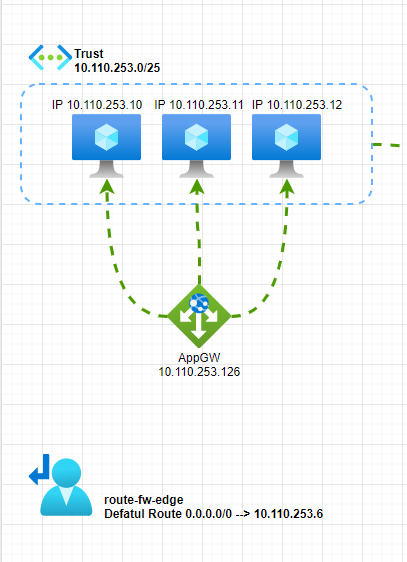
Name “Default” Address Prefix “0.0.0.0/0” Virtual Applicance “10.110.253.6” segundo IP da nossa interface eth2 (Trust)
Agora vamos add um subnet (snet), neste exemplo somente a: vnet-fw-edge-shared-brazilsouth 10.110.253.0/25
Nosso arquivo de roteamento ficou desta forma
Agora qualquer solicitação da snet 10.110.253.0/25 vai para “Trust” no palo alto para ser tratada (liberado ou não), um simples “ping” terá que ter regra para liberação.
Neste exemplo liberamos somente o acesso a internet utilizar http e https
*Toda configuração feita na VM01 replica para VM02″
Veja como esta nossa arquitetura/topologia
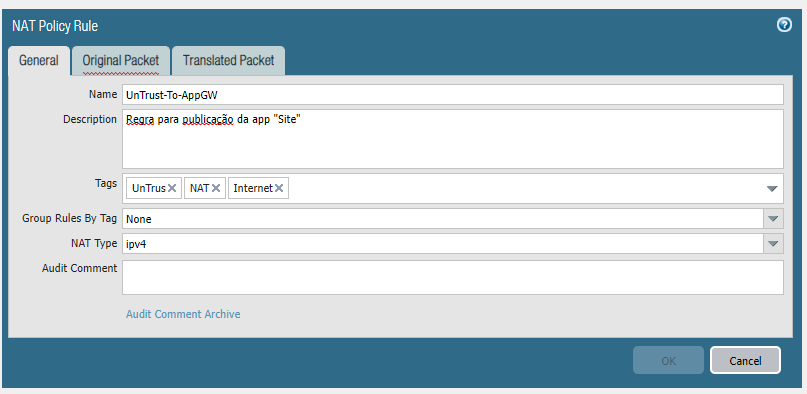
Agora vamos criar uma regra de NAT para INBOUND, isso mesmo, vamos publica uma aplicação neste exemplo denomina “Site” que esta atrás de um “Application Gateway” (Rede Interna).
Vamos lá (A parte de criação/configuração do AppGw não será apresentanda aqui, pode ser usar um load balance tradicional)
Vamos as regras no Palo Alto, em “Policies” “Nat”, clique em “add
Vamos criar um NAT de INBOUND
Name “UnTrust-To-AppGW” Description “Regra para publicação da app “Site” Tags “UnTrust”, “NAT”, “Internet”
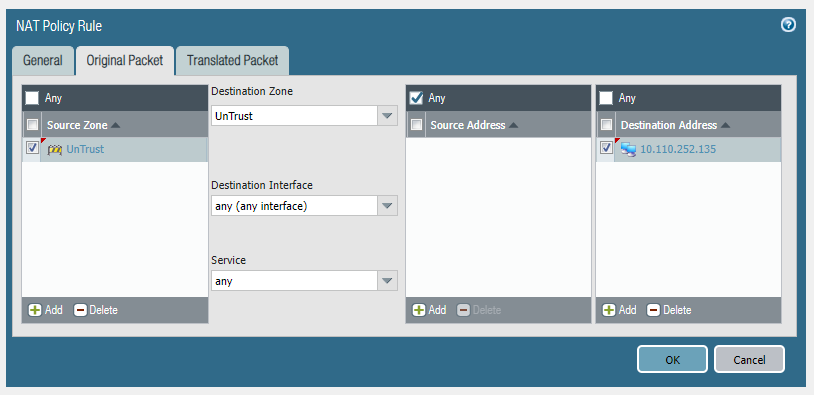
Original Packet
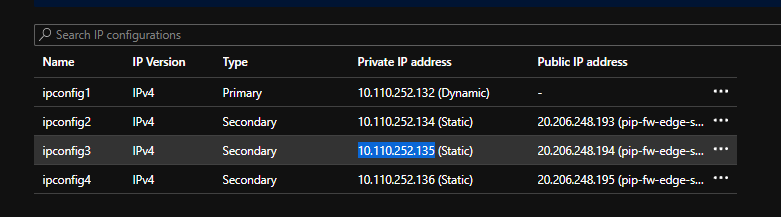
Source Zone “Untrust” Destination Zone “UnTrus” Destination Interface “Any” Source Address “Any” pois estamos publicando para internet Destination Address “10.110.252.135” IP da interface eth1 (segundo IP com IP publico)
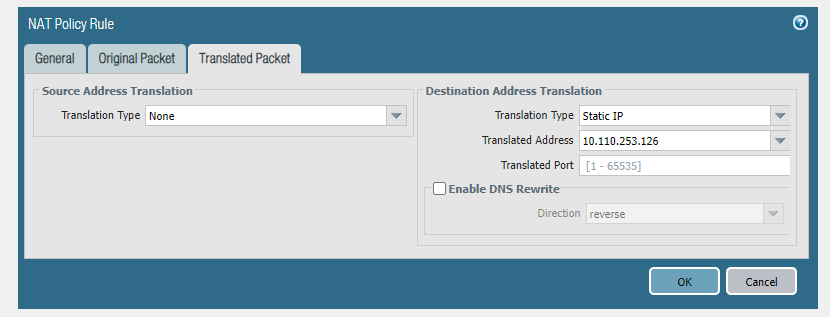
Translated Packet
Translation Type “Static IP” Translation Address “10.110.253.126” IP do AppGw Translation port “” deixar em branco (NAT 1:1)
Clique em “ok”
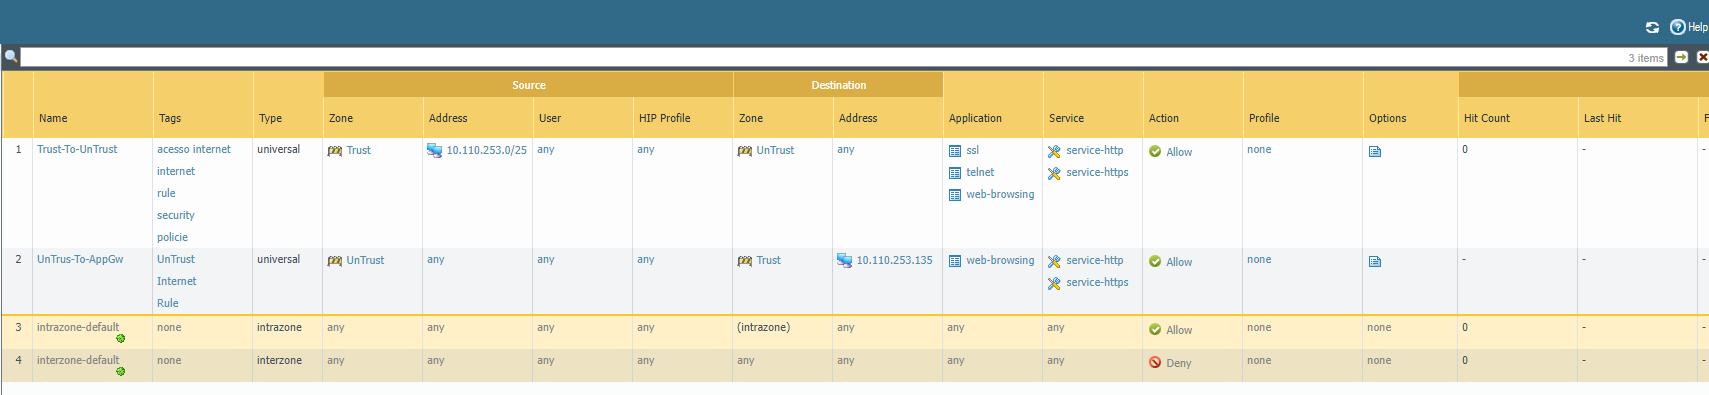
Se tudo esta correto verá tera essa visão
Agora vamos criar a regra de seguranã/firewall
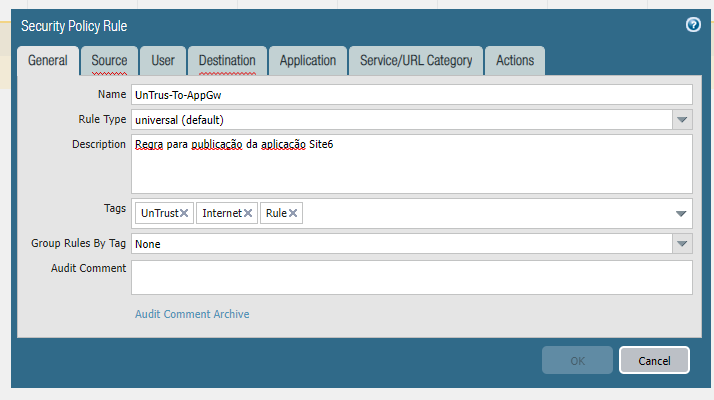
Em “Seguriry”, add
General
Name “UnTrus-To-AppGw” Rule Type “universal” Description “Regra para publicação da aplicação Site6” Tags “UnTrust” “Internet” “Rule”
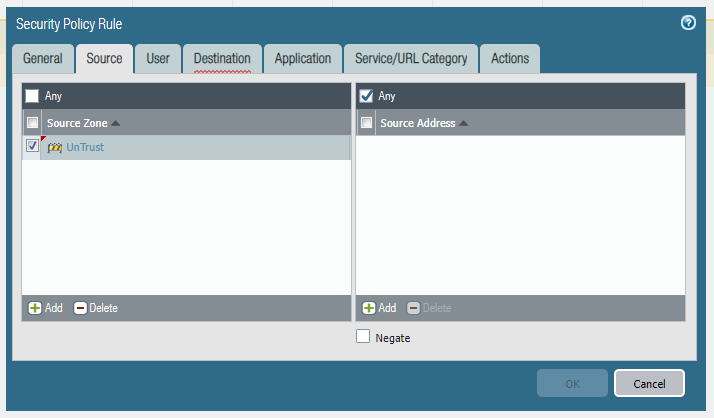
Source
Source Zone “UnTrust” Source Address “Any” publicando para internet
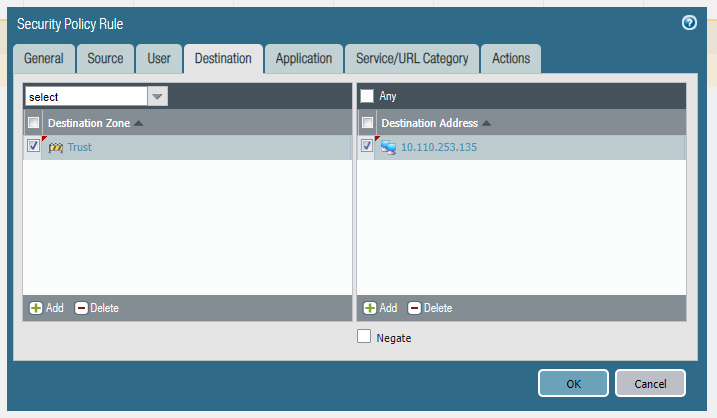
Destination
Destination “Trust” Destionation Address “10.110.253.135” IP que esta na interface eth1 com IP publico
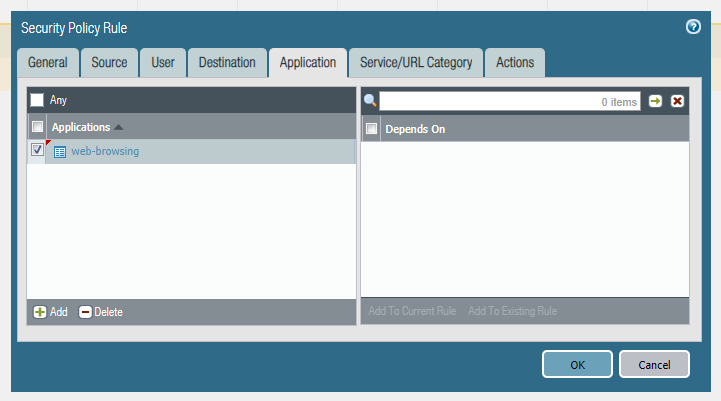
Application
Applications “web-browsing” principio de segurança
Servive/URL Category
Service “http’ e “https” “principio de segurança” URL Category “any”
Action
Action “Allow” log Setting “Log at Session Start” “Log at Session End”
Clique em “ok”
Se tudo correu bem esta vendo esta tela
Agora vamos efetivar nossas configurações, clique em “Commit”
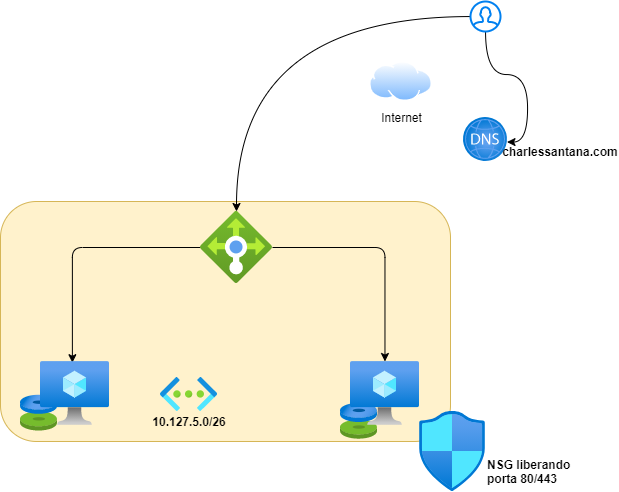
Pronto, agora qual alguém chamar nossa aplicação “site6” https://site6.supportbrazil.com irá para interface eth1 do nosso Palo Alto, dentro dele fará um NAT para nosso AppGw com IP 10.110.253.126 e a partir dai o AppGw irá enviar os pacotes para as VMs.
E se por algum motivo a VM01 (Caixa principal do Palo Alto) ficar indisponivel, todos os IPs secundarios das interfaces ETH1 e ETH2 seram migrados automaticamente para a caixa secundaria
Espero ter contribuido para sua arquitetura/Topologia mais segura e concentrada em um unico ponto, lembrando que estamos com Palo Alto HA e Availability Zone.
Neste artigo iremos criar Web Site em alta disponibilidade, composto por duas VM Windows Server 2019 com IIS habilitado e um load balance, não iremos abordar aqui segurança como Application Gateway, WAF, API MAN, etc. Este artigo visa somente a criação via scritp de toda a infraestrutura (também não iremos abordar o deploy de qualquer aplicação neste artigo).
az vm availability-set create -g “${RG_Name}” -n “${Name_AV_SET}” –platform-fault-domain-count “${Fault_Domain}” –platform-update-domain-count “${Update_Domain}” -l “${Location}” –tags “${Costacenter}”=”${Value_Costcenter}” “${Environment}”=”${Environment_Value}” “${Depto}”=”${Depto_Value}”
###Declarando varivel para utilizar Vnet existente (Obrigatório)
SUBNET_ID001=$(az network vnet subnet show –name “${Subnet_Name}” –vnet-name “${Vnet_Name}” -g “${RG_Vnet}” –query id –output tsv) SUBNET_ID002=$(az network vnet subnet show –name “${Subnet_Name}” –vnet-name “${Vnet_Name}” -g “${RG_Vnet}” –query id –output tsv) export IPConfig_Name=”ipconfig1″
###Criando NIC (Interface de rede)
az network nic create –name “${NIC_Name1}” -g “${RG_Name}” –subnet $SUBNET_ID001 –accelerated-networking “${Accelerated}” –network-security-group “${NSG_Name}” –tags “${Costacenter}”=”${Value_Costcenter}” “${Environment}”=”${Environment_Value}” “${Depto}”=”${Depto_Value}” az network nic create –name “${NIC_Name2}” -g “${RG_Name}” –subnet $SUBNET_ID002 –accelerated-networking “${Accelerated}” –network-security-group “${NSG_Name}” –tags “${Costacenter}”=”${Value_Costcenter}” “${Environment}”=”${Environment_Value}” “${Depto}”=”${Depto_Value}”
###Declaranado Variaveis para Fixar IP
NIC_ID001=$(az network nic show –name “${NIC_Name1}” -g “${RG_Name}” –query id –output tsv) NIC_ID002=$(az network nic show –name “${NIC_Name2}” -g “${RG_Name}” –query id –output tsv)
###Declarando varivel para utilizar IP Fixo existente (Obrigatório)
IP_ID001=$(az network nic ip-config show -g “${RG_Name}” -n “${IPConfig_Name}” –nic-name “${NIC_Name1}” –query privateIpAddress –output tsv) IP_ID002=$(az network nic ip-config show -g “${RG_Name}” -n “${IPConfig_Name}” –nic-name “${NIC_Name2}” –query privateIpAddress –output tsv)
###Fixando IP na interface de rede#Fixando IP
az network nic ip-config update -g “${RG_Name}” –nic-name “${NIC_Name1}” -n “${IPConfig_Name}” –private-ip-address $IP_ID001 az network nic ip-config update -g “${RG_Name}” –nic-name “${NIC_Name2}” -n “${IPConfig_Name}” –private-ip-address $IP_ID002
az disk create -g “${RG_Name}” -n “${Disk_Data01}” –size-gb “${SizeDisk_02}” az disk create -g “${RG_Name}” -n “${Disk_Data02}” –size-gb “${SizeDisk_02}”
###Anexando Disco a VM existente
az vm disk attach -g “${RG_Name}” –vm-name “${VM_Name1}” –name “${Disk_Data01}” az vm disk attach -g “${RG_Name}” –vm-name “${VM_Name2}” –name “${Disk_Data02}”
###Habilitando IIS Windows Server
az vm extension set –publisher Microsoft.Compute –version 1.8 –name CustomScriptExtension –vm-name “${VM_Name1}” -g “${RG_Name}” –settings ‘{“commandToExecute”:”powershell.exe Install-WindowsFeature -Name Web-Server”}’ az vm extension set –publisher Microsoft.Compute –version 1.8 –name CustomScriptExtension –vm-name “${VM_Name2}” -g “${RG_Name}” –settings ‘{“commandToExecute”:”powershell.exe Install-WindowsFeature -Name Web-Server”}’
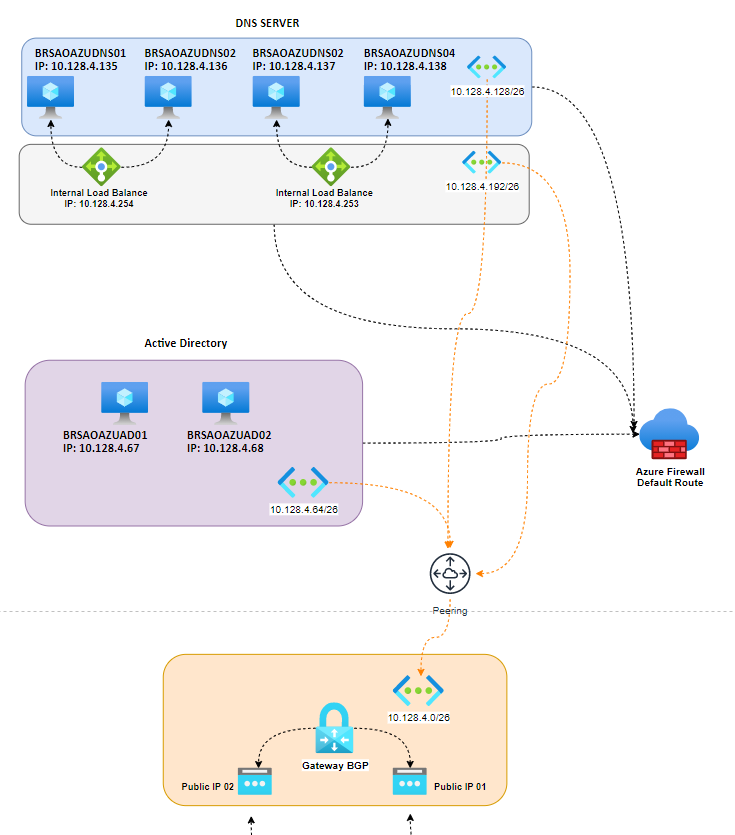
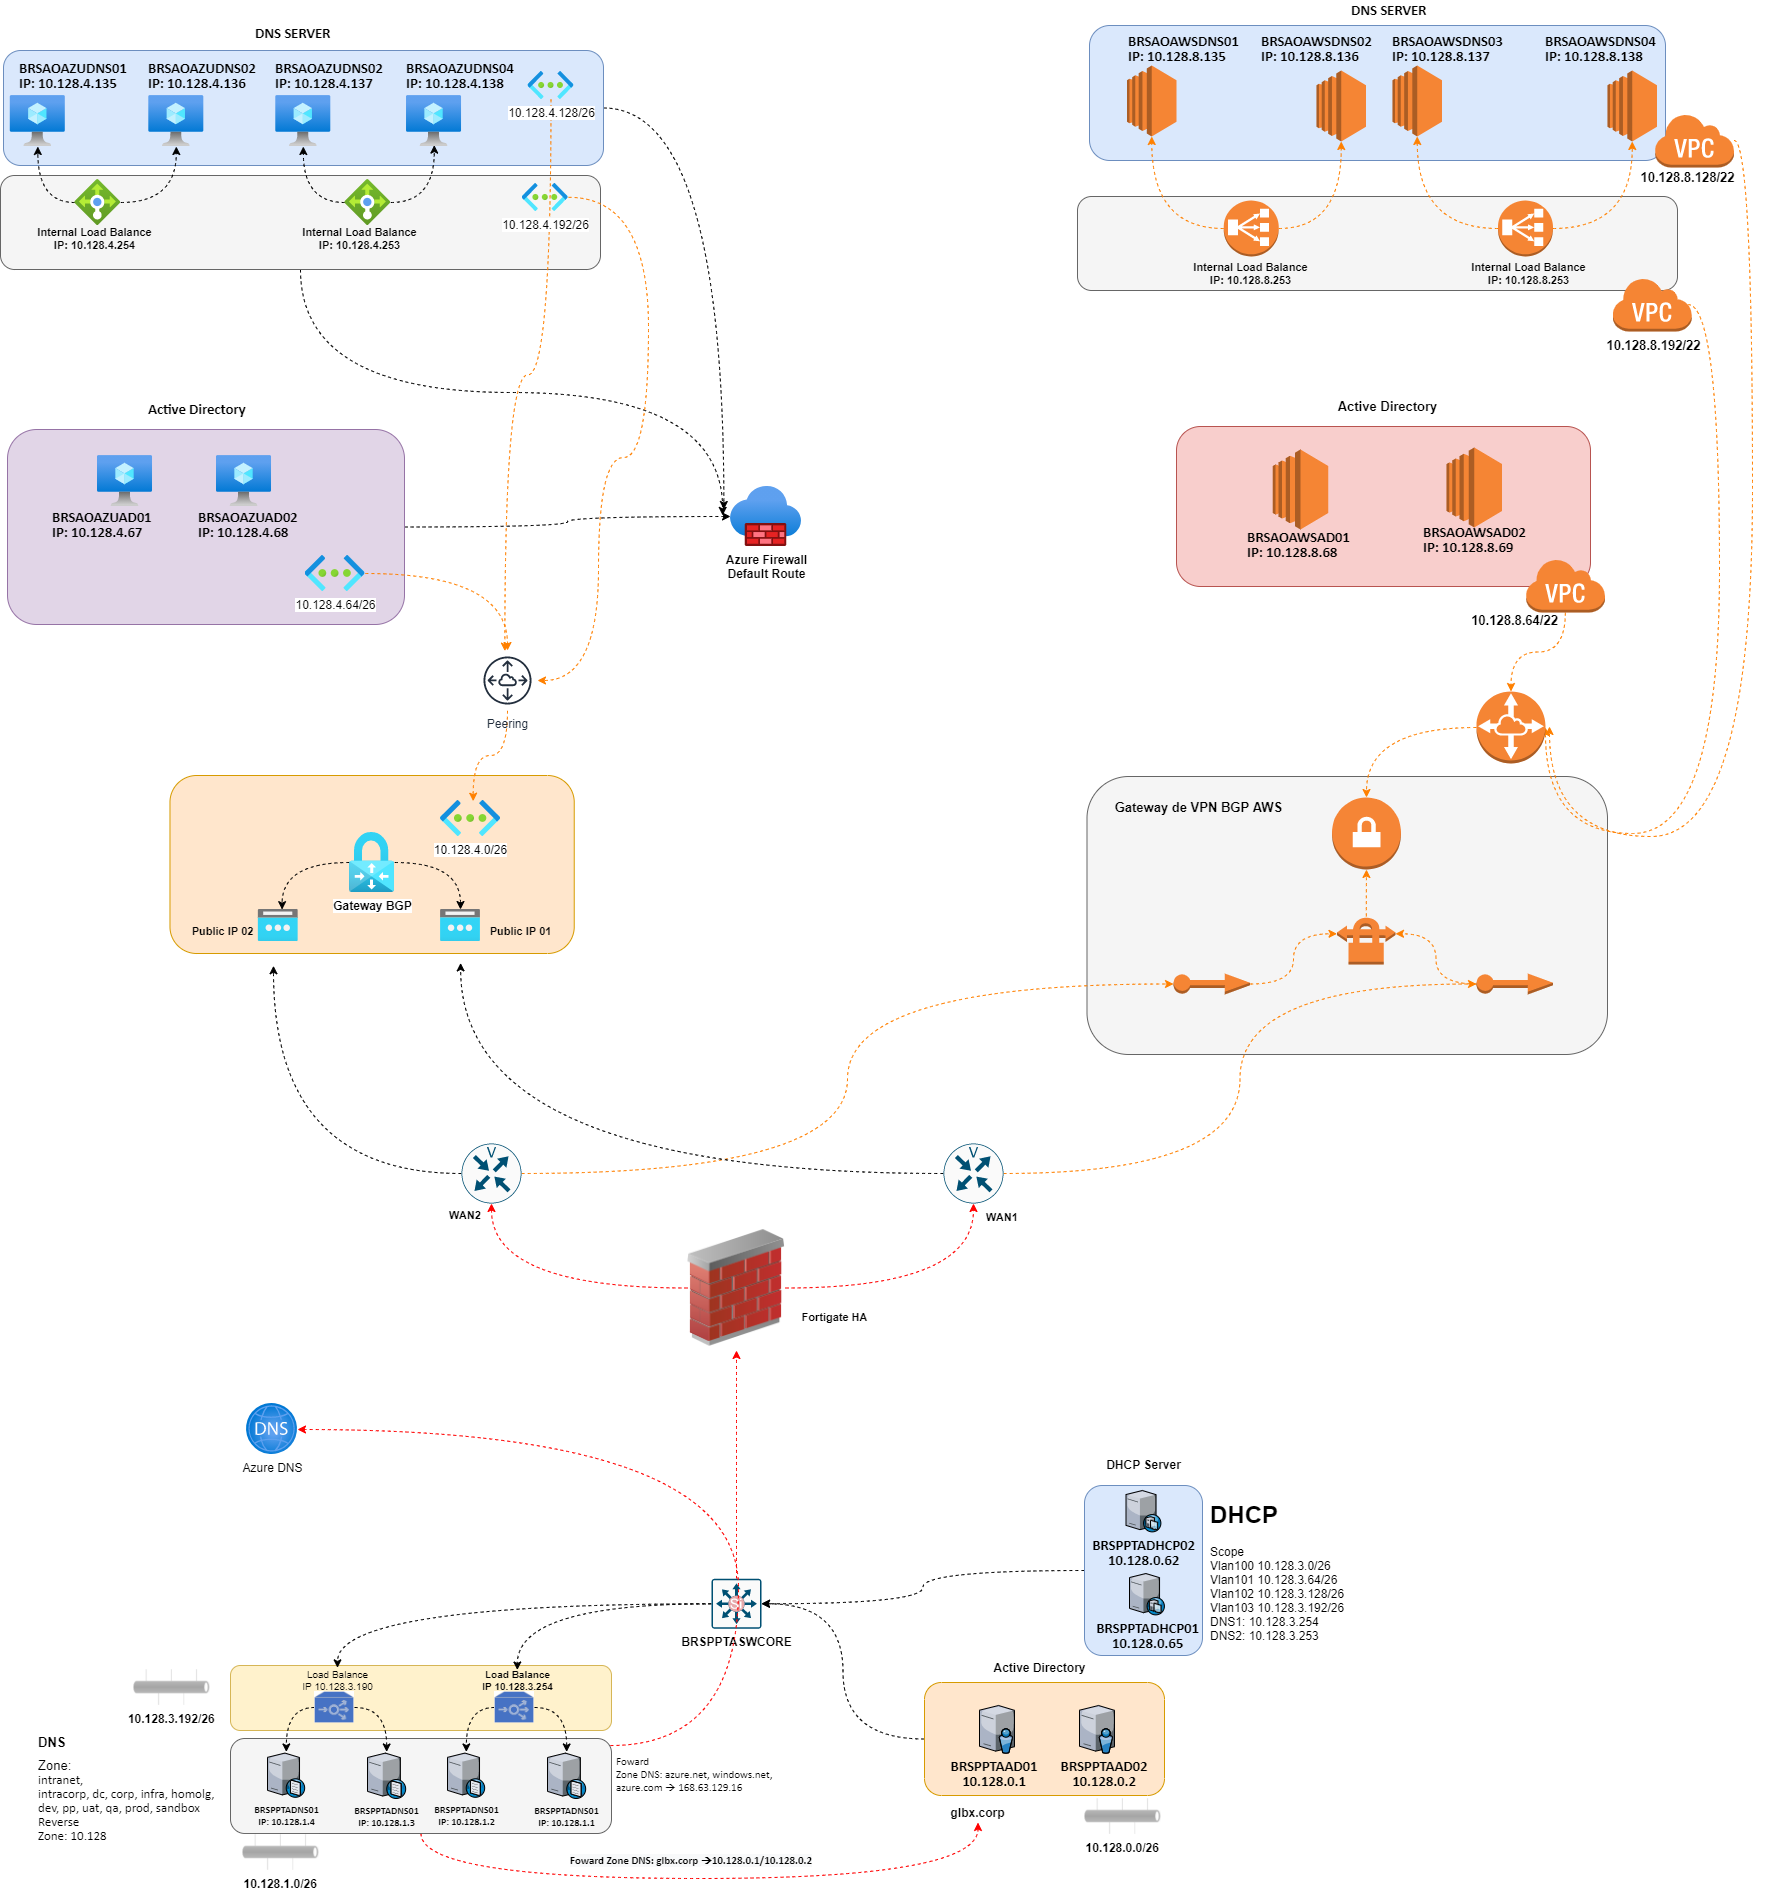
Neste artigo venha trazer um modelo de DNS Personal multi cloud em infraestrutura Híbrida, não estou certo nem errado para promover essa infraestrutura de DNS, quero apenas mostrar como uma infraestrutura de DNS Personal em alta disponibilidade Multi Cloud pode ser altamente recomendada em ambientes Híbrido Multi Cloud.
Bom chegar de falar e vamos lá.
Primeiramente vamos separar aqui os papeis, DNS é DNS e AD é AD, certo disso, então vamos a mão na massa. (Não vou entrar muito em detalhes de topologia e configurações, aqui será mais uma visão macro da infraestrutura de DNS Personal)
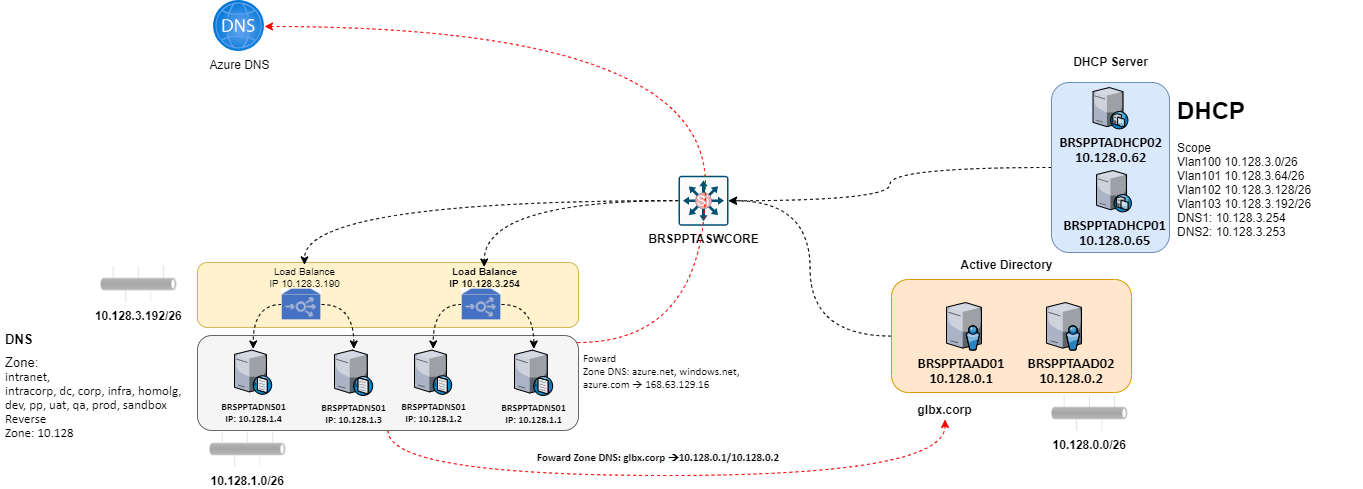
Vamos ao nosso ambiente On Premises.
Temos em nosso em ambiente local as seguintes configurações:
DNS Personal Vnet DNS1: 10.128.8.254 DNS2: 10.128.8.253
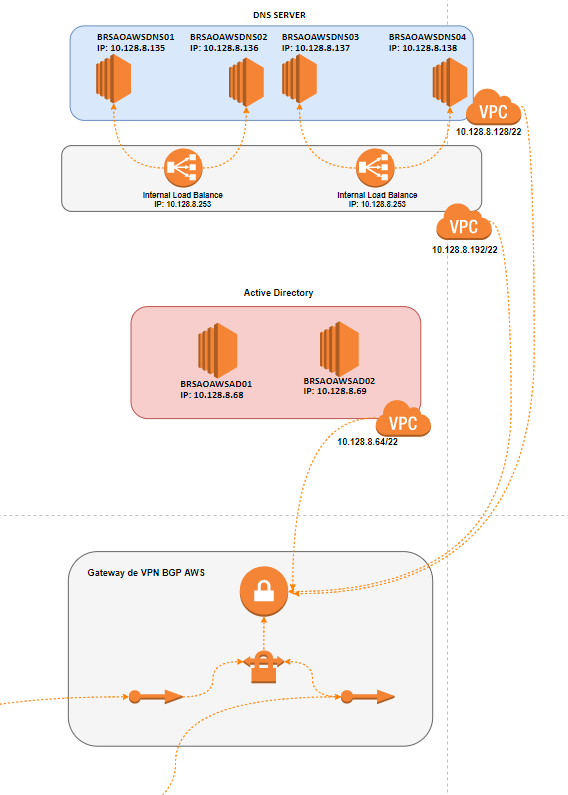
Topologia DNS AWS
E por fim chegamos em nossa infraestrutura DNS com Alta disponibilidade em ambiente multi Cloud Híbrido.
Temos em nossos servidores de DNS as seguintes zonas Domínios DNS Personal: intranet, intracorp, dc, corp, infra, homolg, dev, pp, uat, qa, prod, sandbox Reverse Zone: 10.128 Foward Zone DNS: glbx.corp (cada servidor DNS faz o Foward para seu respectivo AD Local) Exemplo Azure faz Forward para BRSAOAZUAD01 e BRSAOAZUAD01 Exemplo AWS faz Forward para BRSAOAWSAD01 e BRSAOAWSAD01 Exemplo On Premises faz Forward para BRSAOPTAAD01 e BRSAOPTAAD01
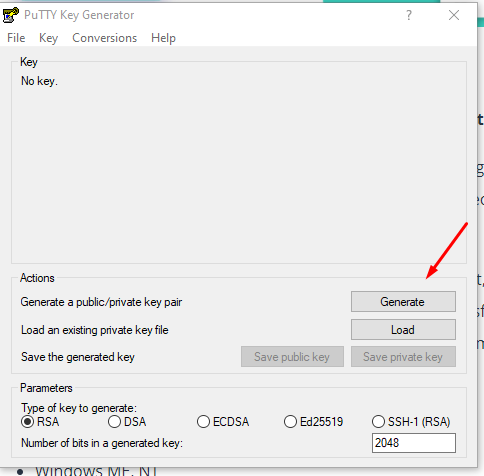
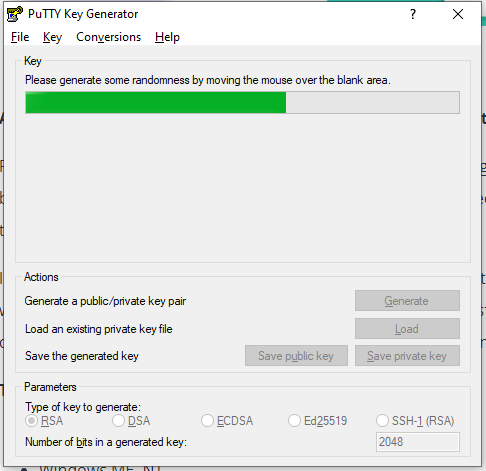
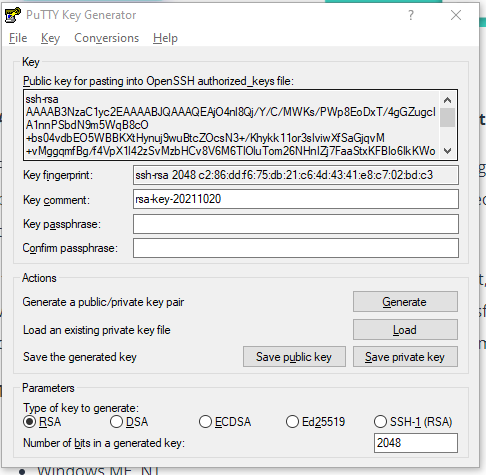
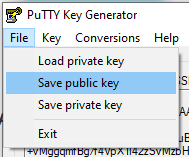
Neste artigo iremos criar uma Maquina Virtual com CentOS Linux utilizando uma Vnet existente e fixando IP (rede interna), criaremos também um NSG para esta VM, um storage account para diagnostico de boot e conjunto de disponibilidade e com acesso via chave publica/privada sem a necessidade de utilizar senha.
#!/bin/bash
##Declarando variáveis
##Declarando variáveis (Obrigatório)
export Subscription_Name=”Azure Subscription” export RG_Name=”Nome do Resource Group” export Location=”Azure Region” export Object_Name=”Nome do Objeto”
##Storage Accout
export Storage=”Nome do Storage Account” ##Exemplo storagevmdiag## export SKU_Storage=”SKU do Storage Account” ##Exemplo Standard_LRS##
##Conjunto de Disponibiliade Availability Set
export Name_AV_SET=”AV-SET”-“Nome do Conjunto de Disponibilidade” export Fault_Domain=”3″ export Update_Domain=”20″
##Network Security Group NSG
export NSG_Name=”Nome do NSG” ##Exemplo NSG-VM-Frontend##
##Vnet Existente (Variáveis para utilizar Vnet Existente)
export RG_Vnet=”Nome do Resurce Goup onde encontra-se a Vnet existente” export Subnet_Name=”Nome da subnet existente” export Vnet_Name=”Nome da Vnet existente”
##Variáveis de Rede (Obrigatório)
export NIC_Name=”Nome da interface de rede” export Accelerated=”False ou true”
##Variavel para criacao da VM (Obrigatório)
export Image_SO=”CentOS” export VM_Name=”Nome do servidor” export User_Name=”azroot” export key_PUB=”Local da chave publica” ##Exemplo /script/key/chave_publica.pub## caminho absoluto export Size=”Tier da VM” export SKU_STG=”Sku do Disco” ## Disco ## Exemplo Standard_LRS###
##Variaveis TAGs (Não Obrigatório)
export Costacenter=”Centro de Custos” export Value_Costcenter=”Numero do centos de custo” export Environment=”Environment” export Environment_Value=”Ambiente” ##’Desenvolvimento’-‘Homologação’-‘Produção’## export Depto=”Departamento” ##Squad-Team-Time## export Depto_Value=”Nome do Departamento” ##infra-cartões-telecom
###Execução do Script
###Selecionar subscription
az account set –subscription “${Subscription_Name}”
###Criando Resource Group
az group create -n “${RG_Name}” -l “${Location}” –tags “${Costacenter}”=”${Value_Costcenter}” “${Environment}”=”${Environment_Value}” “${Depto}”=”${Depto_Value}”
Neste artigo iremos criar uma Maquina Virtual com CentOS Linux utilizando uma Vnet existente e fixando IP (rede interna), criaremos também um NSG para esta VM, um storage account para diagnostico de boot e conjunto de disponibilidade.
Vamos ao script
#!/bin/bash #||||||||||||||||||||||||||||||||||||||||||||||||||||||||||||||||||||||||| #|||Script Charles Aureliano Santana||| #|||||||||||||||||||||||||||||||||||||||||||||||||||||||||||||||||||||||||
##Declarando variaveis export Subscription_Name=”Azure Subscription” export RG_Name=”Nome do Resource Group” export Location=”Azure Region” export Object_Name=”Nome do Objeto”
##Storage Accout export Storage=”Nome do Storage Account” ##Exemplo storagevmdiag## export SKU_Storage=”SKU do Storage Account” ##Exemplo Standard_LRS##
##Conjunto de Disponibiliade Availability Set export Name_AV_SET=”AV-SET”-“Nome do Conjunto de Disponibilidade” export Fault_Domain=”3″ export Update_Domain=”20″
##Network Security Group NSG export NSG_Name=”Nome do NSG” ##Exemplo NSG-VM-Frontend##
###Vnet Existente (Variaveis para utilizar Vnet Existente) export RG_Vnet=”Nome do Resurce Goup onde encontra-se a Vnet existente” export Subnet_Name=”Nome da subnet existente” export Vnet_Name=”Nome da Vnet existente”
##Variaveis de Rede (Obrigatório) export NIC_Name=”Nome da interface de rede” export Accelerated=”False ou true”
##Variavel para criacao da VM (Obrigatório) export Image_SO=”SKU Image Azure” ##Exemplo ‘CentOS’ export VM_Name=”Nome do Servidor” “”15 caracteres export User_Name=”Usuário do SO” export PWD=”Senha do usuário do SO” export Size=”Standard_D2S_v3″ ## Tier da VM export SKU_STG=”Standard_LRS” ## Disco ##
##Variaveis TAGs (Não Obrigatório) export Costacenter=”Centro de Custos” export Value_Costcenter=”Numero do centos de custo” export Environment=”Environment” export Environment_Value=”Ambiente” ##’Desenvolvimento’-‘Homologação’-‘Produção’## export Depto=”Departamento” ##Squad-Team-Time## export Depto_Value=”Nome do Departamento” ##infra-cartões-telecom
##Execução do Script ###Selecionar subscription az account set –subscription “${Subscription_Name}”
###Criando Resource Group az group create -n “${RG_Name}” -l “${Location}” –tags “${Costacenter}”=”${Value_Costcenter}” “${Environment}”=”${Environment_Value}” “${Depto}”=”${Depto_Value}”
###Criando Network Security Group NSG az network nsg create -g “${RG_Name}” -n “${NSG_Name}” -l “${Location}” –tags “${Costacenter}”=”${Value_Costcenter}” “${Environment}”=”${Environment_Value}” “${Depto}”=”${Depto_Value}”
###Criar Grupo de Disponibilidade az vm availability-set create -g “${RG_Name}” -n “${Name_AV_SET}” –platform-fault-domain-count “${Fault_Domain}” –platform-update-domain-count “${Update_Domain}” -l “${Location}” –tags “${Costacenter}”=”${Value_Costcenter}” “${Environment}”=”${Environment_Value}” “${Depto}”=”${Depto_Value}”
###Declarando varivel para utilizar Vnet existente (Obrigatório) SUBNET_ID001=$(az network vnet subnet show –name “${Subnet_Name}” –vnet-name “${Vnet_Name}” -g “${RG_Vnet}” –query id –output tsv) export IPConfig_Name=”ipconfig1″
###Criando NIC (Interface de rede) az network nic create –name “${NIC_Name}” -g “${RG_Name}” –subnet $SUBNET_ID001 –accelerated-networking “${Accelerated}” –network-security-group “${NSG_Name}” –tags “${Costacenter}”=”${Value_Costcenter}” “${Environment}”=”${Environment_Value}” “${Depto}”=”${Depto_Value}”
###Declaranado Variaveis para Fixar IP NIC_ID001=$(az network nic show –name “${NIC_Name}” -g “${RG_Name}” –query id –output tsv)
###Declarando varivel para utilizar IP Fixo existente (Obrigatório) IP_ID001=$(az network nic ip-config show -g “${RG_Name}” -n “${IPConfig_Name}” –nic-name “${NIC_Name}” –query privateIpAddress –output tsv)
###Fixando IP na interface de rede#Fixando IP az network nic ip-config update -g “${RG_Name}” –nic-name “${NIC_Name}” -n “${IPConfig_Name}” –private-ip-address $IP_ID001
###Criando Virtual Machine CentOS Linux az vm create –name “${VM_Name}” -g “${RG_Name}” -l “${Location}” –availability-set “${Name_AV_SET}” –boot-diagnostics-storage “${Storage}” –image “${Image_SO}” –nics $NIC_ID001 –admin-username “${User_Name}” –admin-password “${PWD}” –size “${Size}” –storage-sku “${SKU_STG}”


Você precisa fazer login para comentar.