Autor: Charles Aureliano Santana

Profissional certificado Microsoft , cloud computing infraestrutura

Service “realmd.service” “Failed to start Realm and Domain Configuration.”

Ao ingressa uma VM CentOS 7 no domínio Windows me deparei com esse erro:

Failed to start Realm and Domain Configuration. Ao analisar encontrei “couldn’t claim service name on DBus bus: org.freedesktop.realmd”

Solução:

sudo systemctl restart dbus

Seja Feliz!!!!!!!!!!!

Ingressando CentOS Domínio Windows

Vamos ingressar CentOS em domínio Windows, com isso temos como gerenciar as identidades (quem precisa de acesso) baseado no AD da sua organização.

1-) # yum update (para deixar seu SO atualizado)
2-) Necessário as instalação abaixo:
sudo yum install oddjob oddjob-mkhomedir sssd adcli samba-common-tools realmd krb5-workstation krb5-libs -y (estou partindo do principio que ja tem SSH instalado)
3-) sudo realm discover CONTOSO.CORP (Seu dominio FQDN deve estar em letras maiusculas)
Resultado:

CONTOSO.CORP
type: kerberos
realm-name: CONTOSO.CORP
domain-name: contoso.corp
configured: kerberos-member
server-software: active-directory
client-software: sssd
required-package: oddjob
required-package: oddjob-mkhomedir
required-package: sssd
required-package: adcli
required-package: samba-common-tools
login-formats: %U
login-policy: allow-realm-logins
contoso.corp
type: kerberos
realm-name: CONTOSO.CORP
domain-name: contoso.corp
configured: no

4-) sudo kinit [email protected]
5-) sudo realm join –verbose CONTOSO.CORP -U ‘[email protected]

Resultado:

[root@NINTENDO ~]# realm join –verbose CONTOSO.CORP -U ‘[email protected]

  • Resolving: _ldap._tcp.contoso.corp
  • Performing LDAP DSE lookup on: 100.100.100.100
  • Performing LDAP DSE lookup on: 100.100.100.101
  • Successfully discovered: CONTOSO.CORP
    Password for [email protected]:
  • Required files: /usr/sbin/oddjobd, /usr/libexec/oddjob/mkhomedir, /usr/sbin/sssd, /usr/bin/net
  • LANG=C LOGNAME=root /usr/bin/net -s /var/cache/realmd/realmd-smb-conf.RVBTY0 -U [email protected] ads join CONTOSO.CORP
    Enter [email protected]’s password:
    Using short domain name — CONTOSO
    Joined ‘NINTENDO’ to dns domain ‘CONTOSO.CORP’
  • LANG=C LOGNAME=root /usr/bin/net -s /var/cache/realmd/realmd-smb-conf.RVBTY0 -U [email protected] ads keytab create
    Enter [email protected]’s password:
  • /usr/bin/systemctl enable sssd.service
    Created symlink from /etc/systemd/system/multi-user.target.wants/sssd.service to /usr/lib/systemd/system/sssd.service.
  • /usr/bin/systemctl restart sssd.service
  • /usr/bin/sh -c /usr/sbin/authconfig –update –enablesssd –enablesssdauth –enablemkhomedir –nostart && /usr/bin/systemctl enable oddjobd.service && /usr/bin/systemctl start oddjobd.service
  • Successfully enrolled machine in realm
    [root@NINTENDO ~]#

Com o resultado acima seu CentOS ingressou no dominio Windows, veja se foi criado a entrada de DNS, se for o caso crie ela manual

6-) sudo sed -i ‘s/use_fully_qualified_names\ =\ True/use_fully_qualified_names\ =\ False/g’ /etc/sssd/sssd.conf
O comando acima server para ter que digitar o FQDN ao logar, exemplo: [email protected], basta somente charles.santana

7-) sudo systemctl daemon-reload && sudo systemctl restart sssd

Agora vamos adicionar o grupo de usuários do Windows (AD) para ter privilégios de ROOT

#visudo (enter) role até o fim e edit o arquivo

Allow root to run any commands anywhere

root ALL=(ALL) ALL
%\CONTOSO.CORP\Domain_Admin_Linux ALL=(ALL) ALL

Neste caso os usuários deste grupo terão privilégios de ROOT

ESC e wq! para salvar

Seja Feliz!!!


Virtual Machine – VMM Error (2915)

Falha de comunicação VMM com host de Hyper-V

Error (2915)
The Windows Remote Management (WS-Management) service cannot process the request. The object was not found on the server (XXXX.contoso.corp).

WinRM: URL: [http://XXXX.contoso.corp:5985], Verb: [GET], Resource: [http://schemas.microsoft.com/wbem/wsman/1/wmi/root/scvmm/FileInformation?Filename=C:\ClusterStorage\Volume4\XXXXX\VM2012R2_Default.vhdx]

Unknown error (0x80338000)

Recommended Action
Ensure that the VMM agent is installed and running. If the error persists, restart the virtualization server (XXXX.contoso.corp) and then try the operation again.

This error can also happen due to an older version of the VMM agent on the virtualization server. Ensure that the VMM agent is upgraded to the latest version, and then try the operation again.

No host HOST Hyper-V execute “nets start SCVMMAgent” para iniciar o serviço do Agent do VMM

Seja Feliz!!!!

Install Zabbix Agent x64 (Windows Server)

The is a problem with this Windows Installer package.
A script requiried for this installer to complete could not be run. contact your support personnel or packahe vendor.

Se isso ocorrer provavelmente você possui o serviços do Zabbix Agent instalado, basta executar esse comando em modo elevado que o problema deve-se resolver

sc delete “zabbix agent” (Ou o nome que foi dado)

Seja Feliz!!!!

VPN IPSEC Fortinet for Azure

How to VPN IPESec Fortinet for Azure Cloud.


ISO 5.4

http://cookbook.fortinet.com/ipsec-vpn-microsoft-azure-54/

Gateway

Nat Traversal “Disable”
Dead Peer Detection “On idle”
IKE “V2”

Phase1

Encryption “AES128”
Authentication “SHA256”
Diffie-Hellman Group “2”
Key Lifetime (seconds) “28800”

Phase2

Encryption “AES128”
Authenticaton “SHA256”
(PFS) “Disable”
Local Port “Enable”
Remote Port “Enable”
Protocol “Enable”
Auto-negotiate “Disable”
Auto Keep Alive “Disable”
Key Lifetime “seconds”
Seconds “27000”


IOS 5.2

http://cookbook.fortinet.com/download/3127

Gateway

Nat Traversal “Disable”
Dead Peer Detection “Disable”

IKE “V2”

Phase1

Encryption “AES128”
Authentication “SHA1”
Encryption “AES256”
Authentication “SHA256”

Diffie-Hellman Group “2”
Key Lifetime (seconds) “56600”

Phase2

Encryption “AES128”
Authentication “SHA1”
Encryption “AES256”
Authentication “SHA256”
Enable replay Detaction “Disable”
(PFS) “Disable”
Local Port “Enable”
Remote Port “Enable”
Protocol “Enable”
Auto-negotiate “Disable”
Auto Keep Alive “Disable”
Key Lifetime “seconds”
Seconds “2900” “Segunda suporte Microsoft esses valores devem ser maiores que do Azure”

Best Regards.

Configuration VPN Palo Alto Networks for Microsoft Azure with VPN RoutedBased

Olá,

Neste tutorial iremos criar um tunnel de VPN entra Azure (RoutedBased) e Palo Alto (Iremos abordar somente configuração do no Palo Alto).

Iremos considerar o seguinte cenário:

Rede Local (Palo Alto): 10.91.0.0/16
Rede Remota (Azure):   10.255.0.0/16

https://docs.microsoft.com/en-us/azure/vpn-gateway/vpn-gateway-about-vpn-devices

No Palo Alto

1-) Passo

IKE Crypto

Name: ike_crypto_azure

DH Group: group2

Encryption: aes-128-cbc

Authentication: sha1

Key Lifetime: Seconds 29000

IKEv2 Authentication Multiple: 0

2) Passo
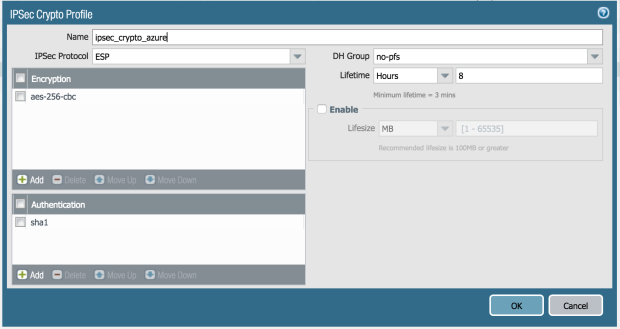
IPSec Crypto

Name: ipsec_crypt_azure

Encryption: aes-256-cbc

Authentication: sha1

DH Group: no-pfs

Lifetime: Hours 8

3) Passo

IKE Gateway (General)

Name: ike_gateway_azure

Version: IKEv2 only mode

Address Type: IPv4

Interface: ae1.200 (Neste exemplo essa é minha interface)

Peer IP Type: Static

Peer IP Address: IP do PUBLICO

Pre-shared Key: XXXXXXXXXXXX

Local Identification: Nome

Local Identification: Nome

4) Passo
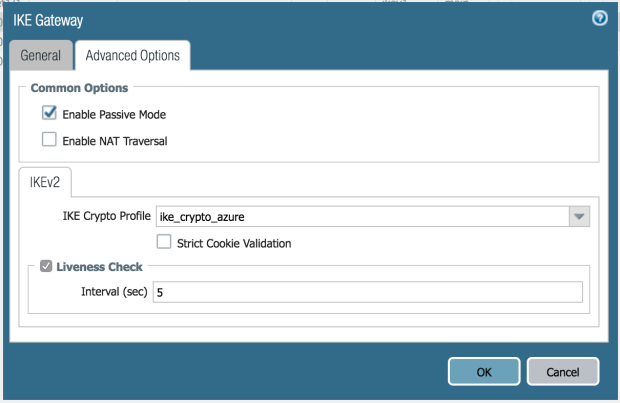
IKE Gateway (Advanced Options)

Common Options: Enable Passive Mode

IKEv2: ike_crypt_azure

Liveness Check: Interval (sec) 5

5) Passo
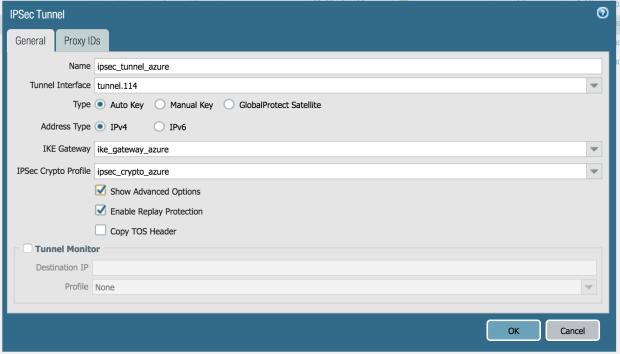
Interfaces

Add

Name: ipesec_tunnel_azure

Tunnel Interface: tunnel.114

Type: Auto Key

Address Typer: IPv4

IKE Gateway: ike_gateway_azure

IPSec Crypto Profile: ipsec_crypt_azure

Show Advanced Options
Enable Replay Protection
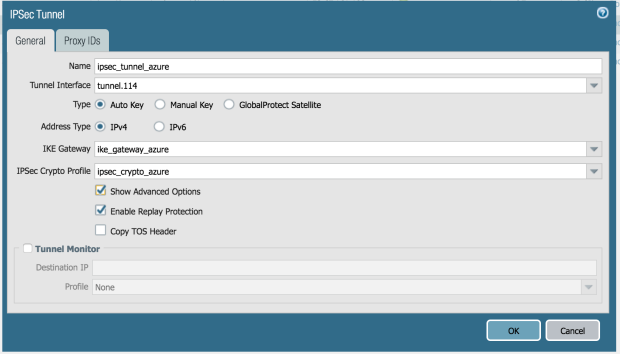
6) Passo

Proxy ID

Sem Proxy ID


Pronto!!! Tunel de VPN entre Palo Alto e Azure está ok.

Não esqueça de criar:

Route – Zone – Rule Firewall

DNS Server Cache Snooping Remote Information Disclosure

Segurança da informação:

DNS Server Cache Snooping Remote Information Disclosure

http://support.simpledns.com/kb/a153/what-is-dns-cache-snooping-and-how-do-i-prevent-it.aspx

Literatura
http://technet.microsoft.com/en-us/library/cc771738.aspx
http://technet.microsoft.com/en-us/library/cc775637%28v=WS.10%29.aspx
http://technet.microsoft.com/en-us/library/cc961401.aspx
http://technet.microsoft.com/en-us/library/cc755941%28v=ws.10%29.aspx
http://www.rootsecure.net/content/downloads/pdf/dns_cache_snooping.pdf

Correção:
http://support.microsoft.com/kb/2678371

recursion

Vulnerability in SSL 3.0 Could Allow Information Disclosure – Microsoft Security Advisory 3009008 – SSLv3 Padding Oracle On Downgraded Legacy Encryption Vulnerability (POODLE)

Recentemente o pessoal do departamento da Segurança da Informação, abriu uma requisição referente a seguinte vulnerabilidade:

SSLv3 Padding Oracle On Downgraded Legacy Encryption Vulnerability (POODLE)

Literatura Microsoft
https://technet.microsoft.com/en-us/library/security/3009008.aspx

Literatura Oracle
http://www.oracle.com/technetwork/topics/security/poodlecve-2014-3566-2339408.html

Correção Microsoft:
https://support.microsoft.com/kb/3009008

ssl30

Seja Feliz!!!!!!

Disable RC4 Windows Server 2012 R2

Cenário 40 Servidores Windows Server 2012 R2 (Datacenter da empresa), isso mesmo 2012 R2 produção e homologação, o pessoal da segunda da informação descobriu um brecha de segurança o RC4.

http://support.microsoft.com/kb/2868725/en-us

A Microsoft disponibilizou o cabe acima para corrigir este problema, porém não existe para Windows Server 2012 R2, a solução foi a boa e velha chave de registro.

———————————————–

Windows Registry Editor Version 5.00

[HKEY_LOCAL_MACHINE\SYSTEM\CurrentControlSet\Control\SecurityProviders\SCHANNEL\Ciphers\RC4 128/128]
“Enabled”=dword:00000000

[HKEY_LOCAL_MACHINE\SYSTEM\CurrentControlSet\Control\SecurityProviders\SCHANNEL\Ciphers\RC4 40/128]
“Enabled”=dword:00000000

[HKEY_LOCAL_MACHINE\SYSTEM\CurrentControlSet\Control\SecurityProviders\SCHANNEL\Ciphers\RC4 56/128]
“Enabled”=dword:00000000

————————————————–

Eu não fiz isso servidor por servidor, eu criei um GPO/GPP e distribui por ela.

Referencias:

http://littlehyenas.wordpress.com/2014/04/12/disable-rc4-cipher-suites-on-remote-desktop/
http://support.microsoft.com/kb/2868725/en-us
http://blogs.technet.com/b/srd/archive/2013/11/12/security-advisory-2868725-recommendation-to-disable-rc4.aspx

Ou podem usar este software, mas tem que executar maquina a maquina.

https://www.nartac.com/Products/IISCrypto