Set-CASMailbox –identity “[email protected]” –MAPIEnable $False (Disable Access)
Set-CASMailbox –identity “[email protected]” –MAPIEnable $True (Enable Access)
Set-CASMailbox –identity “[email protected]” –MAPIEnable $False (Disable Access)
Set-CASMailbox –identity “[email protected]” –MAPIEnable $True (Enable Access)
Import-CSV “E:scriptsdisable_access_outlook.csv” | foreach {Set-CASMailbox -identity $_.userPrincipalName -MAPIEnable $True}
.Csv file

Resolution
Close Microsoft Outlook
Access
C:Userscharles.santanaAppDataLocalMicrosoftOutlook
Rename
Offline Address Books.old
Open Microsoft Outlook,.
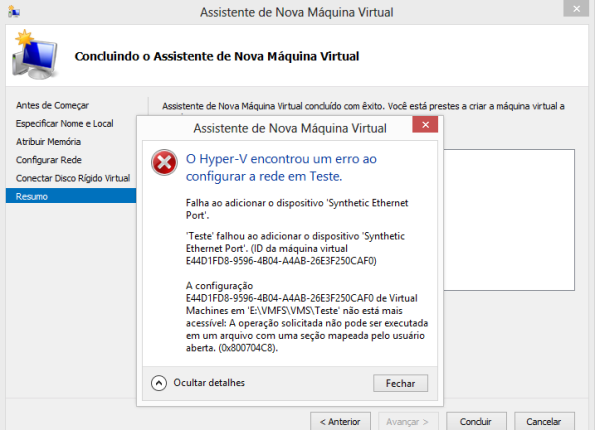 Ao criar uma maquina virtual utilzando Hyper-v do Windows Server 2012 me deparei com o seguinte erro: Deste momento lembrei de uma frase de um grande amigo Samuel Ribeiro “O Obvio nos induz ao erro” Solução: Solution: Disable AV/Software
Install Vmware server Windows server 2012
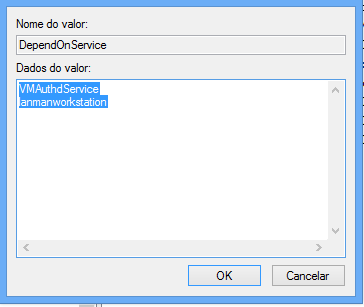
The VMware Host Agent service depends on the following service: ProtectedStorage. This service might not be installed
Edit Regedit
HKEY_LOCAL_MACHINE\SYSTEM\CurrentControlSet\Services\VMwareHostd
DependOnService
After restart
Pelo Dashbord clique em Agrupamente de NIC

Depois em Adaptadores e Interfaces

Depois, selecione as interfaces (neste caso as 4), adiconar Nova Equipe (New NIC Team)

De um nome para o time

Agora em propriedades adicionais

Temos algumas opções
Modo de agrupamente:
Alternar independente
Agrupamento estatico
LACP
Modo de balanceamento de carga:
Hash do endereço
Porta Hiper-V
Adaptador em espera:
Nenhum (Todos ativos)
Lista de todos as placas
E a principal neste cenário, interface de equipe primaria (VLAN)

Neste caso marcamos a opção de utilizar Vlan especifica VLAN103
OK, em todas as telas, ele começará a salvar as configurações:

Após salvar as configurações você verá seu grupo ativo:

Agora em propriedade de REDE, vemos todas as interfaces e GRUPO que criamos:

Vamos configurar o IP na placa que criamos, o processo é normal, como configurar um placa de rede comum.

Quase pronto, agora em seu switch CISCO, vamos criar o port channel utilizando 4 portas
entre no cisco
configure terminal
interface range fast 0/1-4 (enter) desta forma selecionamos as 4 portas de uma fez só\
channel-group 1 mode active
switchport trunk encapsulation dot1q (Se for um Switch Layer 3, ex: 3750)
switchport mode trunk

Após feito isso, você terá uma conexão de 4 GB entre o switch e o servidor windows server 2012 (Partindo do principio que seu switch cisco é GIGA e suas placas de rede do Servidor sça GIGAS também)
Connection for powershell
1-) $LiveCred = Get-Credential
2-) $Session = New-PSSession -ConfigurationName Microsoft.Exchange -ConnectionUri https://ps.outlook.com/powershell/ -Credential $LiveCred -Authentication Basic -AllowRedirection
3-) Import-PSSession $Session
4-) Connect-MsolService
After
Get-MsolUser -ReturnDeletedUsers | Remove-MsolUser -RemoveFromRecycleBin -force
Connection powershell
1-) $LiveCred = Get-Credential
2-) $Session = New-PSSession -ConfigurationName Microsoft.Exchange -ConnectionUri https://ps.outlook.com/powershell/ -Credential $LiveCred -Authentication Basic -AllowRedirection
3-) Import-PSSession $Session
4-) Connect-MsolService
Get-Mailbox | Set-MailboxJunkEmailConfiguration -TrustedSendersAndDomains contoso.com, xpto.com
Synchronized objects in Active Directory, we can not make any changes in Exchange Online.
To add a user for secondary SMTP example:
[email protected] as primary SMTP and
[email protected] as secondary SMTP
Access:
![]()
Then select the object:
![]()
Right / Properties / Attributes
Locate ProxyAddress
![]()

add secondary SMTP:
SMTP: [email protected]
Ok in all screens can force synchronization or wait for the normal period synchronization of Exchange Online, it also serves to distribution groups.
Creating forwarding emails (Synchronization with Active Directory)
Connect powershell
1-)$LiveCred = Get-Credential
2-)$Session = New-PSSession -ConfigurationName Microsoft.Exchange -ConnectionUri https://ps.outlook.com/powershell/ -Credential $LiveCred -Authentication Basic -AllowRedirection
3-)Import-PSSession $Session
4-)Connect-MsolService
Command
Set-Mailbox Contato –ForwardingSmtpAddress [email protected]om –DeliverToMailboxAndForward $false
Contato = Mailbox that will receive forwarding to another email
[email protected] = E-mail address that will receive the forwarding mailbox contact

Você precisa fazer login para comentar.